I am an on-the-side and increasingly up front papercrafter who loves nothing more than getting inky and creating pretty things with paper and stamps!
I am also a wife to lovely hubby and mummy to a wonderful 14yr old princess.
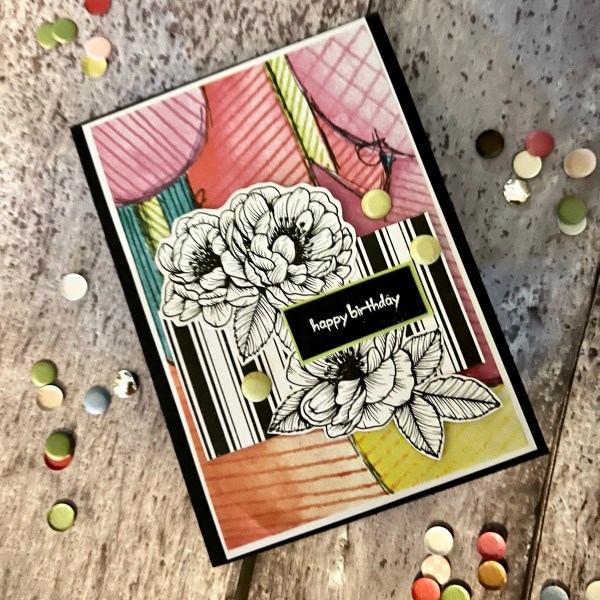
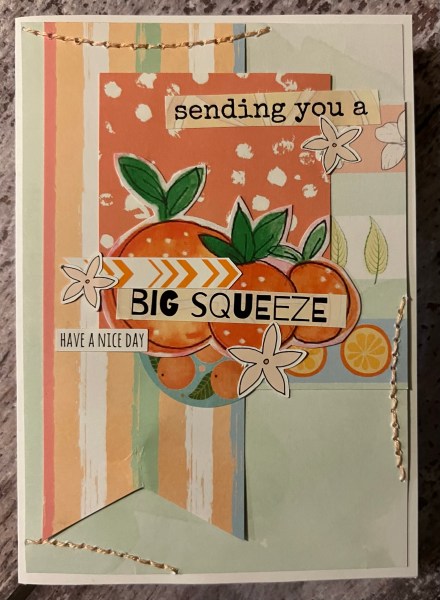
A really quick card that I put together using scraps off the desk once again.
I made this card so quickly because I had already fussy cut the dsp flowers and the Art by Marlene collage paper was sitting on the desk ready for using!
These first few photos are taken in the evening when lighting is not great … skip to the bottom to see it in the light!
I used card Candi to embellish and those True Love dsp flowers are fab against that bright background!
Love this bright card with the black and white elements. Sentiment is in white embossing on the black with a tiny pop of the Parakeet Part my as a mount to the sentiment!
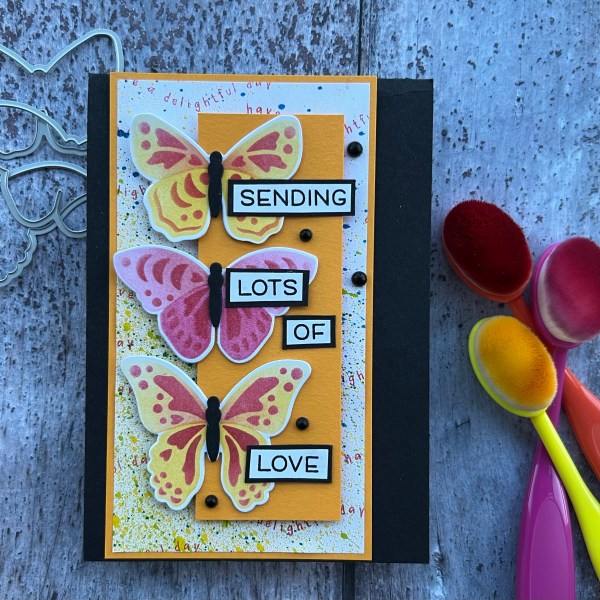
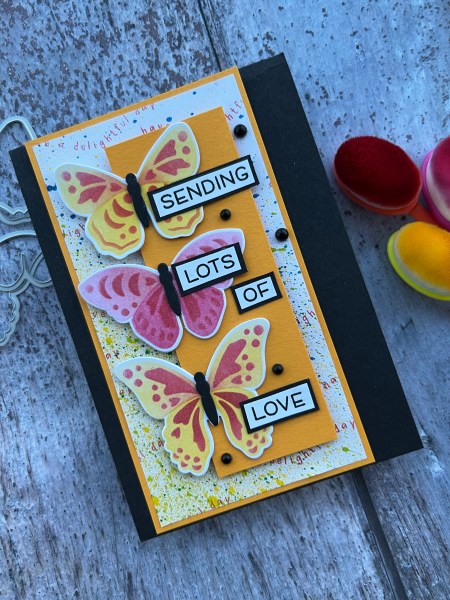
Yes I know that 2023 is no spend on new craft stash but I bought these between Xmas and New year so they don’t really count as spends! Anyway … I bought the Boho Butterfly layered stencils, dies and stamp set and this was my first play with the stencils and the dies (I used a few of the stamps the other day).
Do I love those layered stencils? Yes, yes I absolutely do! They are amazingly easy to use and the results are gorgeous!
I teamed these three with one of those spray backgrounds and some scrap orange cardstock and a Lawn Fawn sentiment I cut apart and mounted onto black to go with the black card base.
Each of the butterflies is stacked a few times and I used one of the sentiments from the stamp set to add to the background to also add in the pink colour.
Love how it turned out… and if you fancy watching the process there is a long craft with me video which shows me making it, along with my usual rambling and also a little tidy up section and haul section!
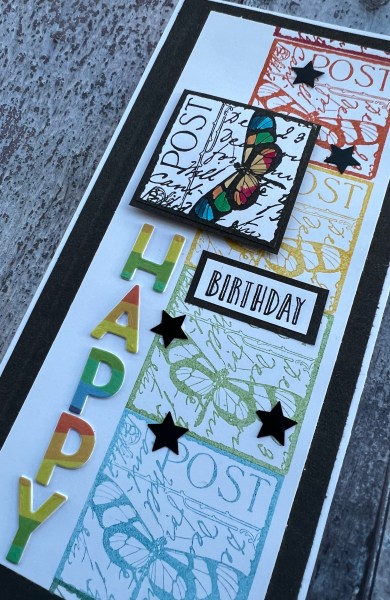
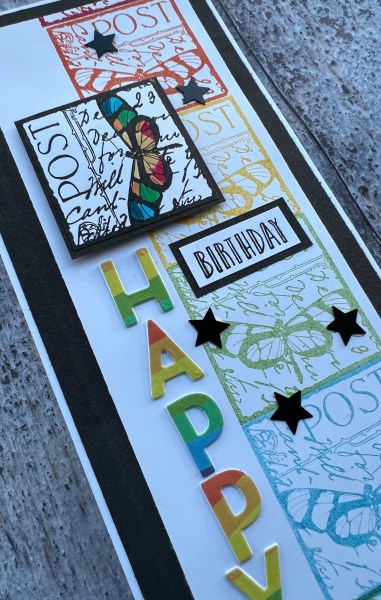
I’m back delving into the box of Craft Stamper magazine stamps and sorting out which are for keeping and which are for leaving my stash… today it was this one with a collage type feel to it that I decided to play rainbows 🌈 with.
I stamped it in a row along a longer piece of cardstock so I could make a DL card from. I then stamped it again in black on a separate piece so I could colour in the creature (I think it’s a moth but I went colourful as though it was a butterfly!)
I then cut that out and mounted it onto black. I used black to also mount the background panel but I also used my scoreboard to edge it a little … it’s subtle but it’s there I promise!
I then decided to go a bit rainbow mad with the die cut letters and used a rainbow washi I’ve got to cover some card then die cut the letters on different parts and at different angles. I stacked them on other die cut letters to give them the dinension too.
Next I took some of the stamp from a happy celebrations for the other part of the sentiment and mounted that onto black.
I also added some shiny black stars as embellishments.
As much as I love this card I think it is unlikely I would use it again and have plenty of collage type stamps I could use instead, so it’s going into the get rid pile rather than the keep pile.
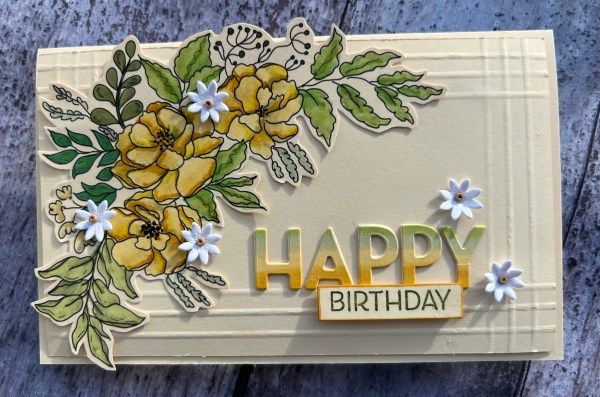
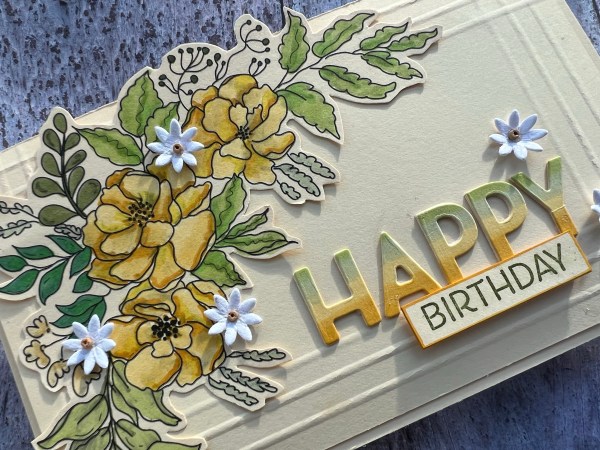
First design team contribution for Creative Knockouts of 2023 to share with you today. The theme is Celebrations and we are sponsored by Alex Sybera designs.
I chose this Lovely Bouquet image which was kindly gifted for using for the challenge.
Our challenge was celebrations so I went with happy birthday as that is the thing we celebrate most in our house.
I printed the image onto cream cardstock and coloured in using my Stampin Blends. Admittedly I should have paused between the printing and colouring as it did move the line art ink a little but not enough for me to consider it ruined.
I then fussy cut the whole image out.
I created a base panel and used my scoreboard to create some border lines … this was because I was also entering this card into a challenge over at UK stampers forum to include dry embossing.
I adhered this panel to the base card, which is slightly larger with foam behind the middle section so it is slightly raised.
I then stuck the flower image in place.
I decided on some ombre letters for the sentiment so I coloured the scrap cardstock with my stampin blends before die cutting the letters using Playful Alphabet dies. I then cut more out of the scrap cardstock so I could stack them for dimension.
Next I used a stamp from the Artistically inked set for the birthday, cut it out, stacked it once and then edged it with the yellow ink to give it a little dimension.
Finally I added the little flowers as embellishments.
Really pleased how it came out and how cute this card is. I must also remember to use the scoreboard more for the creating of borders like this as it is so elegant.
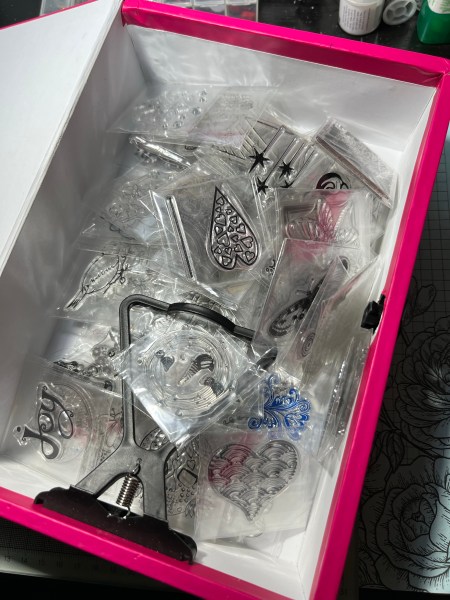
I have an a5 box which has a fair few Craft stamper magazine stamps in it …
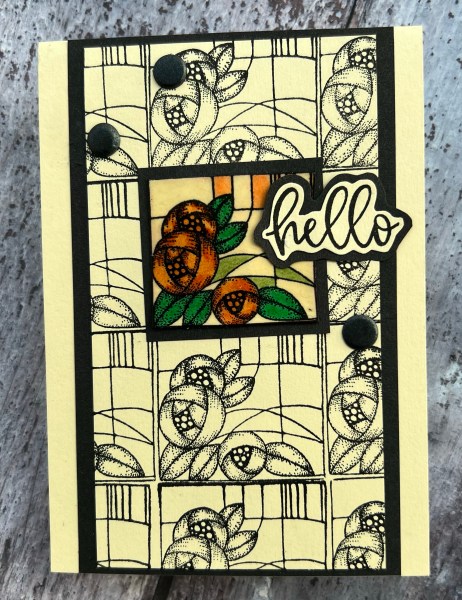
… which I NEVER think to use so making it one of my things this year to go through and either get rid or put in a more accessible place so I think to use them and this card is the first card I’ve made using them.
And I love it!
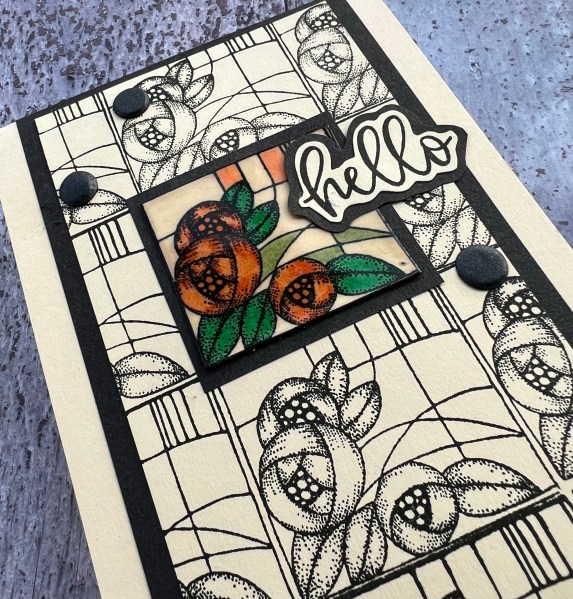
I grabbed the Rennie MacIntosh style tile stamp and stamped it in black all over a piece of cardstock and then again on a separate piece which I added colour to. I then cut that out and decided to turn it into a tile by heat embossing clear over it twice so it becomes nice and glossy. I used to do this a lot but I forgot about it until now and suspect I made do this again more often as I LOVE it.
I added a black mat behind this tile and also the piece of cardstock which I trimmed down to be slimmer than the card front.
Next chose to use the Biggest Wish stamp onto the cream card in black which I then fussy cut and mounted onto black and fussy cut that too.
Finished off with some black card candi on the front to embellish.
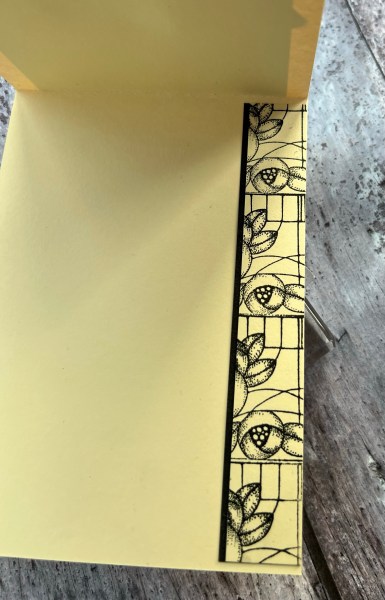
Inside I added one of the off cuts of the card panel I had stamped and a small strip of black.
Really love how this came out and this made me immediately put this stamp into the keep pile as I can imagine using this again.
This last week has been busy and what’s more even when I had some time I could have crafted in, the hubby was using the chair in the craft room so it was too much effort to move things around to be able to craft. So today has been my first time of getting to the desk and getting crafty.
Now I am sure this isn’t just me, but when I’ve had a break it’s almost like I don’t know what to do so I always find it sit and stare at stuff a while and the first card I make is a bit of an oddity! And this is one of those cards.
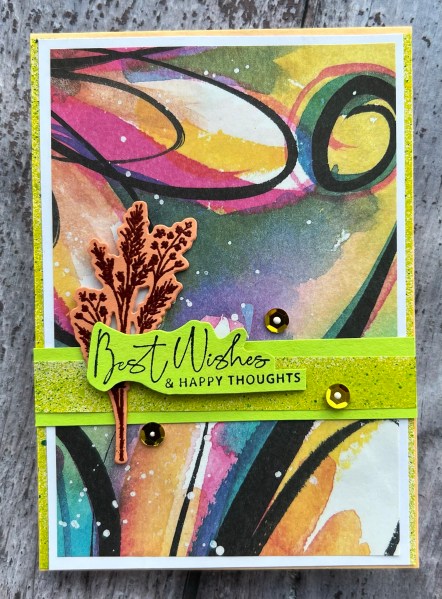
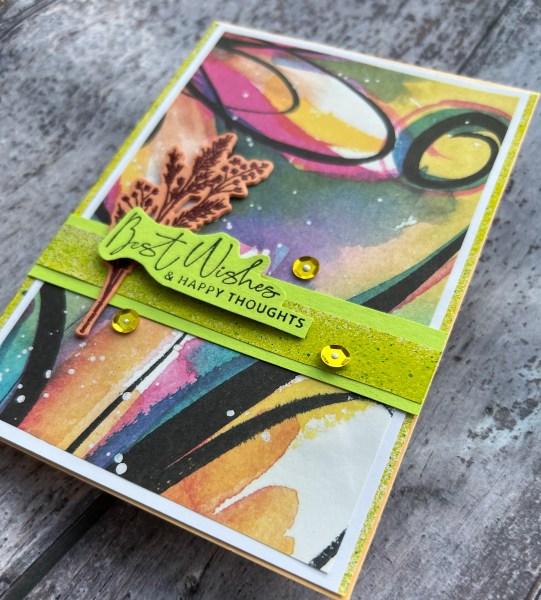
It started by me grabbing the piece of Art by Marlene collage paper and sticking it to white cardstock, then a piece of the leftover sprayed paper from last weekends photography session (see last weekends blogs for explanation). I then created a sentiment and found an embossed sprig from the Natures Prints set already made and then some gold sequins!
As I say oddments … but I actually think it looks ok overall and I like the zingy colours.
And now I’ve got through the initial block on creativity I’m off and ready to create in a more thought through way … so I already know because it’s happened by the time I’m writing this post that two more projects have come together quite easily – one of which in particular I am super super happy with … but you will get to see those as an when I get round to writing them up.
So this next week … and probably the one after that … are likely to be just as busy but at least my hubby won’t need to borrow my chair anymore so if I do get some time I might get some more crafting done for you to see… but be warned there may be a few gaps as life gets in the way!
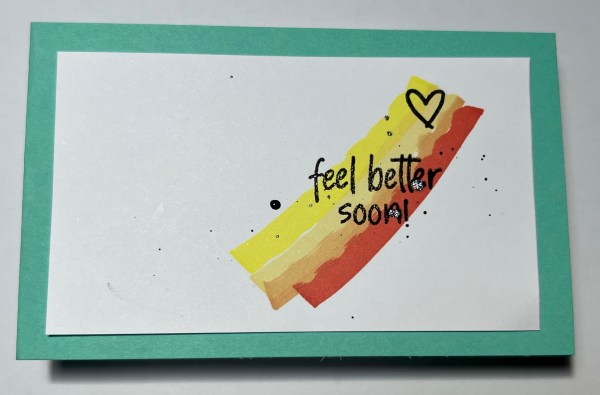
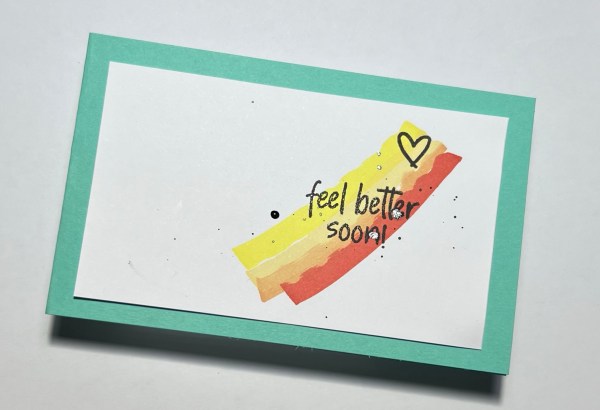
I made this cute little get well note, not because I needed it but because I had scribbled some promarkers onto the paper and I thought it would look good with a sentiment stamped on it so tried out a new concord and 9th set and this is the sentiment I plumped for.
Now before you remind me that my plan for this year was no spend and then I mention new stamps this was a little haul I bought between Christmas and new year … so hence new… so although they didn’t arrive until 2023 (postal issues) they were paid for in 2022!
Anyway back to the card … I’d done the scribbling during the photo shoot (see the last two posts for more info!) and so not letting things go to waste I decided to use this little piece as the focal point on a simple card.
I did add some splatters too using my black wink of Stella pen too so it’s got a little sparkle as well.
The card is only 3 x4.5 in size so a really cute little one.
Not often I go so small or so clean and simple but this little scribble with promarkers did the job perfectly for me!
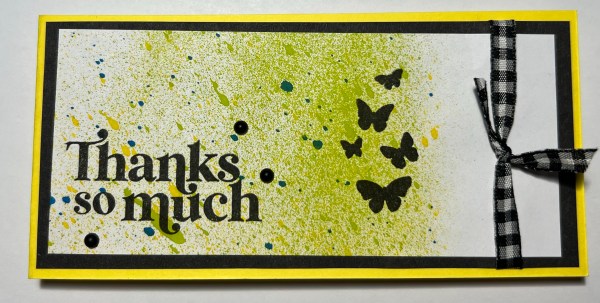
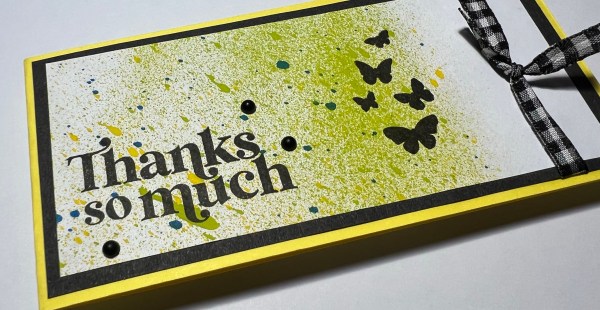
So I blogged yesterday that my daughter had been doing a photo shoot with some of my craft supplies … and whilst playing in the light box she made for the photo shoot she decided to have some sprayed backgrounds to her subject matter. Well I couldn’t let lovely backgrounds go to waste so had a quick play cutting one up and used it on a cute little slimline card.
I used some Concord and 9th stamps to add the butterflies and the sentiment.
I mounted the panel onto black and then used some of the lovely black and white checked ribbon and some black gems to embellish.
I decided to then add to the zingy yellow card stock from the stash which I made into a slimline card base.
Pretty and good use of some paper leftover from the photo shoot. I’ve got a few more pieces so cut them into backgrounds to use at some point in the future!