Christmas cardmaking 2022 challenge… #3

Hello

Todays Christmas cardmaking challenge theme is star. Now I remember using the Tidings and Trimmings stars last year but as I used that set last week I wanted something different. So I scoured the stash and found these fab Jofy star stamps and decided to go a bit mixed media.

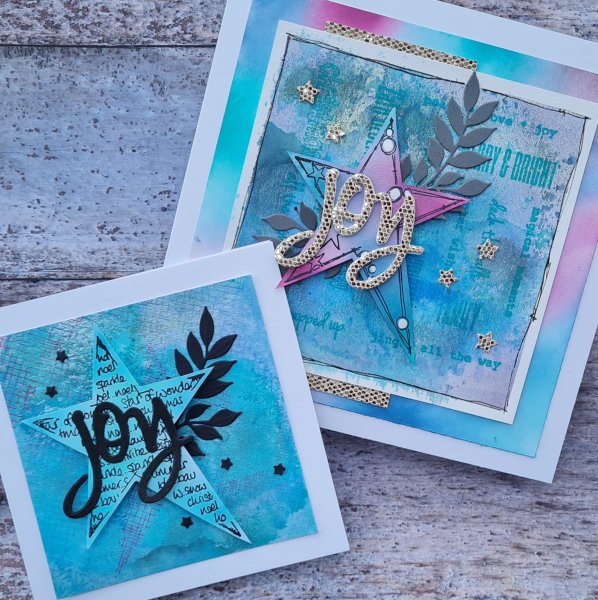
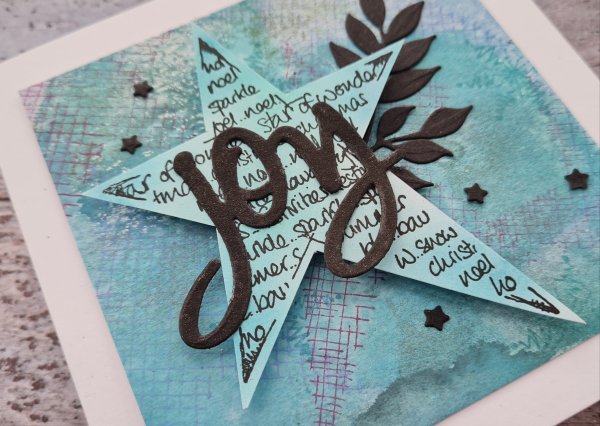
I stamped the stars onto basic white and then ink blended over them to add colour using my distress oxides. Then I grabbed some mixed media cardstock, distress oxides and my Gelli plate to create some fun backgrounds… I love the randomness of this and the different patterns it can create. Onto one of them I decided to stamp more of the stars and snowflakes from the same stamp set and then cut down the background to fit a 5×5 card. Then I added a black die cut branch and some black star and the fabulous Joy die cut from Colorado Craft Company.

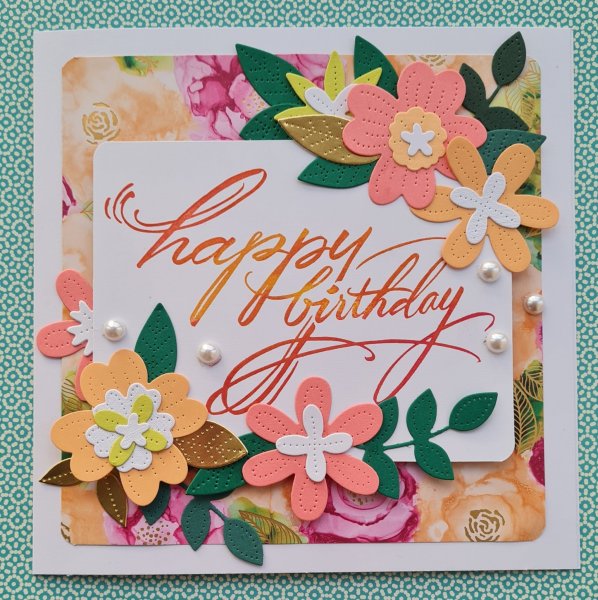
This was my simple card … I did pop the star up on foam tabs but kept the whole thing simple.

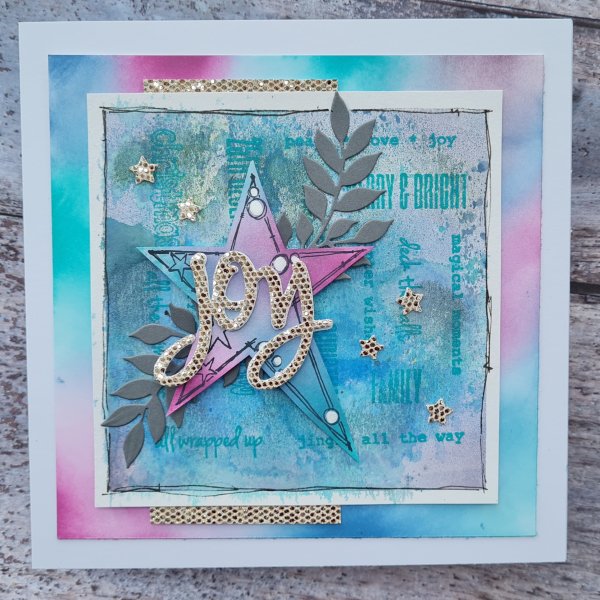
The other one I grabbed a different Paperartsy stamp set that has lots of sentiments and made them into a square shape on the stamp platform so that I could stamp in one go and make a background.

Whilst it is still subtle I love how it looked (in fact I made two more backgrounds similar but not done anything with them yet so they are in the “still to play with pile” for now.

I decided to make another layer and make this into a bigger card so blended the bottom panel with the same colour of inks but kept it random, like I had on the star.

I added the fab glimmer paper onto this too… with the stars, the little strip that went top and bottom and the word die. I also stacked the word die so it was nice and chunky!

This time I did some grey leaves but top and bottom and also added white paint pen to the design on the star.

So these are my star themed cards for this week. Are you joining in with my challenge? If so I would love to see what you are making so please let me know here or over on Instagram.

Happy crafting!

Catherine

Keeping it simple

Hello!

Some days I just want to keep my crafting simple by taking pieces of patterned paper, cutting them up and making them the main part of the card … and this is what happened with this.

I just took some Indigo Blu paper and fussy cut the butterflies using the number paint splatter background as a panel and mounted it on Soft Suede cardstock. I did add some dimension underneath the Biggest butterfly and also the sentiment. And then added gems. To step up the cars a little I did a peeking bit of the paper top left and curled the cardstock back.

But otherwise simple and pretty using one a4 piece of Indigo blu paper and a stamped sentiment. Jobs a good’un!

Happy crafting!

Catherine

Halloween themed monster card

Tonight I have a house full of teenagers having a halloween themed night … so I decided to dig through the folder of images that were already stamped and coloured. This includes images that I no longer own the stamps for or were gifted from swaps. I think this particular monster image I have had for several years and coloured using my Prismacolour pencils. It is good to get some old stash used occasionally. This monster ended up being a Halloween themed card!

I fussy cut it out and then decided to add a stencilled background as I remembered I had some Tim Holtz Halloween stencils.

I decided to just stencil a small patch in the middle and then flicked both the orange ink and some purple ink splatters. Then I stencilled the word Boo as well using the Black Soot ink.

I then added a little foam under the little monster so there was just the smallest amount of dimension and adhered him in place. Then I added the glossy accents to his eyes too.

I finished with three black gems from the stash.

Love how this came out.

Happy crafting!

Catherine

DT: Creative Knockouts… anything but square

Todays blog post I decided to film the making of … so check it out on YouTube.

It is a design team contribution for Creative Knockouts and the challenge is to make a card that is anything but square. We are sponsored by LeeAnn’s World 101 and I received the Rudy image to work with.

I decided to colour him with promarkers and then fussy cut him out.

I decided a circle shaped card would work OK with the image and my largest circle die was just about the right dimensions to cut out the card blank.

I then used a panel I had already die cut with the stitched snowflakes and die cut the circle and then the green ring were already on my desk.

I added the sentiment on the front and in the middle from the Christmas to remember set in white embossing.

I added the lovely laser cut snowflake embellishments and glossy accents for the finishing touches.

Love how this came out. So cute.

Happy crafting!

Catherine

JOFY flower card

On Sunday I had some fun playing with some supplies I had to hand… and I videoed it and yabbered along whilst I was crafting … just for fun!

This is the resulting card.

The background is one I made with embossing over the blended background d and then black ink added to create a resist effect.

I then added die cut leaves in a mix of autumnal colours. Then I cut out the flowers I had stamped and coloured with distress oxides onto peachy cardstock.

I made the sentiment using the Playful Alpabets in the white to create a space to add in the green letters (die cut inlay). I then embossed the rest onto some Calypso Coral cardstock.

Finished with the white sequins.

Love how this turned out and really enjoyed my crafty playtime.

Happy crafting!

Catherine

Happy birthday ickle cus

Yesterday was my cousin’s birthday and I wanted to share the card I made for her. I will admit I made this several months ago and I am impressed with myself for not losing it, and remembering to post it! That last one in particular is a real achievement for me! 🤣

This started as an experiment to think of different ways to add colour to the Merriest Moments die cut panel … and I thought that the background stamp in Artistically Inked might be a good one for adding different kinds of texture to the colour rather than flat colour. So I die cut the panel out first and then stamped the stamp in Pear Pizazz and Old Olive randomly all over the panel. I also took the three small flower stamps and stamped them randomly in Mossy Meadow to give a few darker patches.

Next I ran it through the embossing folder and I loved the effect. I wasn’t however in the mood to make a Christmas card so I thought why not make my cousin a special birthday card and throw all the dimension at it … so that’s what I did. I chose a colour palette of subtles: So Saffron, Blushing Bride and Calypso Coral and went to town stamping and die cutting. I blended the inks a little for the larger flower to give the edge a darker colour.

I then die cut and embossed another of the Merriest Moments panels in white to give a background to the green one … I layered them the opposite way round so they didn’t line up. I then die cut a white panel for the centre as I like having that bit clean on these panels. I chose how to arrange my flowers and added foam under the large one and then slotted the leaves in too.

The sentiment I did try using a die cut banner but the ones I have were a little too wide for the sentiment so ended up just cutting a strip and edging it with the So Saffron ink to frame it a little and raised it on foam … for some dimension.

I contemplated the back panel being the Merriest Moments embossing but decided instead to use the Painted Texture one and to distress the edges too. I added the main panel onto this with 2 layers of foam and then adhered this to the card blank made from So Saffron.

I finished off with just a single pearl gem that is Petal Pink which I think worked well enough with the other colours.

Inside the card I added a panel of white and then one flower and leaf leftover from my stamping and die cutting.

No fancy envelope for this … didn’t have any inspiration this time … I ended up just putting it in a Kraft coloured envelope for posting which was cute in itself.

So happy birthday Michelle … and hope you all like the card I made her.

Happy crafting!

Catherine

Christmas cardmaking 2022 challenge… # 2

Hello again… week two of my personal Christmas card challenge and we have the theme of stocking. So I had to grab the Tidings and Trimmings set, which I did last year too. But this time I’ve gone crazy colour and funky!

The background is a mop up piece of glossy cardstock, like photo paper and I used it to mop up distress oxide when I’ve been playing with the smooshing technique. I love how it creates a natural messy background with no thought. It also is the perfect type of background to use a background die on like this snowflake one from Waffle flower.

So I had this already in a pile of backgrounds I have to one side to grab when I’m not sure what to do and decided to die cut it at an angle to create this funky panel and mount it onto black card for a fun modern look.

Then I grabbed the distress oxides to stamp the elements I wanted for the stocking focal point.

I die cut pieces out plus some layers for adding dimension and then made my bright cluster.

Then I die cut the letters for the word merry twice so I could stack them and added wink of Stella to give then some shimmer. I also die cut the little dots that I think are berries for the sprigs in the Trimmings die set but went for black adding them as embellishments.

As its a black card blank I added and insert and added some similar elements to finish off and give a nice surface to add a message… black card blanks always lead to the having to search for a paint pen otherwise and that is unlikely to happen when ploughing through the card writing!

So I love this funky and modern card … so nice to use the stamps and dies with a different colour scheme too.

Happy crafting!

Catherine

Christmas cardmaking 2022 challenge… #1

So long term readers of my blog will know I attempted a Christmas card making challenge last year and failed to finish… this year I’ve shortened it but I’m back with a very similar challenge again this year and really hoping I might succeed with a bit of planning and tenacity… let’s see shall we.

I’ve kept to very similar themes … just got rid of a couple so that it will work as a weekly challenge and take us up to just before Christmas… because yes 10 weeks (or thereabouts) to go to Christmas week.

So first up … foliage. Last time I did use the Christmas to Remember and Christmas Season bundles to create my cards. But this time I’ve gone very different with the same set and created the card I’m going to give my parents this year.

I concentrated on the die cutting and lots and lots of dimension… so there are three layers to the background panel of die cuts in 2 colours of green, some of the pine cones also have three or four layers. I stacked up the sentiment panel and also the embossed background.

This photo in the sun shows all the shadow and conveys the depth to the card quite well.

I heat embossed the sentiment and love the white against all the greens and brown. Modern but with a hint at tradition. I added the brown twine from the stash which makes a lovely different embellishment alongside the pearl gems.

I think my parents will like this card, and as its a 7×7 card it’s a good size for special recipients.

I really love how it turned out… to be honest I rarely use these very detailed dies as they can be tricky to cut out on my Big Shot (it’s getting old and the pressure isn’t as good as it was) so this took some time… but I think it was worth it.

Also love that Fern embossing folder. I was able to extend it over the whole 6×6 square as knew the “join” would be masked by the die cut panel on top… so no one would know it isn’t a 6×6 embossing folder!

Would love it if you were inspired by my personal challenge and let me know… either here or on Instagram…. would love to see what you create.

Happy crafting!

Catherine

DT: Creative Knockouts… finish the inside

Hello! Gosh these design team projects come round quickly! Todays is for the Creative Knockouts challenge where our theme is to finish the insides. This has been sponsored by Pattie’s Creations and I chose this gorgeous Magnolia Branch image as my gifted image to work with.

I printed it off onto plain old copier paper (admittedly by accident!) and decided to use my Stampin Blends to colour in the image using a mix of yellow and green. I know this is a colour magnolia doesn’t really grow with but it worked with the dsp I wanted to use.

I coloured the image twice as I knew I wanted to continue the image into the inside of the card.

I decided to use some die cuts as additional embellishments and used the swirly flourishes from Crafters Companion.

I chose a pale mint colour for the base of the card and added a die cut panel to break up the dsp background a little more then decided to repeat that colour with the sentiment die which I stacked three times with the white shadow which I stacked twice. This gives it so much dimension.

Of course I grabbed Biggest Wish for the Happy part of the sentiment … seriously can’t get enough of this stamp set.

I know you can’t see it well but I added shimmer to the Birthday die cut using my wink of Stella and finished the front with some tiny pearl gems.

Inside I did a panel of the dsp and added the floral image but this time I only cut out part of the image to keep a white border down one side.

Although the dsp is a heavy pattern I think you could still write a greeting over it or alternatively write on the reverse of the front of the card.

I do like finishing the inside of cards but don’t always do it and certainly rarely plan it. A simple way of finishing the inside is a strip of dsp … but this time clearly I went overboard as it was more planned.

Also a handy thing is that this card base wasn’t the thickest/ strongest cardstock so adding the panel inside as well as the front gives it extra strength to help it stand nicely when displayed.

Hope you like what I made, I love this colour scheme in particular and the mix of the graphic vintage dsp and the beautiful floral.

Happy crafting!

Catherine

DT: Happy Little Stampers Anything Goes with Dies challenge

Hello dear blog visitors. Once again I have a Design Team contribution for you, again for Happy Little Stampers Anything Goes with Dies challenge blog.

Once again I have a project that was made and sent onto the recipient a while ago but as it was die cut based I figured it would be perfect for getting ahead on my design team work! So it is a 7×7 card for my Auntie who turned a special number but didn’t want it recognising! Personally I think the number is a good one to celebrate but she didn’t want to so I kept the numbers off the card! Lol!

Instead I went for special dsp which is the Expressions in Ink with the gold foiling in it and then chose lots of the gorgeous Pierced Blooms in coordinating colours to add as embellishments. I did want a big sentiment though so I chose a Stampendous stamp I’ve had a long time and using the stamp platform used coordinating inks for an ombre look.

I raised this stamped panel up on foam so I could tuck the flowers and leaves under and on top to create dimension.

I also added some gold die cut leaves in to coordinate with the gold in the dsp. I finished with the large pearls as embellishments.

Inside the card I added a strip of the dsp, another cluster of a flower and leaf and a small sentiment strip and then decided to add another stamped ombre sentiment. This time the Happy Celebrations set.

I used the remaining piece of dsp (it was a half sheet 6×12) on the front of the envelope as 2 strips down either side.

Love the colours and the touches of luxury with the gold on this card.

Happy crafting!

Catherine