Merry Christmas!

Merry Christmas everyone. Just popping in to say hi and share the cards I made for my hubby and daughter.

But first…

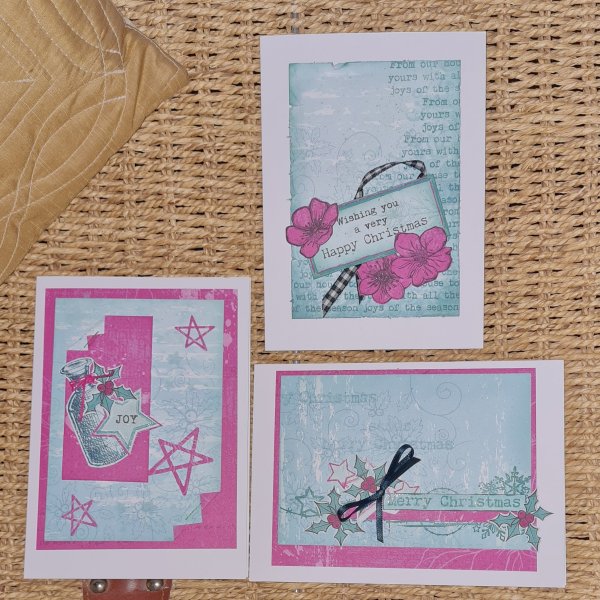
Well my Christmas card challenge failed abysmally… I only managed 6 of the themes I think and then life got crazy busy and crafting went to the back of the priority list… so sorry for those who were enjoying the challenge. Maybe I will revisit it when I get a chance.

But I did manage to make 2 more cards … one for the hubby and one for the child.

Hubby…

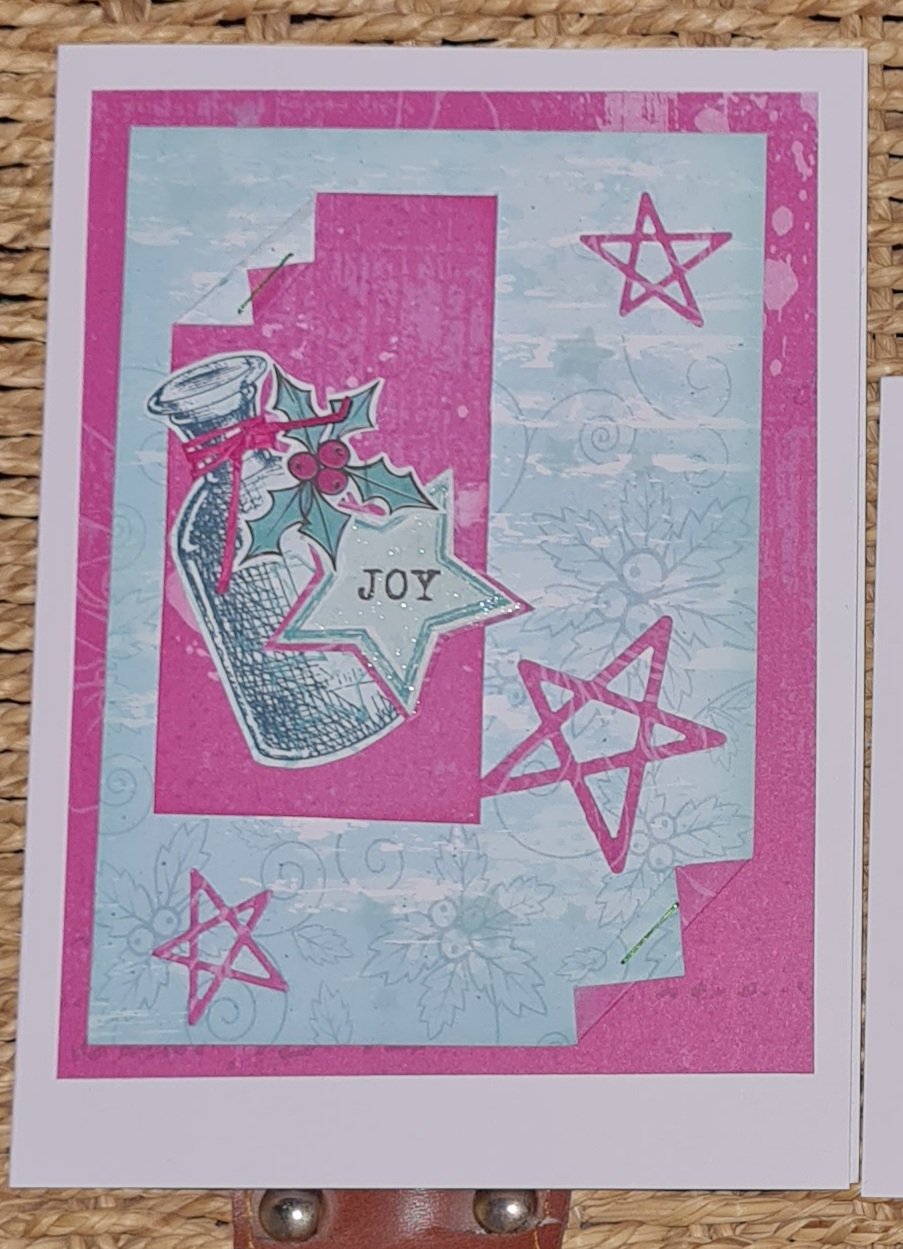
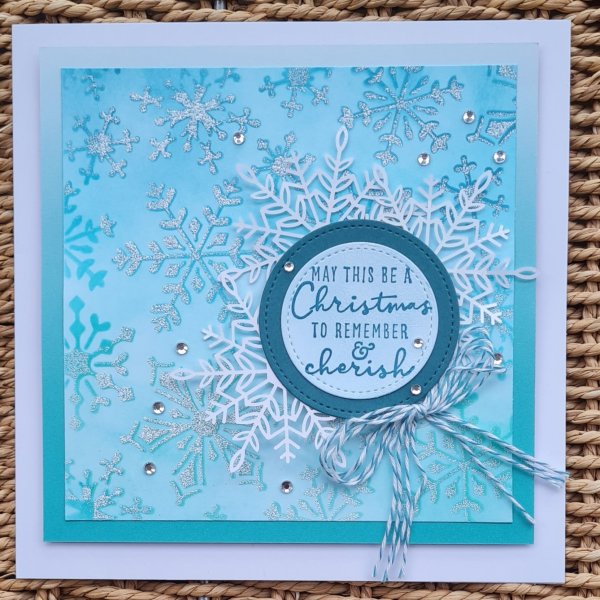
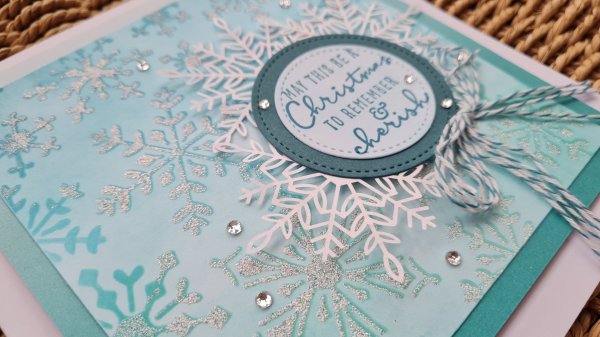
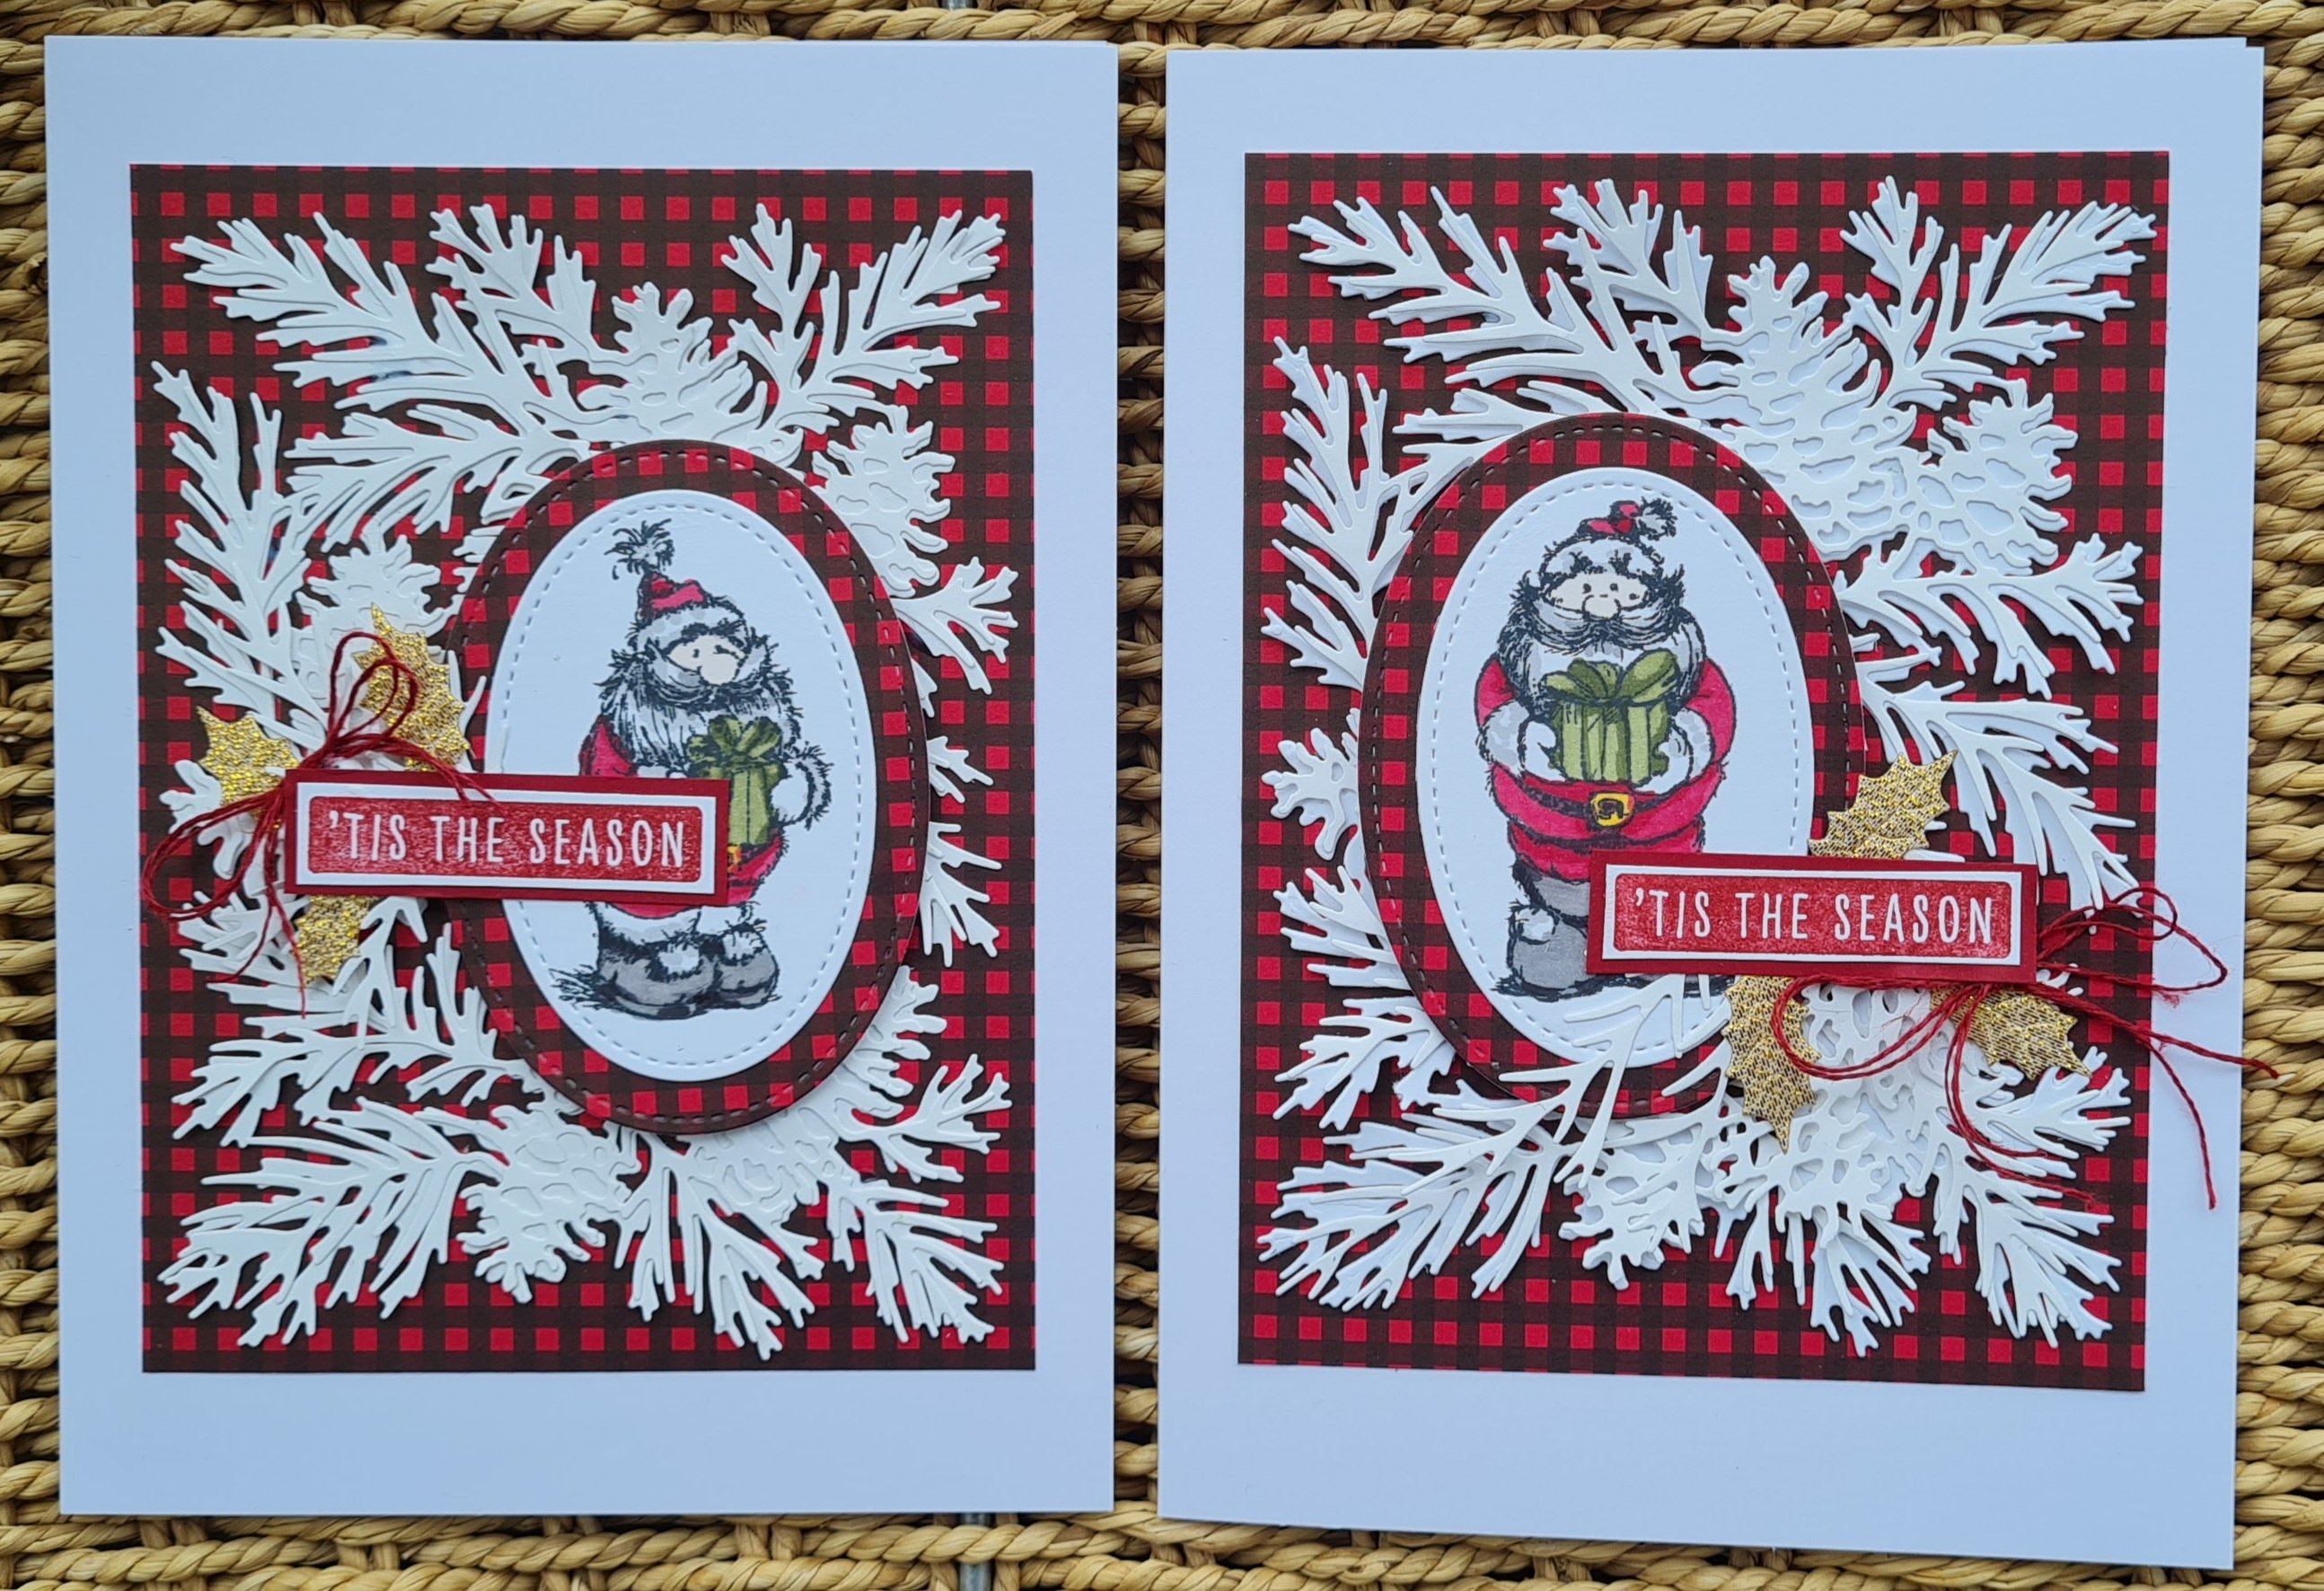
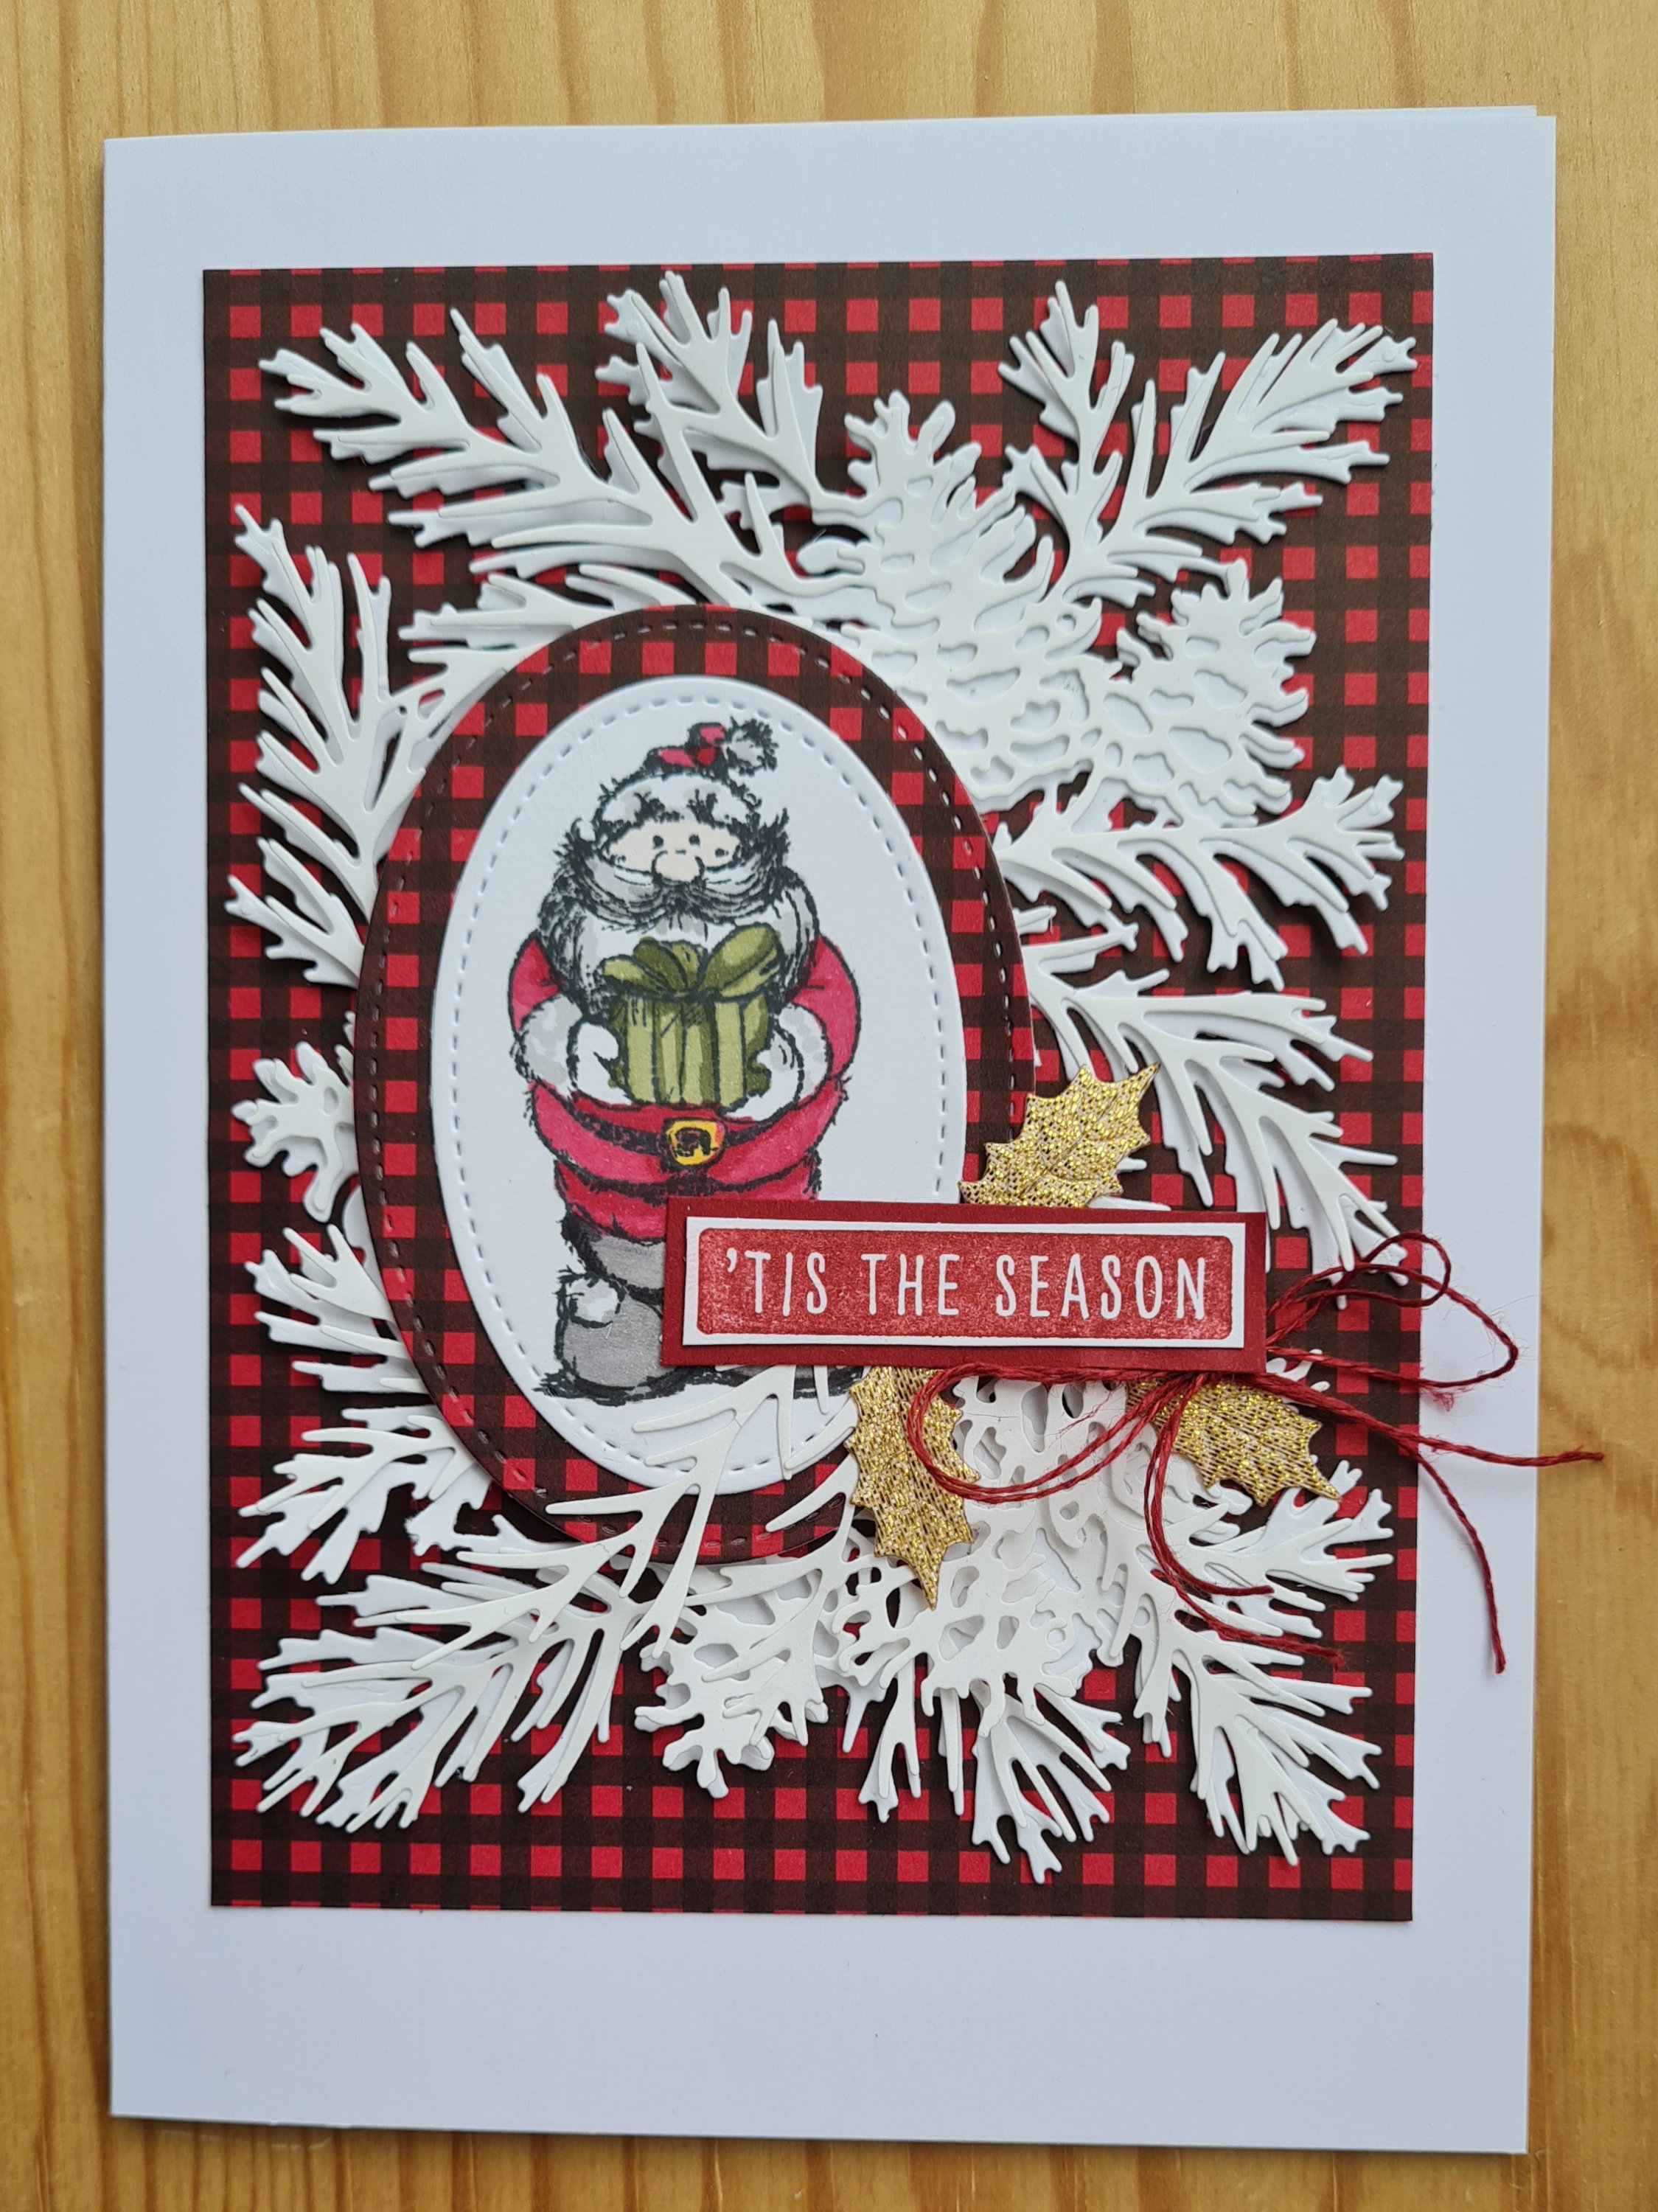
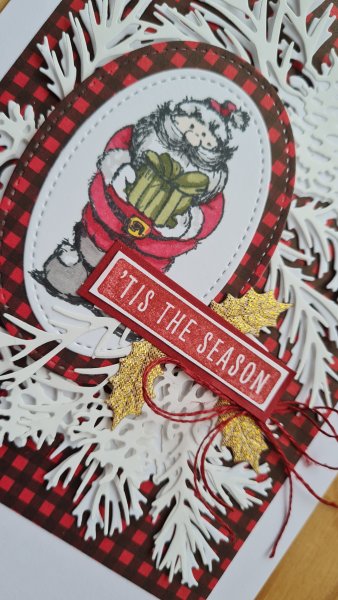
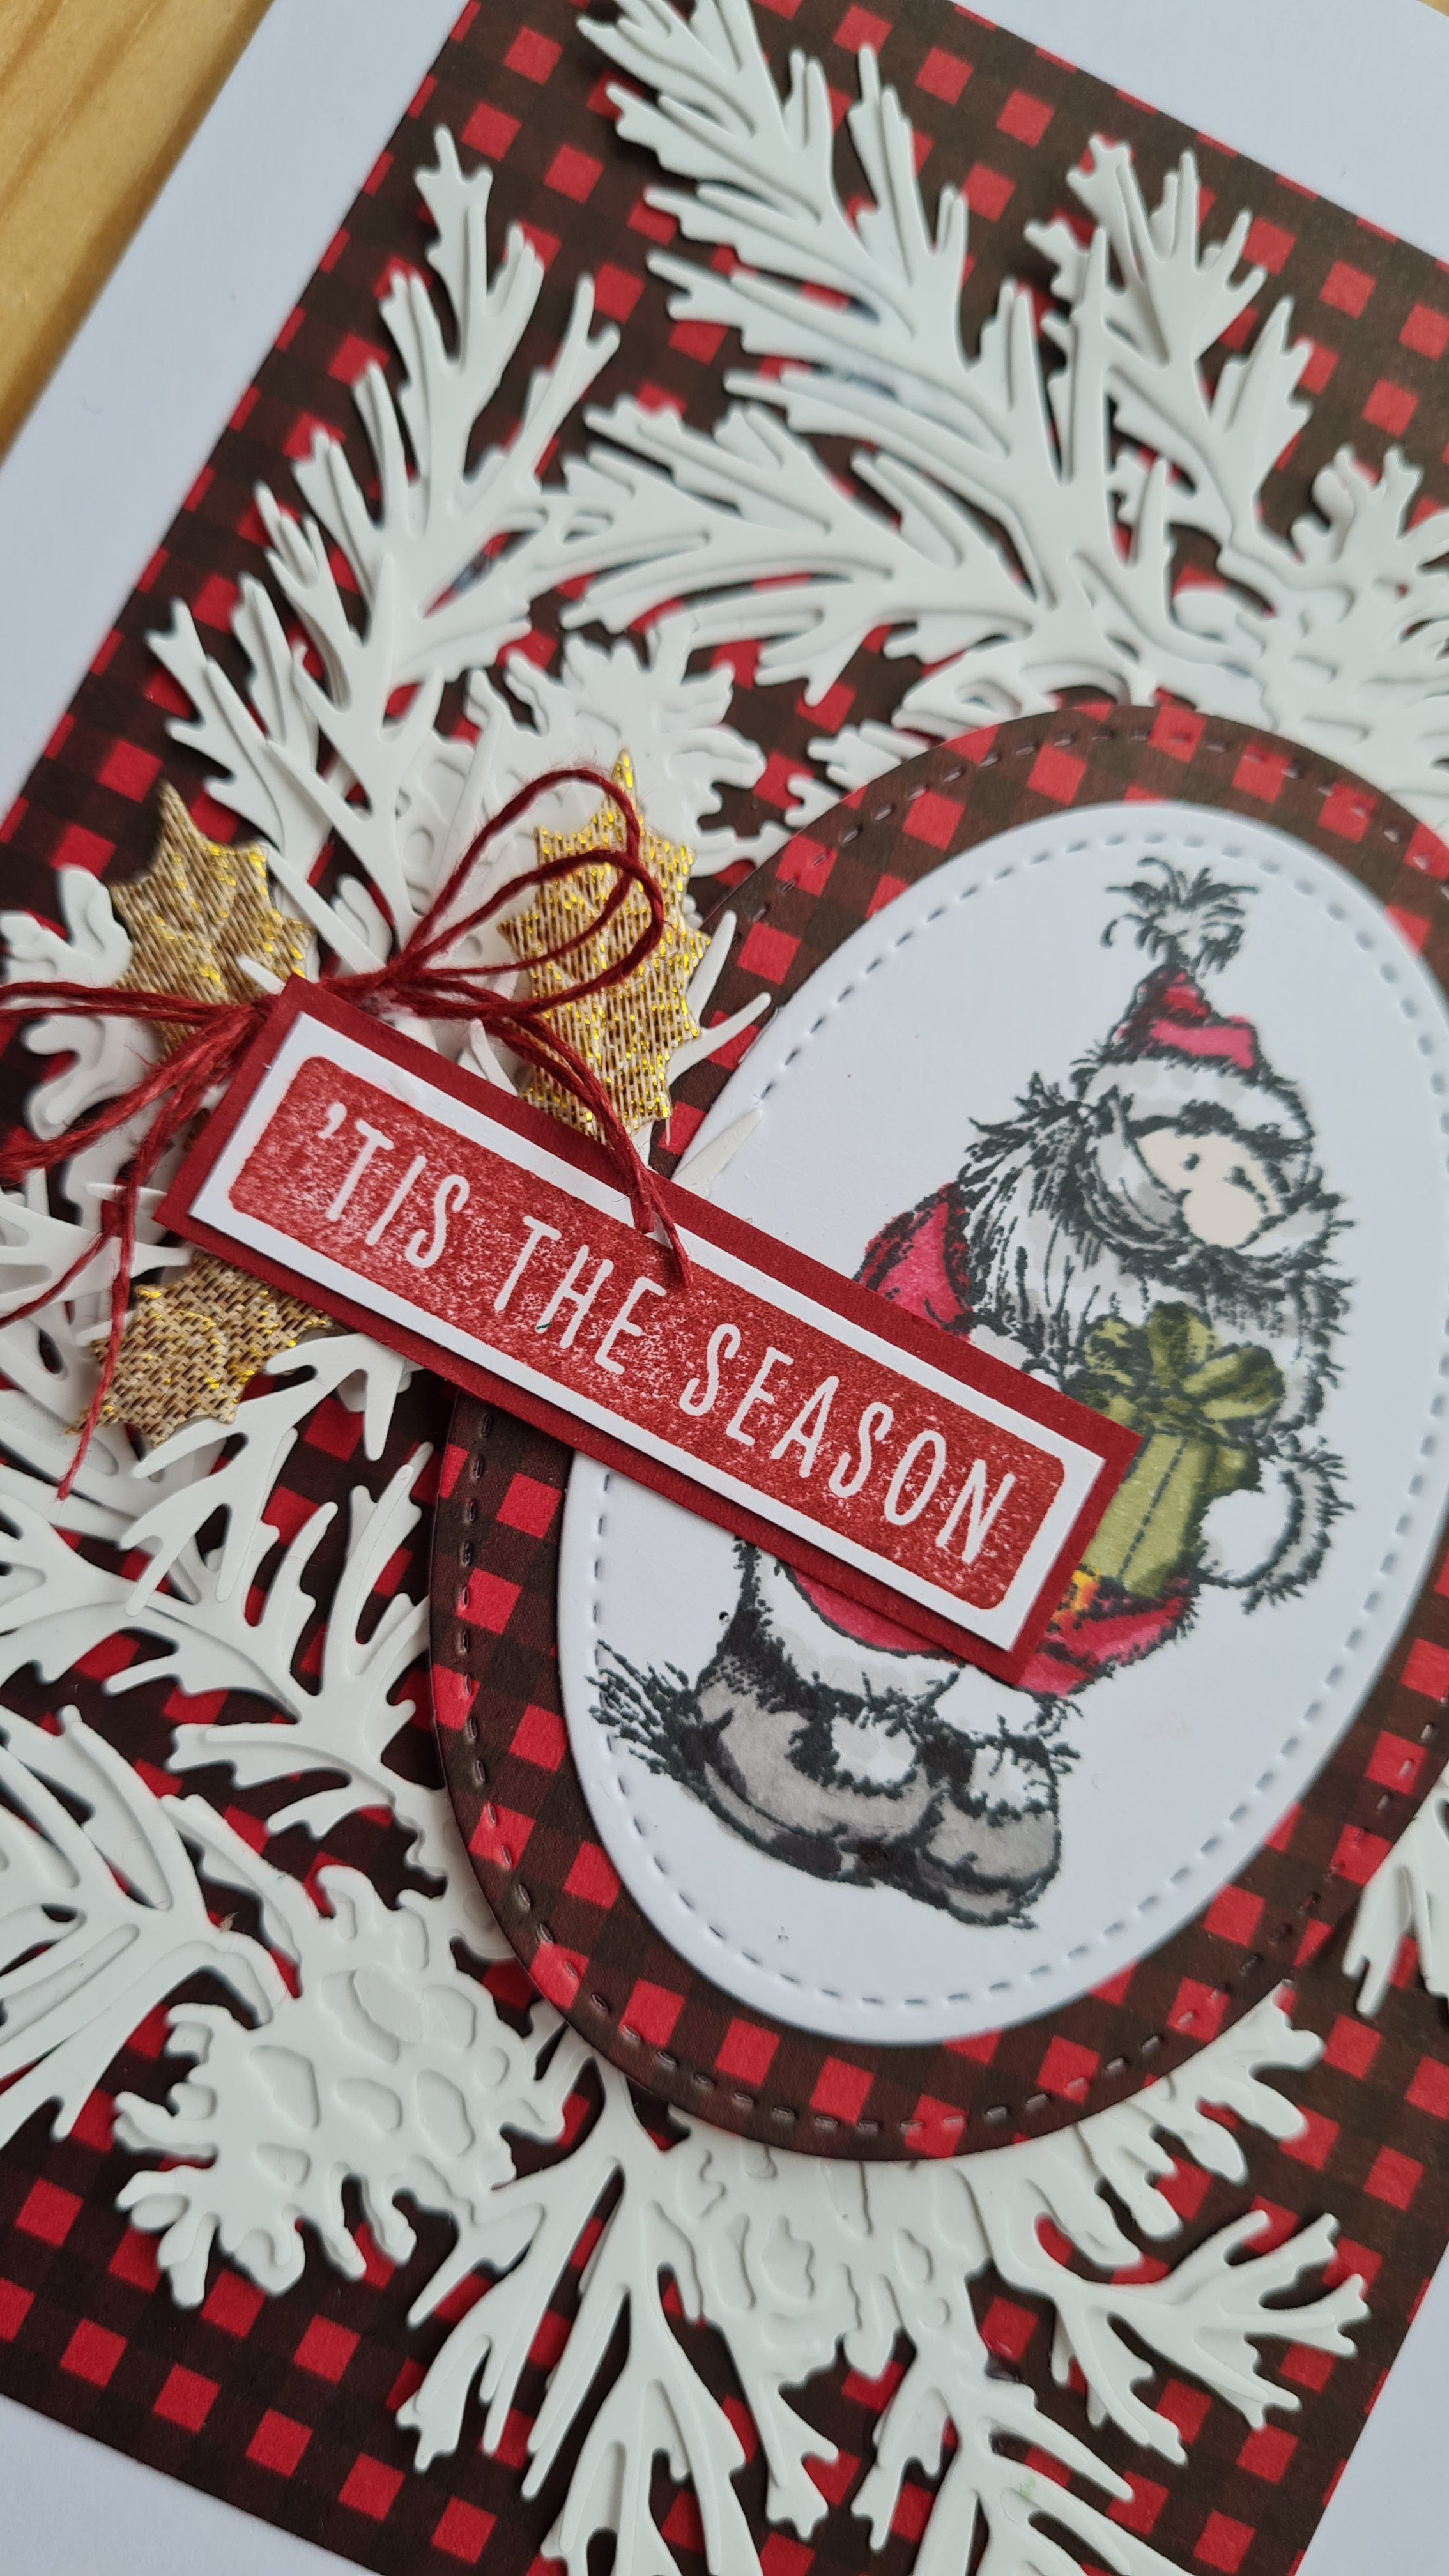
I went to town on this 7×7 card with dsp, dies, stamps a day some bling!

Pretty much everything from the Painted Christmas suite got thrown at it. Love love love this and all the foliage!

Definitely one of my favourite cards I’ve made this year! Entering it into the challenge at The card concept

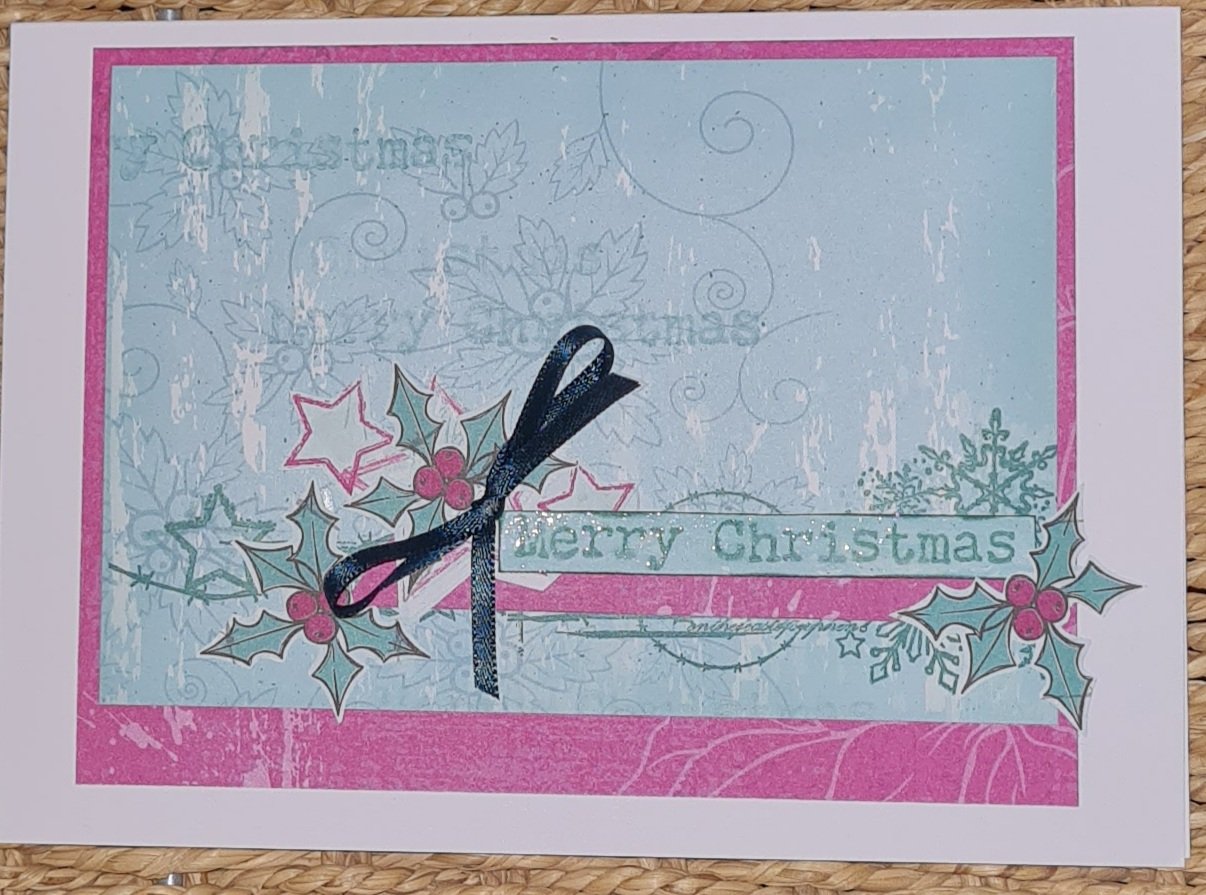
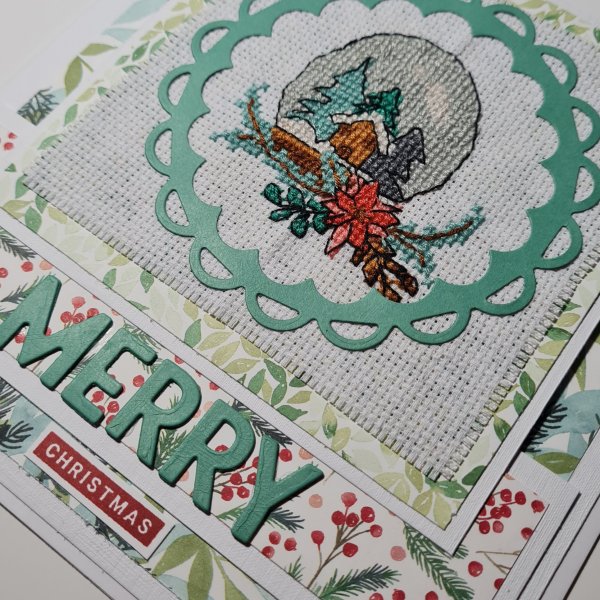
Next up is the card I made for my daughter.

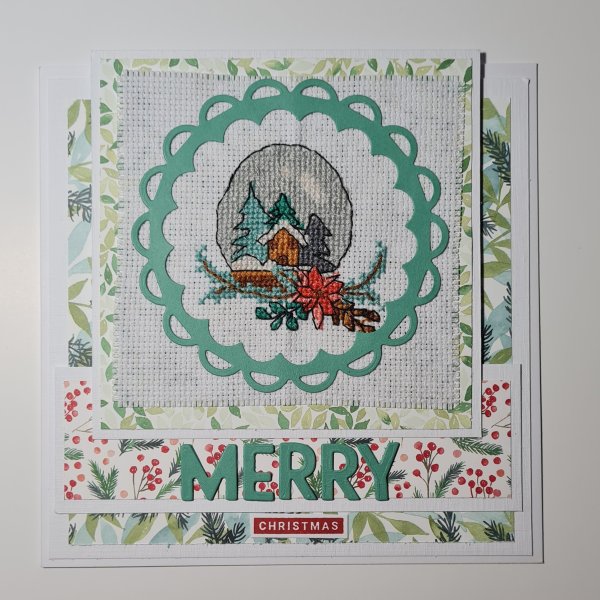
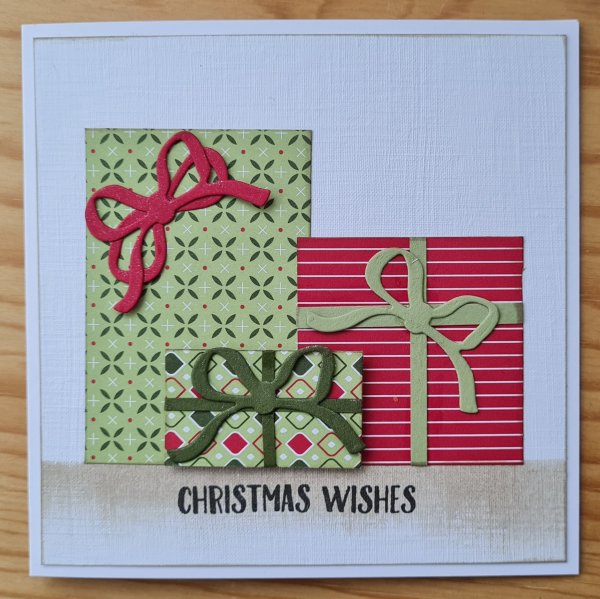
To be honest I made the cross stitch in 2020 but never found a use for it… until now! I decided it worked will with the Painted Christmas dsp and just created a frame from some old spellbinders dies and the sentiment from the Playful Alphabets dies and last years favourite stamps… Peace and Joy.

A cute and beautiful card … with a sewn element so perfect for my girl.

So these are the last of the 2021 Christmas cards. I actually did well in using the vast majority of the cards I had in the stash this year (between me and my parents!) which means I probably shouldn’t wait too long to start making them for 2022! Good job I have plenty of dsp left to play with!

Wishing you all a fabulous Christmas and festive season.

Happy crafting!

Catherine

DT: Happy Little Stampers Anything Goes with Dies

Hello! Time for another DT contribution to share with you. This time for Happy Little Stampers Anything Goes with Dies challenge blog.

This month I made yet another 16th birthday card, and even though this was for Niamh’s birthday in November I wanted it to be bright and cheerful and tropical.

Now I must admit this project used up some table decorations I had made for a fun night my daughter had had with Niamh so it was a case of just deciding on a layout and putting it all together rather than making from scratch… bit it was fun to do!

All the leaves in the background were made by stamping and then smooshing the inks onto the paper and then fussy cutting them out. These were originally made as table confetti. I then glued them to the white card square and turned them into a patterned paper background.

Next I stamped and embossed the Happy from Biggest Wish onto Polished Pink cardstock.

I then created a banner and added the die cut 16th using the Playful Alphabets dies.

Onto the top I then added the focal cluster of the pineapple and flowers. The pineapple is a Lawn Fawn stamp and coordinating die. I stamped this onto some glossy cardstock I had used to wipe up the ink smooshing (love this for creating a different texture and fun patterned paper). The bottom flower is actually a poinsettia flower from Tidings and trimmings which I fussy cut and then the top flower is from Sweet Strawberry. I added a gem to the centre to finish that element off.

I then decided I wanted a more graphic finish to the sentiment so chose the accompanying stamp from Happy Celebrations and stamped that onto the same Petal Pink card I made the 5×5 card blank from.

Next I rummaged in the ribbons box and found a scrap of ribbon that I thought worked well with the colours.

Next I created a panel for the inside of the card and added three of the leftover leaves to decorate.

Oh and of course some additional gems added for bling to the outside.

Delighted with the final card and the fact I could reuse some of the fun elements was a bonus.

Happy crafting!

Catherine

DT: Craftyhazelnuts patterned paper challenge

Happy advent everyone! Hope you are all ready to enjoy the festive season!

As its the first of the month it is also time for me to share my Design Team contribution for Craftyhazelnuts patterned paper challenge blog.

I made three cards using the Indigo Blu magazine kit I bought a few months ago that has sat untouched!

I started by cutting one sheet into three panels and then made each one a little different!

I edged each of them with the Speckled Egg distress oxide and then started playing with stamps and stencils in the kit to make them different.

The kit also has sone printed elements that you can cut apart for embellishments and sentiments.

I added some additional bits like ribbons and some wink of Stella too to add sparkle.

Love the fun colours and the grungy mix of images.

Happy crafting!

Catherine

Happy birthday Hugo

I’ve been awol for weeks and weeks now because I’ve had zero time to craft. But my youngest great nephew turned 1 this weekend and I made this card for him.

Love the bright colours I chose and the cute paper from the stash. Used the Biggest Wish stamps and the Playful Alphabets dies to make up the sentiment on the front. Also those little heart dies I found in my stash in a gummipan set. So cute!

The little first I stamped using some mini alphas and then used wink of Stella and glossy accents to turn it into a raised sticker effect.

Had a lovely day yesterday celebrating with Hugo and some of his family.

Hoping to find myself a bit more craft time in the coming days to get back on top of the Christmas challenge that has completely gone to pot!

Happy crafting!

Catherine

DT: Happy Little Stampers Anything Goes with Dies challenge

Hello! Another month flew by and time for another DT contribution for Happy Little Stampers Anything Goes with Dies challenge blog.

This month I went to town stamping on a large tag in the stash and embellished with loads of different sized stars which I die cut from the Trimmings and Tidings bundle.

I added some stamped stars too and then made a title for the tag using a stamp set to make the start and the end of the title embossed onto black and then the Biggest Wish stamp to create the focal word.

Just love how this turned out. Fun to make the patterned paper with all those Happy stamps from the stash.

Happy crafting!

Catherine

DT: Craftyhazelnuts patterned paper challenge

Happy advent all!

As its the first of the month it is time for a Craftyhazelnuts patterned paper challenge blog design team contribution… and once again I shied away from a OSW and instead decided to play with old dsp and a JOFY stamp to make 4 slimline cards.

They are all individually made and all approx 3×6.5 inches in size so at some point I will also need to make bespoke envelopes but hey ho… aren’t they cute?

I stamped and coloured all the images first and then started pulling out papers that worked with the colours I had used. They were all retired dsps that were in my stack of 6×6 papers.

I also added a double embossed panel on each of them. What’s double embossing, well you add versamark to the inside of the embossing folder, then run it through to create the texture, then add embossing powder and heat. I used a pearl white powder and it have a gorgeous sheen and really stepped up some plain white cardstock.

I added a sentiment to three of them and some wink of Stella to the bow on a couple of them too.

Love how these came out…. mainly using scraps of cardstock and some old dsp!

Of course it helps that the stamped image is pretty fun too!

Happy crafting!

Catherine

Christmas challenge #7

Onto the second half of the challenges now … and this week it is snowflakes!

This time I’ve made one card only… but it is a larger card as its 7×7 in size.

I started with the snowflake stencil and blue inks and the blending tools and created a blended background and snowflake images. Once I had got all the ink down I then added versamark through the stencil and used a sparkly embossing powder to add some glitz to the snowflakes.

Love how this created some shine, but also the colour came through to give dimension.

Next it took three of the iridescent snowflake embellishments… these are so pretty. I created a cluster of them to go under my sentiment. I added some of the ink left on the blending tool to the sentiment to make them match.

I mounted the snowflake and sentiment cluster onto some foam for dimension and added the twine bow from some twine from the stash. I mounted the panel onto a 6×6 ombre paper from the stash and then added some more foam underneath to add more dimension.

Finally I added plenty of bling with the gems.

So happy with this card and think it might be going to my parents for this year as it’s one of the larger cards I’ve created. Sure they will love it.

Happy crafting!

Catherine

Happy for Abbie

My lovely colleague and friend Abbie has a new job and I am delighted for her as much as I am sad that we will no longer be at the same workplace together.

I had to make her a special card though to let her know how happy I am for her.

I started by stamping Delightful Dahlia stamps on cardstock in Versamark and embossing them in white and then plenty of distress oxides and the smooshing technique made a cool background. I also wiped away the excess ink with a piece of glossy photo paper which I ended up using in the card too.

I stamped a few of the smaller flowers for the card too and inked up using the same colour oxides.

I cut down the panel for the background and then got out the Artistic dies as I love the flower cluster one. I cut it from the photo paper and again from white cardstock so I could layer them to give it extra dimension.

Next I created the sentiment. I was inspired by the sentiment in the Delicate Dahlia set but wasn’t keen on the font so instead made my own using lots of other stamp sets and of course the Biggest Wish for that fab Happy part. I added the twine bow and plenty of foam under the sentiment and flower cluster so this is a VERY dimensional card.

I added lilac gems from the stash an a mount of the Blackberry Bliss cardstock. I then stamped (badly) the Dahlia onto the envelope and blended some ink over the corner.

And inside the card a strip of the background I had trimmed off and mounted it on blackberry bliss and added the final small flower.

Love how this came out. I know Abbie will appreciate the love I put into making her card and I hope she knows how much she will be missed.

Best of luck Abbie.

Happy crafting!

Catherine

Christmas challenge #6

Week 6 … already … oh my … running a little late on the posting today … but better late than never!

So it was time for the main man to arrive. Except then I realised I don’t own many Santa stamps. I ended up digging some old Making Cards magazine stamps out to make the focal image. I stamped the Santa’s and coloured them using my Stampin Blends.

I grabbed some of the dsp I got in Saleabration and cut some plaid panels and the mounts for the images.

I then die cut the christmas pinecones large foliage dies in white with an extra one which I could cut up and use for additional embellishments.

After putting the layers together I decided to also add some of those gorgeous gold leaves and some cherry Cobbler twine. The sentiment I stamped from the Christmas to remember stamps… wish I had used the stamp platform so I could have got the colour darker but hey you learn from your mistakes! And it looks lovely regardless.

Don’t forget if you are playing along to add #christmascard2021IFCchallenge so I can follow along.

Happy crafting!

Catherine

Christmas challenge #5

So I am at the point of the challenge where I wonder what my brain was thinking in giving myself the prompt of gifts. Turns out I don’t really have many gift stamps or dies in my collection. So I had to think outside of the box… in fact I had to make the box to think outside of!

I started by grabbing the Heartwarming Hugs dsp and cutting lots of squares and rectangles to make my gifts. Then I started die cutting bows from some scrap coordinating cardstock. This die is the one from the retired Wreath Builder set (I forgot there was a bow in tidings and Trimmings!). I also cut some slithers of cardstock too.

Next to construct my gifts and work out how to use them!

I decided to make piles of boxes and add dimension using shading and pen work… well sort of!

First I went in with my Sahara sand ink and inked the edges of the boxes and created a ‘surface’ for them to sit on.

Next I used the grey alcohol pens to add shadow and dimension.

And on this one I added some sketchy pen lines…

Think I actually prefer this last one of all three but maybe it speaks to my mixed media grungy messy heart.

I had some boxes left over so made three tags to match… so it became a little collection of cards and tags.

Love those bow dies … still think SU should never have retired this bundle! Ah well!

And love those papers… so pleased that they are still available!

Happy crafting!

Catherine