Excited to be here scrapbook page

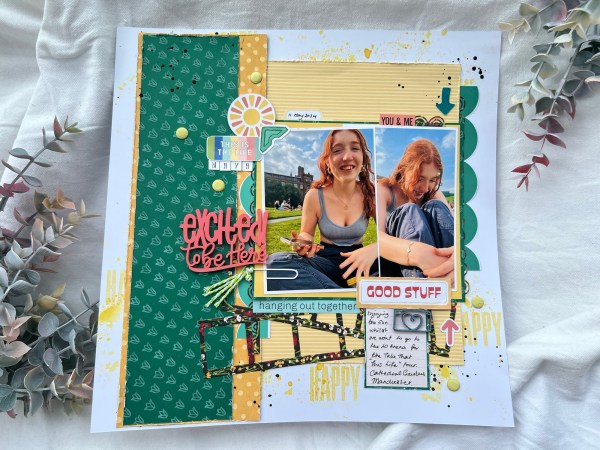
This was actually made a few weeks ago to join in with the July 1 sketch: 3 ways challenge my friends Helen, Sarah and Jackie have come up with.

I videoed the process that shows the full process. I actually change my plan and use of the sketch half way through and end up turning the sketch but not the photos so it does end up quite different by the end.

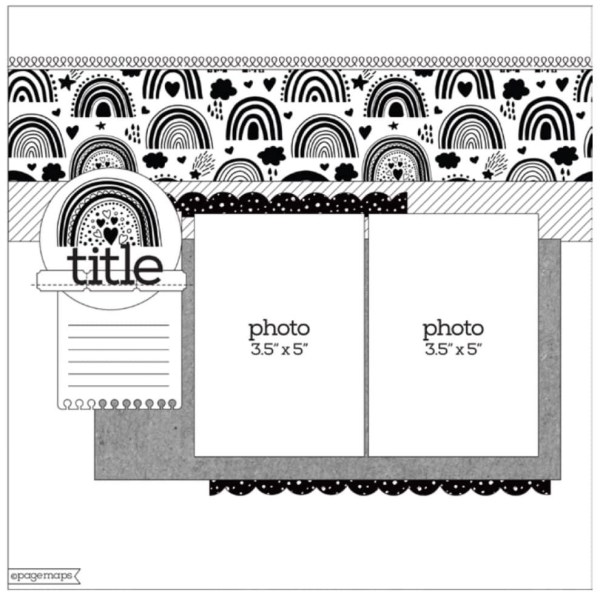
The sketch is above and it was a page maps sketch.

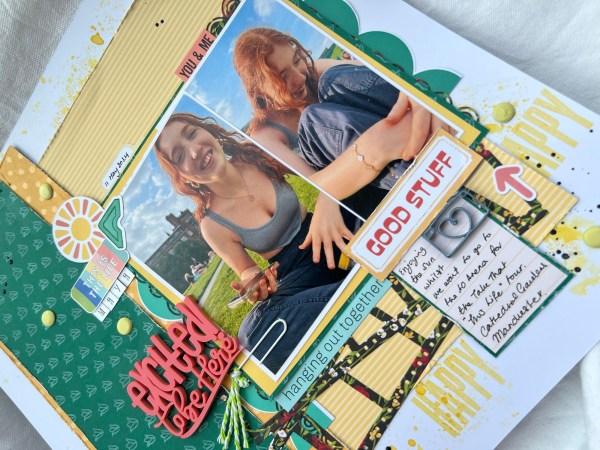
I chose to use old papers from the stash and then some bramble fox and lollipop box club kit stash. I also used the Hey Little Magpie dies too.

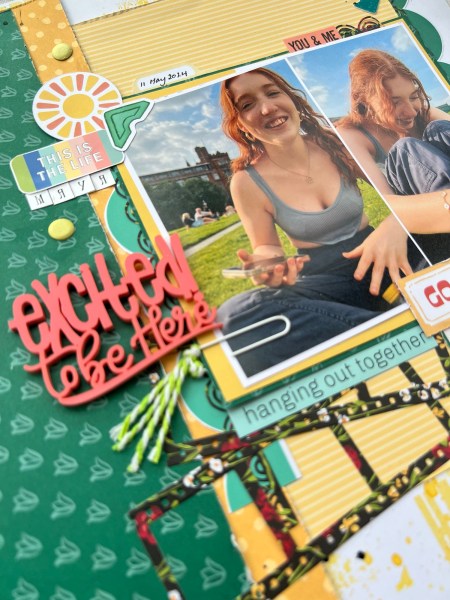
Love the way the title worked – so pleased I remembered when I came to finish the page (I did it in two sessions) that the box had this in it as had been struggling with titles having not got the right letters in the right colours.

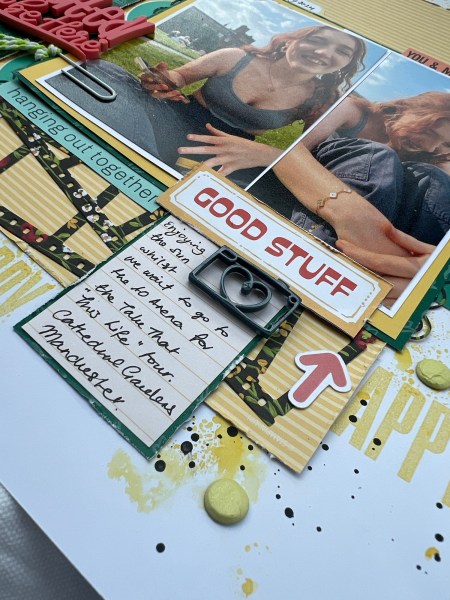
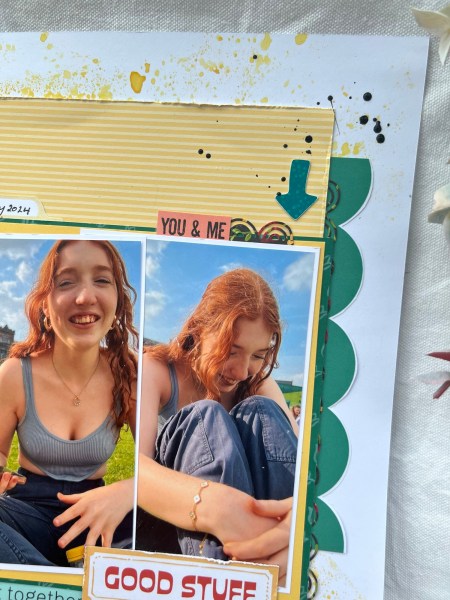
As usual a bit of mixed media going on in the background using the packaging technique and some black gesso splatters.

Love how this came out.

Happy crafting!

Catherine

#1skh3wys

#12x12layouts

#memorykeeping

Use embossing challenge at UK stampers forum

I decided to join in the challenge of use embossing at the UK stampers forum over on Facebook. And went to town with my embossing!

I videoed the process so check that out on YouTube.

I started with an inky background and embossed the debossing! I chose the pearlescent powder so it’s a subtle but beautiful finish to the background with that brocade design folder.

Then I stamped all the flowers twice from the smile more stamp set from Altenew. I watercoloured them loosely with inks and then embossed the line art over the top for more embossing but I also love this look. Then I die cut them out and layered them in a cluster diagonally across the card.

I then worked on the sentiment cluster with the stamps from the set. I embossed the Be Positive with the same purple embossing powder and then stacked the die cut up a few times.

I decided it needed some separation from the flowers so using some Sizzix dies I added the circle and the banner. I inked the banner with the same ink I had been watercolouring with.

I added a nest of the waxed thread behind the cluster too to add some more texture.

Then I finished off with the purple sequins.

A fun & very shiny card made for the challenge!

Happy crafting!

Catherine

Festive Friday

Hello! Today I decided to use up some bits left from one of the Christmas in July projects!

I took the floral element I had stamped, water coloured and embossed previously and then also took the panel of Blackberry Bliss that had been cut to size previously and added some stamping to that.

I used a script stamp and a splat stamp for that background.

I then added some patterned paper as a torn strip down the background. This gave an interesting contrast.

I used the same sentiment as last time which is a waffle flower and then some pale pink gems to finish off.

So this is different from the project that some of this was leftover from although still similar given the same focal image.

Happy crafting!

Catherine

DT: Creative Knockouts – outside fun

Today I have a design team creation using an image from Patties Creations – Beach Time for a card themed ‘outside fun’ for the latest Creative Knockouts blog.

I went quite simple for this which is unusual for me!

I started by printing the image out and watercolouring with distress oxides. I chose the oxides because I wanted the muted chalky look you get with them.

Then I tore around the image for a rustic look.

I then chose some cream cardstock and die cut it with the watercolour stripes Altenew die which I’ve had in the stash for ages and never got around to using till now!

I kept it simple by just leaving it plain and mounting it onto the same colour cardstock.

I wrapped some linen thread around the panel several times and then using some scrap cardstock I added three bits underneath on either side of the thread to add the torn topper panel. This keeps it slightly raised off the back panel but not too raised like it would be with foam.

I then added the sentiment which I heat embossed onto black and cut a little banner end.

I chose the bronze dotty card Candi to finish off.

Simple and sweet. It’s a slightly wider card than I normally make (it’s more of an American size with that card cover die) so it will have to have a larger envelope like a 5×7 but I don’t mind the odd size. The crumb cake base works well with the linen coloured thread.

Happy crafting!

Catherine

Waffle flower fall leaves bundle

I decided to use all the waffle flower fall leaves bundle of stash on three gelli print backgrounds to make two autumnal themed cards.

I videoed the process so please check out how I put these together.

This one I added a few pierced blooms flowers to it as well and the oval die cuts are a bit of a change for me as don’t often go for oval shapes.

Love the dimension from those die cuts and all the different colours and textures in the background.

I used the cover die on the second one as well which adds loads of texture.

I also love the texture this background has from the paint from the gelli print.

I also love the addition of the linen thread on. It’s a lovely different addition to the cards that works well for more masculine cards.

Sentiment I chose was from Beautiful Flowers by Simon Says Stamp – love the clean look of the font.

Inside the cards I added scraps and leftover die cuts along with the stamped sentiment again.

Really enjoyed putting these cards together – great to put this bundle of supplies to the test as well as using up some ready made backgrounds.

Happy crafting!

Catherine

Altenew splendid bouquet play

Once again I got the Altenew Splendid bouquet bundle out to play with … decided to stamp, stencil, die cut and emboss … yes I used all bits of the bundle!

After stamping with Sahara Sand so it was light line art I used the stencils to colour the image and then die cut.

I then took some watercolouring pencils to add even more colour and definition to the images.

I then ran the piece through the coordinating embossing folder.

I took a piece of white cardstock for the background and stamped the image a few times, rotating the image to create the background.

I added some creamy lemon cardstock as a panel for the focal image to sit on and then adhered it together.

I then used some copper thread behind the sentiment.

I also added a few of the die cut banners under the sentiment as extra embellishments. I added some tiny pearls as the finishing touches and that bit of extra texture.

Happy crafting!

Catherine

Waffle flower feathers and old Making Cards magazine papers

Had a lot of fun putting these three cards together using really old patterned paper stash!

So bright and fun!

I die cut some of the rectangles using waffle flower dies I got in the sale at Seven Hills Crafts and layered them up in different configurations with the Coastal Cabana cardstock too.

I then stamped all the feathers and fussy cut them out.

After I had chosen the way I wanted them to be it was time to do the sentiment.

I chose to construct the sentiment from the Altenew set for the strip and the Biggest Wish SU set for the birthday.

The Birthday I stamped and embossed using white onto the coastal cabana cardstock and then fussy cut this out.

I then added gems to each card in a mixture of colours – one silver, one black and one dark grey.

I used leftover scraps of the paper for the inside of each card and then trimmed one down to be slightly shorter a card as it didn’t look right off to the left as I had mounted it.

Really love this set of bright cards and they were really fun to put together – I think those feather stamps are great too for a fun and bold card.

I did remember to video the process of doing this too so check this out on YouTube.

Happy crafting!

Catherine

V’s birthday meal scrapbook page

I grabbed some old stash papers and embellishments from Lollipop box club kits and made this page with a picture of us all at lunch for the hubby’s birthday meal last year.

I actually made this over several weeks in three sessions because I kept getting distracted and putting it to one side. I did however video all of it (except some fussy cutting and sewing) so check out my video on YouTube.

Loved using some old papers and that music print in particular I’ve been hoarding for some time so it was good to be brave and just go for it ripping a strip off for use! Now I know I will use the rest of it too!

I enjoyed adding the sewn elements too – it’s definitely something I like doing to add texture. Unusually though no mixed media! I think I just felt like with the torn edges and the other elements it didn’t need it.

Hope you like this – I certainly liked adding in those old paper mania bits I fussy cut out to make what could have been a girly page with the pink flowers into something a bit different. Definitely think I was channelling the theming in the Bills restaurant!

Happy crafting!

Catherine

Gelli print scraps and waffle flowers leaves

I shared over on my YouTube channel how I make gelli print backgrounds – and leftover from that were these two pieces of torn paper with lots of lovely texture, pattern and colour so I had to get them used! They were just too pretty to throw away!

I glued them to the black cardstock square. Then I chose to use the waffle flower Greenery leaves that I had already die cut on a previous use of the die. They created a nice cluster for the sentiment to sit in.

I added some velvet trim across the panel and then the black gems to add texture and embellishment.

I think with the gold within the paint this is paper gives me luxury and opulent vibes!

Perfect for an anniversary card I think!

I raised the panel up onto foam so it has dimension and it helps to also frame the panel on the 6×6 card base.

I love how you can’t really control gelli printing results (well some people can but I am not talented enough for that!) so you end up with surprise treasures like these torn scraps that make some fun cards!

I did film putting this together as well as the gelli printing process so please do go check that out too.

Entering this into the anything mixed media challenge at Creative artiste mixed media blog

Happy crafting!

Catherine

Festive Friday

A cheat festive Friday for you today as I actually made and shared the round element of the card some time last year but then when hubby went to write the inside of the card he made an error and we couldn’t send the card so I rescued the topper ready to use again another time!

Then I also stamped and embossed the snow Crystal image for other projects but never got around to using it … so decided it made a good base for this topper and so stuck them on the card.

So really it’s a super quick project when this happens but obviously the effort went in the first time I made the card!

So given that I finished it (again) I thought I could use it for this weeks festive Friday project!

Happy crafting!

Catherine