I am an on-the-side and increasingly up front papercrafter who loves nothing more than getting inky and creating pretty things with paper and stamps!
I am also a wife to lovely hubby and mummy to a wonderful 14yr old princess.
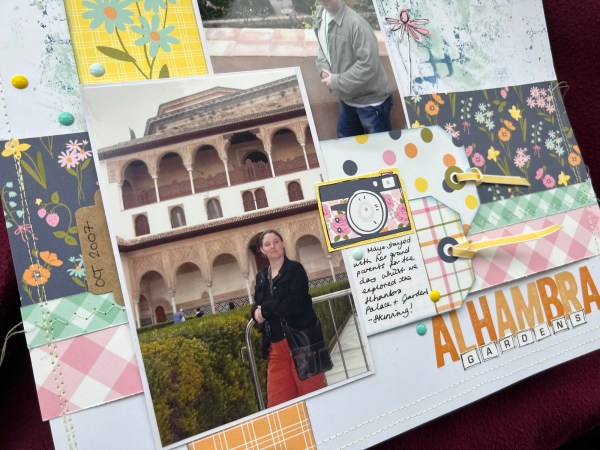
My lovely and talented friend Helen is celebrating surpassing her 500 subscriber milestone over at YouTube so I joined her with making a page with a few instructions.
Use tags
White background
Stitching
2 or more pictures
Mixed media / doodling
So here is what I made …
I videoed the process and have that up on my YouTube channel.
I used the kit I got from Hey Little Magpie at the crop last weekend and had lots of fun playing putting this together!
Some distress oxide playing on the background and lots of sewing around the edges.
Love the little tags and those cute flower die cuts too!
Hope you like what I did and also go support Helen with her celebration!
Today’s card is a use up the scraps on the desk card … just because that’s what needed to happen and it’s pretty much all I had time for to create this! Plus I have a thing about adding strips of patterned paper to cards at the moment!
The strips were cut ages ago for a different festive Friday project and just sat there … so I put them together to show stripes of each side of the paper and then cut a panel that would work on a card front… with an angled finish. To be honest if I had thought it through I would have adhered them the other side up so the angle was the other way as that works better in my eyes but sometimes that’s not how it goes!
I then created a little focal topper from a stamped image and then added the little snowflakes and unfortunately when I created the mat from the red I got a spot of red on the topper so decided to go for a blended ink finish.
It’s not perfect but it’s still cute!
I added some die cuts from the stash underneath to create a cluster look to the focal point and then an embossed sentiment to finish off.
I say finish off but I then decided to add glossy accents to the centre of the snowflakes … not sure it adds much but some days you just end up doing these things.
So my project is done. I feel good for making use of the scraps but I won’t lie it’s not my favourite card I’ve ever made. Sometimes it just goes that way and I’ve learnt the point of me crafting is sometimes just the doing not the final product! And I still think it’s ok… just not one of my favourites!
So I had a very lovely few hours making lots of backgrounds whilst watching Tim Holtz on YouTube – I just played with distress inks and distress oxides and made lots of backgrounds as works in progress for me to grab as and when I fancy to make cards from.
Well I grabbed this one and started transforming it just by playing and grabbing stuff … no plan to start with and certainly wouldn’t have guessed where it ended up!
So I can see blues and greens and stencilling in there and I’m guessing a mix of oxide and ink but who knows? I think I used most of the colours in my collections during the play just grabbing them randomly!
So I started by grabbing a stampin write marker and adding definition to the leaf stencilling.
But then I was less keen on it … so needed a way to cover it up! out came the zero waste leaf die from Altenew and white cardstock.
Hmmm … still not happy .., but then I spotted a pouch of cut apart dsp that I refound whilst tidying the other day and put it on the desk to get it used… and hey presto a card came together!
Most of the background is covered but it is still visible in some spots and the colours went well with the greens of the leaves and the contrast of the red.
And I used up lots of the dsp left including all the cut apart pieces so I was very happy to put it to good use in a way that surprised me!
Added two gems from the stash and also a sentiment I had die cut and stacked (Waffleflower).
I say this is the final set because this is where I got to … but doesn’t mean I won’t make more as making these quick and easy little projects using up stash and scraps is so much fun!
These ones I grabbed pre coloured digital images and fussy cut them out as the focal images. I also added these black chalkboard type stickers I found in the stash!
What has made these projects so easy too is the sentiments … I just stamped lots of the sentiments in one session and embossed them and die cut them and stacked them … all from my scraps and have them sitting there ready to use. In this case silver embossed the Waffleflower ones!
And then one more with scraps of the scraps all made into a little collage …
Then the stamped image and the sentiment … in this case I also added some staples to add to the collage effect!
Normal cardmaking projects to resume tomorrow – but I did enjoy playing with scraps and much loved old dsp to make these little notecards!
Following on from yesterdays I got in the zone and made more little notecards from old dsp …
Some I added die cut flowers which I cut from scraps of cardstock and then added the sentiment…
Others I added the little stamped image I coloured with ink and water…
I also added a little stamping to the panel of grid dsp on these.
I kept going just using up the dsp I couldn’t bear to throw out but knew I needed to not hoard any longer!
This final one for today was simple.
Throughout these projects I’ve been refusing to use anything but scraps and managed to almost clear out the little pouch of small scraps to make them. impressed with myself!
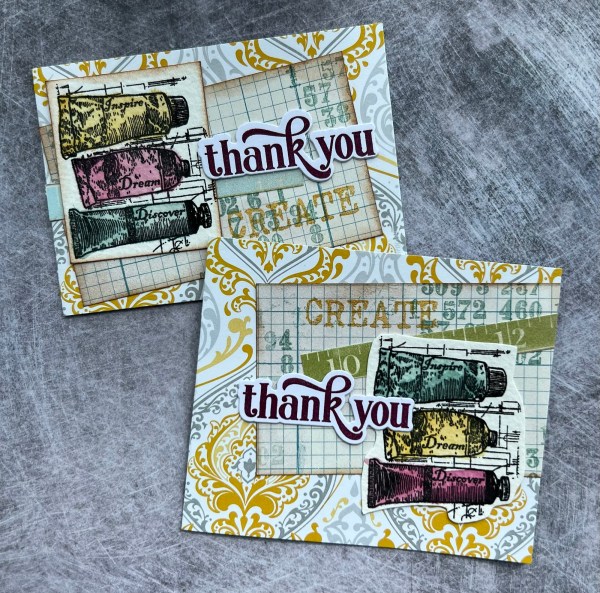
I’ve been trying to have a big clear out in my craft room and came across a box that had offcuts of dsp in that I love so didn’t want to just throw away but I knew I need to start being ruthless with them. As I am currently selling some of my stamps and dies I decided to make some cute little thank you cards from them to enclose when I sell something … this way I’m putting them to use but not hoarding them for projects yet to be determined which may never happen!
These six I used My Favorite Things stamps of the cats and dogs to give them a similar theme!
I added strips of other dsp or bits of cardstock that were in the scraps pouch.
They were simple to put together and inside each I added the white cardstock as a panel to write on.
I also made these two just from bits and pieces I had to hand already coloured…
A simple but satisfying few pieces used up … now really need to get back to being ruthless and tidy up!
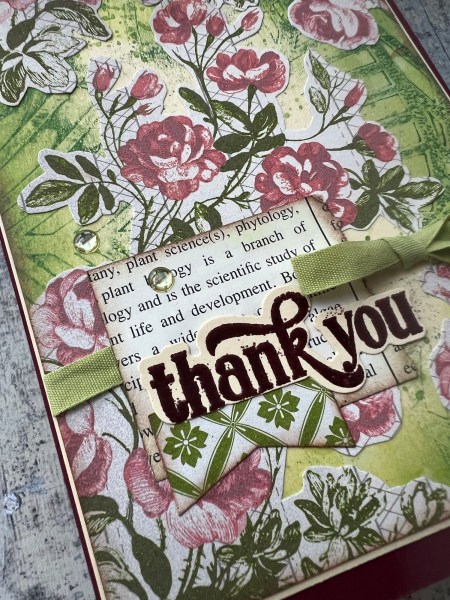
Yesterday I had a lovely crafty day with my friends at a crop in Warrington. It has been ages since I’ve crafted with friends and years since it was in person outside of my house! So I packed lots and lots of projects and things to play with. Some of the things I made I will share as and when I get a chance to blog but had to share this one today.
After doing some other projects I had these tiny scraps of patterned paper and part of a flower left but was struggling to throw them away … so Helen challenged me to make a card from them. She also helped choose the background panel from the stash of recently made ones I had packed for the crop.
I added some stamping to the background with an old Craft Stamper magazine stamp and distress oxide and then edged the panel.
I also used a grey pen to edge the pieces of patterned paper. I also found some white die cut leaves in the stash I had taken to finish off the flower.
I then added the sentiment to the cluster. I added a panel of white to back the patterned paper.
When I got home I finished the card adding it to the card blank and then added some gems to finish off.
All in all I made quite a few card panels ready for mounting onto cards and finishing off with gems etc. I also made a few backgrounds and quite a lot of mini notelets … oh and I chatted lots, met new friends, ate yummy brownies and had a thoroughly lovely day!
Today we are celebrating Easter Sunday as we had to write off last week due to illness – so off to my parents for a yummy lunch and some fun! May get a chance to craft later but depends on the energy levels as still not up to 100% yet so will see how I get on!
On Tuesday I discovered some paints had dried up so in a bid to make sure my paints were ok and get rid of those that weren’t I had some fun gelli printing! After all part of the fun of decluttering and tidying is playing with what you find along the way!
Well I may have got rather distracted with the playing…
Well once I had cleared away the paints and trimmed the papers I had made I grabbed the top one … the one with the leaves at the sides and decided to get something made with it!
I first added some more green to the edge using Mowed lawn distress oxide and then splattered with the same.
Then I grabbed old dsp that that I had cut up and layered all the flowers around the panel and adhered them down.
This totally changed up the panel and made it more vintage rather than grungy I think.
I wrapped some green ribbon round the panel with a little bow to one side and then picked out some scraps of text paper and a little bit of leftover dsp (this is reverse of the floral side) and inked up the edge and layered them up over the ribbon.
Then I added the sentiment that was embossed and die cut.
I mounted the panel on cream and then Merry Merlot. I also added some gems that coordinated.
Love how this came together and really pleased with all the gelli prints I’ve got to play with! Plus one whole box cleared out with paints that had gone off which is frustrating and satisfying in equal measure!
Todays card is carrying on with the stash I used for last weeks cards… I had stamped and watercoloured one more of the floral images and then I grabbed leftover paper strips and a piece of the cream cardstock leftover from the previous cards and made this…
Strips of the patterned paper added and then the floral element connecting them with the sentiment on the background …
Such an easy card to put together and just added the card Candi and some doodled stitches to finish off. Mounted it on black for the frame and then onto a card blank cut to fit.
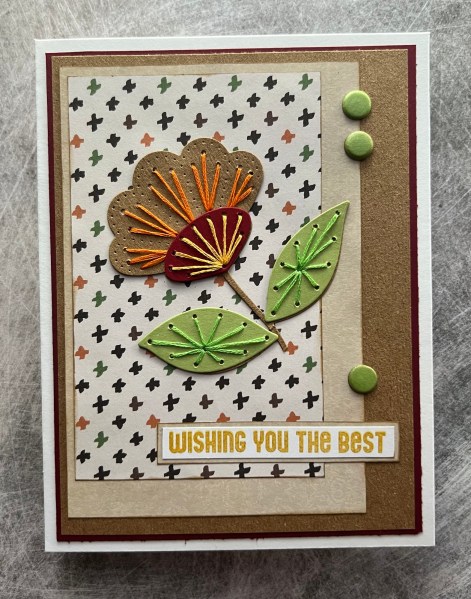
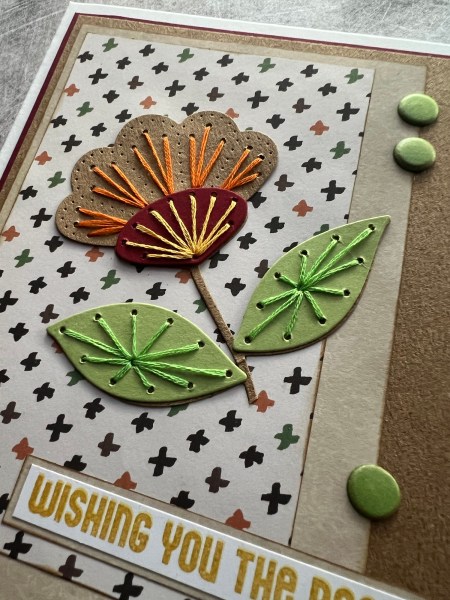
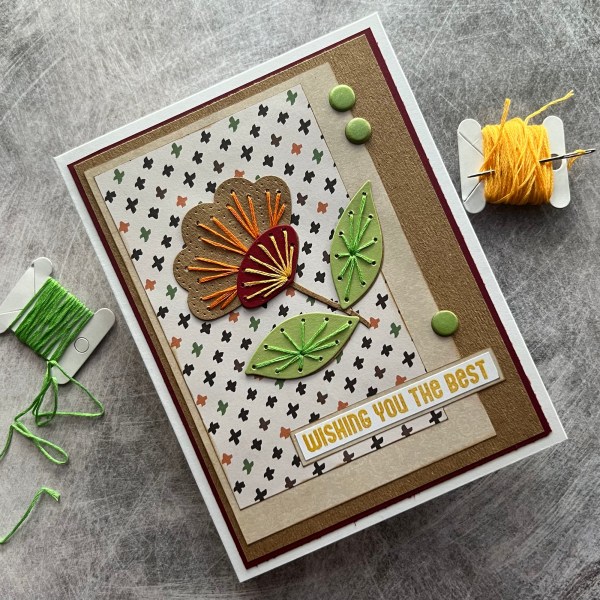
This card I made ages ago but never got round to sharing … better now than never!
It’s one of those stitched flowers I have had in the pouch of ready stitched elements and on the day I put this together I was in a use patterned paper kind of moods! So I grabbed papers I thought worked ok together and worked with the colours in the flower I had stitched. I actually trimmed this flower as didn’t want the stem to be as long.
I added ink to the edges of each of the panels of paper to give them a frame and stuck them down. No dimension just flat with the inked edge worked fine.
I added the Kraft back panel to tie in the colour of the flower and the stem.
I added the sentiment which I stamped in the Hello Honey colour as I thought that worked well with all the elements in the card.
I trimmed down the card blank so it’s about 6×5 rather than the usual size of 7×5 as that worked better with how the layers looked.
Finishing touch was to add those three card candi on the edge of the middle panel of patterned paper … this pulled out the green of the leaves and from the patterned paper.
Cute card and quite different from the other cards I have made with these stitched flower dies.