Festive Friday 2025 #26

Half way through my challenge to make every Friday a Christmas themed project and ahead of my Christmas in July series I went for simple!

Obviously they aren’t actually that simple because of all the sewing – but because these were already die cut, sewn and assembled it was just a case of choosing how to add them to a card with layers etc and a second sentiment added (again these are premade sentiments so simple!).

Probably took my about 15 mins to make these two for this final stage – but let’s ignore all the time I spent sewing them probably at some point last year! 🤣

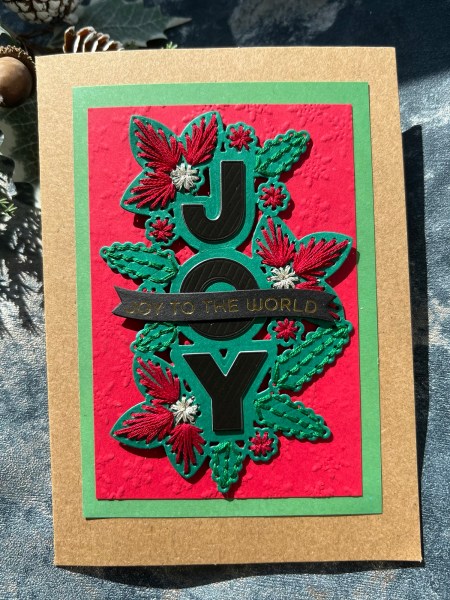
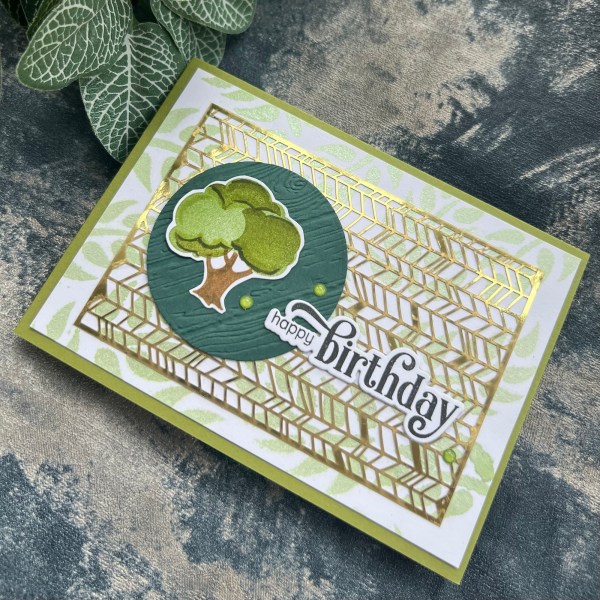
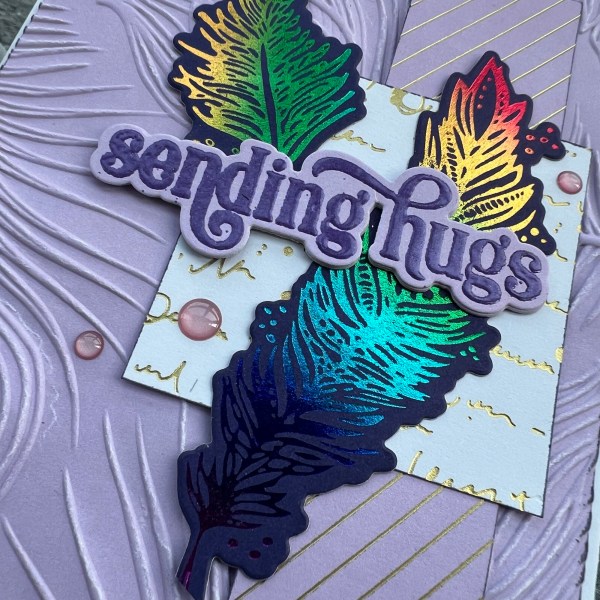
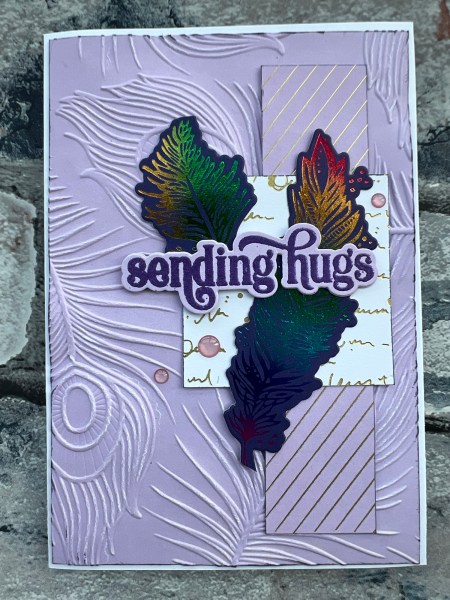
I kept this one so simple with just two panels (one of which has been lightly embossed – I didn’t get the right sandwich for my die cut machine for this yet!) and then a kraft card blank.

The sentiment is a foiled one from the stash I made a couple of weeks ago (I do bulk making of sentiments or foiling whenever I can to save time!)

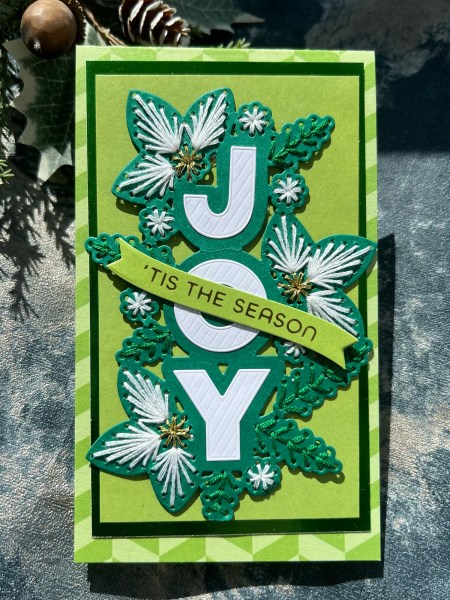
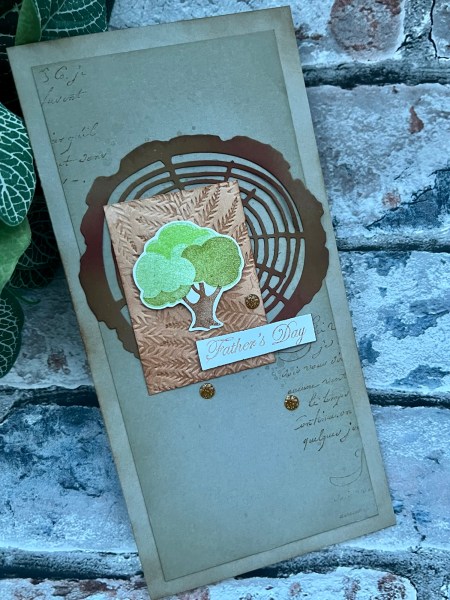
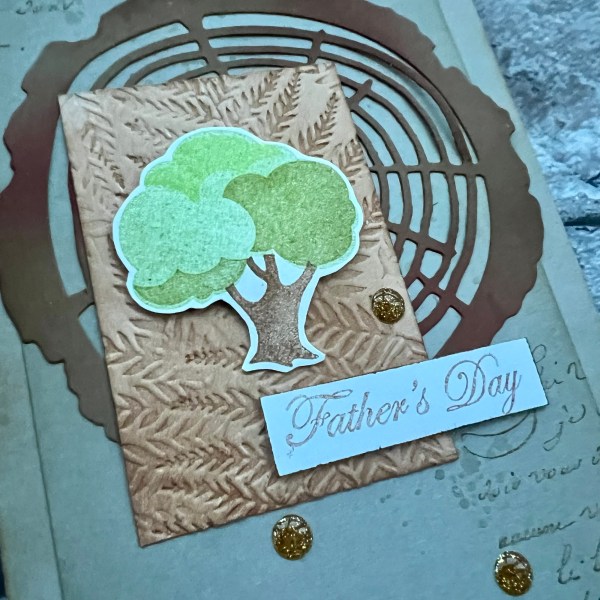
This one is one of the remaining pieces of the paper I used a few weeks ago and is a small slimline – perfect for this tall slim focal point!

I added the foiled cardstock behind the plain green to add interest and again one of those foiled sentiments.

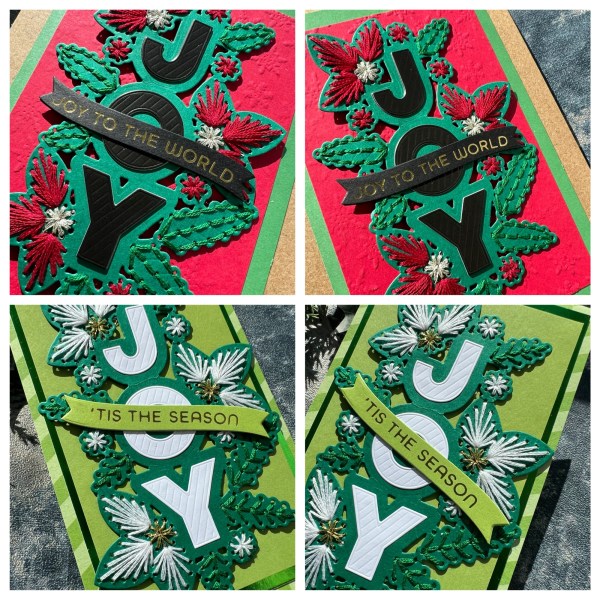
Love how these came out as finished cards and how easy it was for me to make – essential as I am in the thick of planning for Christmas in July and have 31 festive projects I am trying to get planned, and then some are already filmed ready to go! I’m in the nervous state now wondering why I challenge myself to do these things!

Ah well – another festive Friday done and dusted!

Happy crafting!

Catherine

Make it masculine – tree

So I am back with my monthly challenge of making at least one card a month suitable for males! This month the idea came from one of my YouTube subscribers who said she usually uses tree images for her masculine cards so I took that as my theme!

I actually used this same stamp when I made my Father’s Day card but this time went with a different feel with all the greens!

I made the background using the sprays from Kingston Crafts so they have a lovely shimmer and then used the gold laser cut panels from an old Stampin Up kit.

For the actual trees after doing the stamping I added some extra details using my stampin write and stampin blend markers – love how this gave them more dimension and texture.

And those gold panels add a touch of luxury too!

I filmed this of course so check out not just this one but all the make it masculine videos I have done so far! Half way through the year now – 6 more months to do!

Happy crafting!

Catherine

#dyicad2025 week three

So week three of #indexcardaday has not been without trials – mainly being very busy at work combined with a 48 hours of feeling poorly which meant I did zero creating!

But the week started with the chess themed card using an old stamp and then some uneven checkerboard background squares. Pleased with this!

Day 16 I went mad with the envelopes with extra ones doodled to connect the ones on the Carrabelle stamp. Just added shading not colour with the alcohol markers.

Day 17 I used the Tracey Hay Alpaca Pals stamps for the robot and the stars and added the swirly skies to decorate – cute!

Day 18 and day 19 were made one after the other and I opted to not add colouring in to the cards and instead stamped in colour.

Not as keen on the feathers one but do like the leaf sprig one.

Pleased that by the time I made these two I was back to feeling well.

Day 20 I went rainbow with the butterflies and back to a doodled background 🌈 love this one!

And then we got to the weekend!

I kept up with the rainbow 🌈 idea and went for some rainbow coloured hearts using a Lawnfawn stamp – the grey is really patchy for the background and probably should have added more doodles to disguise that but ran out of time!

Three weeks done … I think that means we are one third done! 😀

Will share next week what else I get up to!

Happy crafting!

Catherine

Happy birthday Dad!

Today is my Dads birthday and I made a sunny and bright card for him (in total contrast to the natural earthy tones from his Father’s Day card from last week!)

I used the Kingston Crafts Rainbow kit to make it as I wanted something bright and cheerful!

I created the base from the solid orange, then added the panel of the cloud patterned paper and a strip of the sun patterned paper.

I fussy cut the sun out of the long strip of suns (I’d used most of the strip already and only had two suns left). I also added the banner sticker to some orange and fussy cut that out.

I chose the Celebrate die cut as the main element and then raised the banner up on foam adhesive for dimension.

Next I die cut and stacked the letters for the word DAD and added those and some enamel dots to finish off.

Inside the card I added a white panel and then the clouds paper and the last of the suns which I had fussy cut out.

Hope my dad had a lovely birthday – we went for a late lunch at a local restaurant to celebrate which was yummy!

Happy crafting!

Catherine

Scrappin Saturday – it’s the little things in life

Today’s scrappin Saturday post is bright and cheerful! And with the exception of the base of pink it was entirely made from scraps and older embellishments from the stash!

I used scraps I had in my scrap folder and chose this larger panel of rainbow stripes and then other pinks, yellows, oranges and blues.

I chose to scrap a panel of three photos taken when we had a family games night and chose to concentrate on the bright colours from the central photo of the board game.

I used lots of the word type pieces from the embellishment box – most of these are old Lollipop Box Club kits.

I also added in foam stickers from the stash to add both the title and some of the hearts and stars.

If you want to watch I did video this page … here it is on my YouTube channel.

Love this! So bright and cheerful and really reflects the fun we have when playing games. The day I made this page we had another games night – although admittedly we did a WiiParty games night rather than board games – but still lots of fun!

Happy crafting!

Catherine

Festive Friday 2025 #25

I decided to give myself an easy task today by using the pre die cut and inked moose as my topper and a pre foiled and die cut sentiment.

I then chose two pieces of patterned paper and a bit of foiled cardstock to make my card!

I started by just putting the two papers together with tiny strips of the foiled cardstock on either side of the red to make it look like a mat.

Next die cut the label from the foiled cardstock and then embossed it with an old magazine kit folder. This distressed the foiling but I think it looks great with the white peeping through the shine – especially as I knew most of it is covered by the moose die cut.

I added the moose with glue and then stuck something heavy on top to let it dry as it was sticking to different textures and levels.

Then I grabbed my sentiment and edged it with a brown promarker to add some definition to the edge. This helps it stand out as I was adding it to the brown of the moose at one side.

I added foam tape behind the right hand side of the sentiment and then glue on the part touching the moose to all for the layers that were raised up.

I then added some dots of the glitter glue to the moose accessories for a bit of extra fun!

With all the Kraft and browns on the focal points I thought this worked best on the Kraft card base and decided nothing else was needed.

Forgot how much I loved that painted christmas dsp that is the background – it’s so pretty!

Well I only have another 10 days and then I will be off on the Christmas in July challenge where I will attempt what I managed last year – 31 videos of festive themed projects! I am getting ready for it in the background at the moment – and yes I’m getting a little nervous about how much there still is to do – but sure I will get there!

But for now – it’s festive Friday number 25 done! ❤️

Happy crafting!

Catherine

DT: Addicted to Stamps and More #495 – use die cuts/stencils

Hello! Another design team project to share with you for Addicted to Stamps and More! And this fortnight the theme is Die cuts / Stencils.

I was playing with scraps from the pouch and foiling some of the Dina Wakely feathers – also a small square of white and then another scrap of the diagonal stripes too!

And from that little play came this card!

I die cut the feathers out with the coordinating dies. I also stamped, embossed and die cut the sentiment so that’s the challenge element.

The foiling on the feathers is using the gorgeous rainbow foil on the dark purple cardstock – it’s so pretty!

I then used the satin gold for the two other panels.

Then I grabbed the peacock feathers embossing folder I bought in the sale at Spellbinders and did the full background panel with that.

I edged each panel with a lilac ink to give some definition. With hindsight I wish I had gone for a slightly lighter colour ink but never mind! Still looks good.

I didn’t add any foam for dimension as I thought the textures provided enough.

I did add three of the gems to finish off though as I felt it added a different texture to the card.

Kept the base simple with a white card blank.

Yes it is official – in case you hadn’t worked it out by now – I am addicted to foiling!

Happy crafting!

Catherine

#dyicad2025 week two

Hello! Here is my round up of this weeks index cards for #dyicad2025

Day 8 – I went fishy mad! But isn’t this the cutest? As I had a little more time on my hands (weekend) I pulled out all the colours and that helped build this lovely pattern – I think this would make a lovely fabric to make a skirt or dress for the summer!

Day 9 – this one was inspired by the sentiment sticker and so I took an old magazine kit stamp and did the colouring with the promarkers and then added the glitter glue to the veins in the leaves to create the glitter element. Also love the shadow I created for the leaves so they look like they are floating above the doodled background.

Day 10 – decided to not stamp over all the card this time – not sure I like this but hey – it was an experiment and like the sentiment says – you learn by doing!

Day 11 – back to loving it! Big bold stamp for the leaves and stems and then echoed the design (the talented Darcy designed the stamp) with my doodles – went for a green theme! 💚

Day 12 – another Darcy stamp from Paperartsy this time created a patchwork effect and went full on with colour! Had to do this over two days so was a little late in posting this one! But it is so cute! Love it! Again can imagine this being a cute fabric!

Day 13 – subtle colour this time and very much inspired by the card I made on day one but with a different floral and the addition of a pop of light yellow! I like how this looks – and doing those background doodles is really fun and calming so suspect we will see a lot of these over the 61 days!

Day 14 -I almost forgot day 14 as I had a really busy Saturday – so just as I was about to go to bed I remembered and grabbed the first stamp set to hand and made this one – very much more about the colour than the doodles!

The last card I did break from the sticker sentiment as I actually stamped this onto card from the same stamp set and then adhered that as if a sticker! It is easier to do a sticker but on this occasion I couldn’t be bothered to stand up and get one! Total laziness at 11pm!

Wonder how this series will progress …

I think as I own so many floral stamps that this will become a common go to in my cards if I stick to the stamp, doodle, colour theme! but hey let’s see how it goes!

Happy crafting!

Catherine

Happy Father’s Day

Happy Father’s Day to all the Dads out there but especially to my dear Dad and my lovely hubby.

This is the card I made for my Dad. I kept it quite plain and went with a tree theme (be aware I’m going to revisit this theme later this month for the Make it Masculine series).

I started with the stone coloured cardstock – cut a card blank and also a panel smaller on the front and added some ink to it to create different shades. Then I added the little bit of script stamping on the sides and then splattered with the brown ink.

Then I worked on the focal cluster. I die cut the tree trunk die from Altenew from a dark brown and added some ink to that too so it would have variation in the colour.

I then took a panel of a peach cardstock and inked that too. I rubbed the brown over the Fern embossing folder and embossed the panel so again there was some variation in colour for this textured piece.

I used a small layering stamp set from Altenew to create the tree and different inks to create the cute little tree. I fussy cut it out and layered up some scraps underneath to be able to give it some dimension as a focal point.

The sentiment is an old one from Crafters Companion – I stamped it in brown and embossed it with clear to give it a little shine and then cut the sentiment into a strip and inked the edge.

Finally I added the glittery gold gems to finish off – a bit of shine but not too glitzy to keep the masculine theme!

Love this natural looking card. Hope my Dad liked it too!

Happy crafting!

Catherine

Scrappin Saturday – Joyful Paris

Today my Scrappin Saturday post is one I made last weekend of the picture of my daughter that her friend took of her in Paris back in February.

I chose these elegant papers from the stash that are old Stampin Up ones.

The idea for the page came from an old 30 days of sketches sketch I spotted but now can’t work out which it was …

My lovely friend Helen has worked it out – @scrappy_faith on instagram designed the sketch for 30 days of sketches 14 day 5 – well done Helen!

… it was basically the idea to have strips of patterned paper down the sides. So that was what I went with, taking full advantage of the double sided papers!

I added the rub ons from 49&Market to both the background panel and some of the strips too!

I added scruffy sewing using my machine down each side and also on the photo cluster.

Then I added lots of die cuts from the Songbird collection from 49&Market to the photo cluster and raised that up on foam to give it some dimension.

I then added the sewn flower embellishments I got from Hey Little Magpie and also some sequins.

This added some lovely different textures.

I chose the title from the die cut pack as it fit with how happy she was on her trip to Paris. Jealous would be how I felt! 🤣

I added the journalling to the bottom of the layout under the photo.

I love how well that sand coloured cardstock went with the papers – the cardstock is actually a sneak peek of the Kingston Crafts pastel cardstock coming soon to Hobbymaker 🤣 don’t tell anyone you saw it here first! And seriously considering buying it when you see it – it is both gorgeous and excellent value for the size of the pack you get!

Love how this came out – a fun design (thanks to the mystery sketch designer who gave me the idea!) and if you want to see this come together I did video it all so check out my YouTube .

Happy crafting!

Catherine