(Inter)national scrapbooking day – Hey Little Magpie challenge 5

Hello – another of the layouts from the weekend of challenges at the Hey Little Magpie Facebook group for (inter)national scrapbooking day – this time the challenge was to use hexagon shapes. Once again video up showing the process over on my YouTube channel.

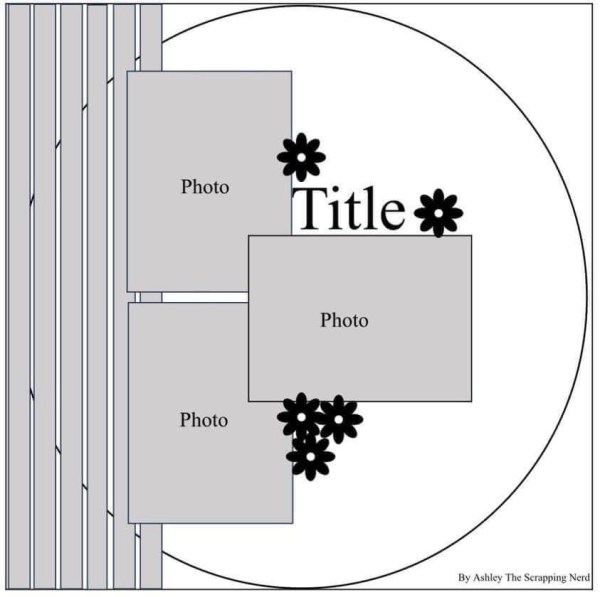
I teamed this with the #30dscbl14 sketch 25 from Kirsten Hughes too …

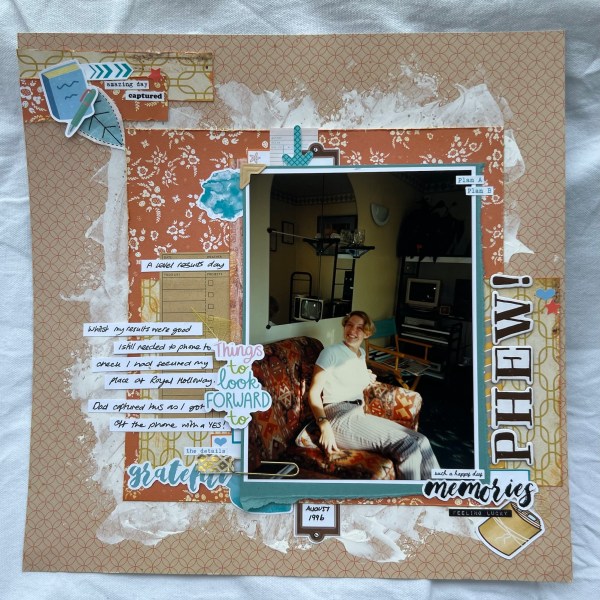
I chose some old dsp which has hexagons as I had no other hexagon shaped stash. Just love this paper so although it was a challenge to cut into paper I have been hoarding for years!

I loved putting this together – but it did go through a few different ideas as I put it together – want to see? Check out my YouTube video of the process.

I loved scratching the coordinations background with sandpaper when I remembered that was an option!

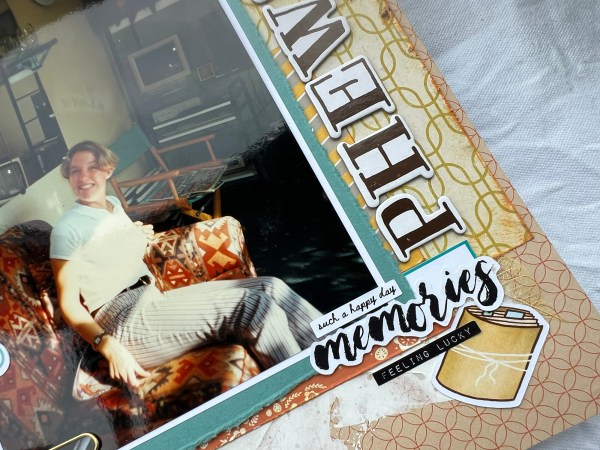
I also love all the sewing I did on the layouts to add some additional hexagon shapes and the little cameras I cut from the Lollipop box club kit stash.

So another fab page and pleased I could join in with the challenge with my one piece of hexagon stash!

Happy crafting!

Catherine

(Inter)national scrapbooking day – Hey Little Magpie challenge 4

Still catching up with the sharing of everything I made during the (inter)national scrapbooking day celebrations at Hey Little Magpie Facebook group.

For challenge number four it was Helen’s challenge to pick 5 from the list she gave …

I went with 3 patterned papers, twine, stamping, stencilling, banner and just for good measure a sixth option of distrssed edge!

I chose to scrap some pics of the day we loved my parents to their new home!

I added stencilling to the base panel of blue, lots of distressed edges, some cute house themed papers and lots of Lollipop Box club bits and pieces for the title and embellishments.

I added the die cut hearts (I used these a lot when doing these challenges) to finish off!

Loved making this – and even though I started worried that because I’d chosen two not three photos I might not do them all – but then managed to do six of them!

Once again I captured the process on video so please do check out my YouTube channel for this and my other makes.

Happy crafting!

Catherine

Art by Marlene little notecards

Some years ago I went to a workshop run by Marlene and had a fab time – of course I also bought some stash. Roll forward many years and art journalling no longer floats my boat and the images and papers aren’t ideal for the usual cardmaking I do… but I’ve held onto them just in case. Well no more! I’ve been in a ruthless get rid mood the past few months but inspired by the little notecards I’ve been making with scraps I decided to do the same with this stash and create little notes for enclosing in with any crafty stash I sell! My thought being that crafty peeps will enjoy the bit of fun!

90 mins later I had made these nine notecards. Lots of glueing and doodling and a few additional sentiments added where I couldn’t find the right sentiment in the Art by Marlene die cuts.

Just love how colourful and fun they are … and of course how simple to make.

Most had around three pieces of the collage paper glued down and then doodled outlines and then went to town with die cuts … most of which I fussy cut after taking them out of the sheet to give them a smaller white frame.

I had a few of those “I see no reason…” sentiments already stamped and embossed so added those and also a few Hello sentiments stamped and die cut … all in all simple!

Happy crafting!

Catherine

(Inter)national scrapbooking day – Hey Little Magpie challenge 3

Another gloriously sunny day here today and so we are planning bbq burgers this afternoon – until then a few chores and little sits outside the sun!

Third challenge for the Hey Little Magpie celebration of (inter)national scrapbooking day and this time challenged to use my border punches… hmmmm… I only have one border punch – but I made it work!

I was inspired for this page by two layouts that Sarah Davies had shared …

The first one with the rainbow and black and the second one with using scraps … so my page I chose black and white papers with pops of colour … but I think you can see how Sarah’s pages were the jumping off point!

As with the others I did video the process so please check it out on YouTube.

I created strips from the papers and punched them along one edge and then tore the sides. I then grabbed scraps for each colour for the rainbow effect.

I then used a piercing tool to create the three hearts and stitched them with black thread. This was fun and quite relaxing to do on the sofa as a break from sitting at the desk.

I then added lots of die cut hearts across the page which I doodled onto.

I decided not to add journalling as such – I just added the date, venue and the title and then lots of little word stickers from old Lollipop Box Club kits.

Was delighted with the final page and this was the third in the one day … so here is the collection of the three …

Happy crafting!

Catherine

(Inter)national scrapbooking day – Hey Little Magpie challenge 2

Sun is out for the day and I am off to get my hair done (last weeks appointment got postponed) so updating my blog for the day whilst drinking my coffee! Today I am sharing challenge two for our Hey Little Magpie group over (inter)national scrapbooking day from a couple of weeks ago where the tile was was to use dies to create embellishment clusters.

I chose pictures from my daughter’s 17th birthday in 2023 and used the really bright and bold papers for the background with lots of die cuts adding to the page.

I fussy cut elements of the paper out too and used dies from a variety of sets to create the clusters of embellishments.

I loved gathering lots of different alphas for the title too (necessity because I couldn’t use any set to spell the complete word!) and loved how easily this came together.

Although it is barely visible I also added sewing on the layout – can you spot it?

Fun to put together and also even though that flowery paper is quite ridiculous in its boldness I love it!

Don’t forget to pop to my YouTube if you want to see how this came together!

Happy crafting!

Catherine

Festive Friday

Today’s festive Friday project had lots of layers of media and pattern and I love it!

It started as a gelli print background and I wish I had a picture to show you the before and after but I don’t! So first off some painty patches and a bit of stencilling onto the gelli print. Then I ran it through a snowflake embossing folder upside down to create the debossed snowflakes. Then I inked over that with a dark teal ink. This left the snowflakes lighter and still white in the places where there wasn’t any paint.

Next the text embossing folder and once that was the texture I added ink over the top of that in dark grey to enhance the writing. Next splatters of white gesso!

Just love all the texture and pattern this created.

So then to choose a focal point. Well I started with the die cut holly leaves. These have been cut from scraps of paper at some point and I have a little pouch of them so decided it was time to use them! Which made me decide a wreath would be a good idea.

I chose the spellbinders one and stacked it a couple of layers to give it some strength. Then I rummaged in the Christmas stamps box and decided these flower stamps would work which are on an old magazine set.

I stamped them and then decided to choose my Stampin Write markers and a blender pen to colour for a change of medium.

I cut them out and then made up my wreath. I used foam squares to give it some dimension and then added the sentiment from Arrange a Wreath.

I mat the layer onto white before adding to a green card base.

Inside I kept it simple with some more holly leaves and one more flower.

Really pleased with this card – truly love it when mixed media works well and also no idea what prompted me to do the two embossing folder trick but it worked so well!

Happy crafting!

Catherine

(Inter)national scrapbooking day – Hey Little Magpie challenge 1

A few weeks ago it was (inter) national scrapbooking day and for the weekend Hey Little Magpie ran some challenges … so I joined in and on day one I made three pages … which I videoed for each of them and will spread out over the next few days of blog posts and YouTube uploads!

The first challenge was set by Sheena to use a large photo (larger than 6×4) so I found this 5×7 photo of me from 1996 to scrap.

I shows me having just got off the phone on A Level results day confirming that I had secured my place at Royal Holloway University of London to study Drama and Theatre Studies and the title Phew! Says it all!

I followed a sketch from #30dscbl14 day 17 designed by Lisa Marie.

Papers from the stash (I think Maggie Holmes for some) and lots of Lollipop Box Club kit stickers too.

I had scraped gesso onto the background to give some frame to the orange piece and add texture.

Love the pop of the blue against the oranges and yellows … and it was great to get such an old picture scrapped.

Check out my video on YouTube for how this came together.

Happy crafting!

Catherine

Scrapbook page – family walks – #30dscbl14 – day 16

Hello!

Another of the 30 days of sketches with Christy’s Beautiful life series 14 and this time day 16 designed by Ashley Thescrappingnerd.

I knew when I was digging through the stash for some papers I wanted to use that there were some sketches with a circle theme so when I came across this circular piece (that was how it came) I decided to have that as my starting point and then chose the other papers accordingly – the yellow as the base and then that very colourful squares one for the section on the left.

Whilst the sketch called for strips down the left I figured this patterned paper worked fine and also added some additional strips to ground the pictures too.

I chose the pics from just over a year ago of us on a family walk around Dunham Massey which is one of our favourite national trust places locally for a wander.

I did grab a few other scrap pieces from the stash (I have started collecting scraps into colour groups in pouches so that I don’t waste but also don’t have to hunt for bits when I just need a pop of a certain colour).

Then I went through word and quote stickers, lollipop box club kit stickers and my letter stickers to create the embellishments and the title for the page.

Finished off with some gems and some journalling. Trimmed the edge just a little to have the frame of white peeping around the edge!

Loved this as it was so easy with that circle paper doing all the hard work on this page. Once again I videoed the process so please check out my YouTube.

Happy crafting!

Catherine

DT: Addicted to Stamps and More – Birthday #468

Today’s card is my contribution for the design team for Addicted to Stamps and More and the theme for this one is Birthdays! Not so difficult for me as I make lots of birthday cards!

This one I used a few of the papers where I had brayered off during the gelli printing session I did a few weeks, actually may even be months ago now – time flies! Anyway when gelli printing or using paints I always keep papers to the side of me for mopping up or cleaning off the brayer and they also make great backgrounds.

This one was only painty for part of the panel but it worked well to ground the large floral image I used to stamp and emboss. This is Beautiful Flowers stamp from Simon Says Stamp that I have been wanting for a long time because I keep seeing it on Amy’s videos.

After stamping and embossing the panel I did trim it down a little and then added those lines round two edges of the panel as a sort of frame. I then mat it only the black.

I added some foam and then added this on top of the other piece of brayered off painty paper. Although not an exact match it was close enough to work as a backing piece.

I finished off with the sequins and some floss tied in a bow and an Altenew sentiment stamped and die cut.

Inside I stamped one of the single flowers from the stamp set directly onto the painty paper (again another not completely the same but similar colour tones papers) and cut round it before adding it. Not the most exciting inside but at least it works with the front.

Really love this stamp and how it brought to life the painty background paper.

Happy crafting!

Catherine

Another set of notecards

This set of notecards is slightly different in that it wasn’t using up the paper I was specifically trying to do … more I wanted to use the three images that have been coloured and in my stash for years!

So they got turned into little thank you notes – with the help of some patterned paper too of course!

Those little angels are just so cute and as I say I printed them and coloured them years ago so all I needed to do was cut them out and add them to the little cards I made with bits of patterned paper layered up with some doodled edges.

I added stamped sentiments I fussy cut and then some black enamel accents to embellish!

Slowly slowly I am working through old stash and getting rid of it either by being brave and throwing it away or by making little cards like this that I enclose with any craft supplies I sell. I have a little stash of the notecards now – but sure at some point they will all come in handy!

Happy crafting!

Catherine