Happy Easter

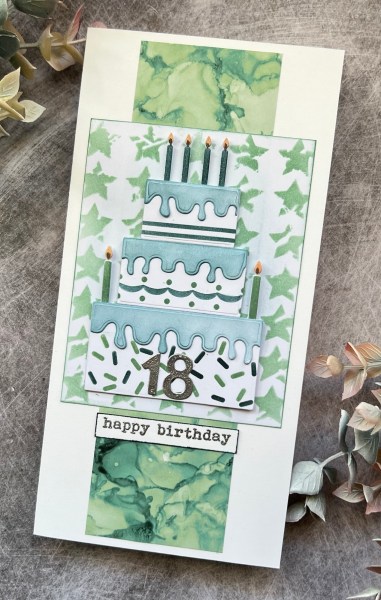
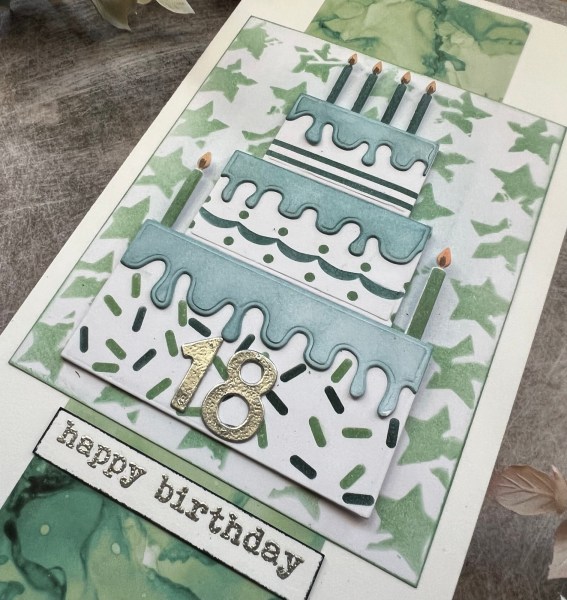
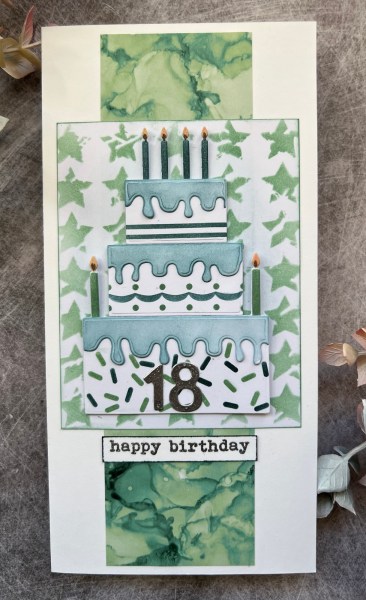
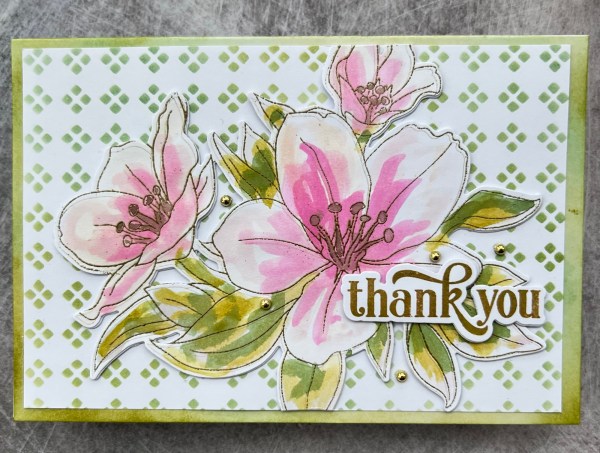
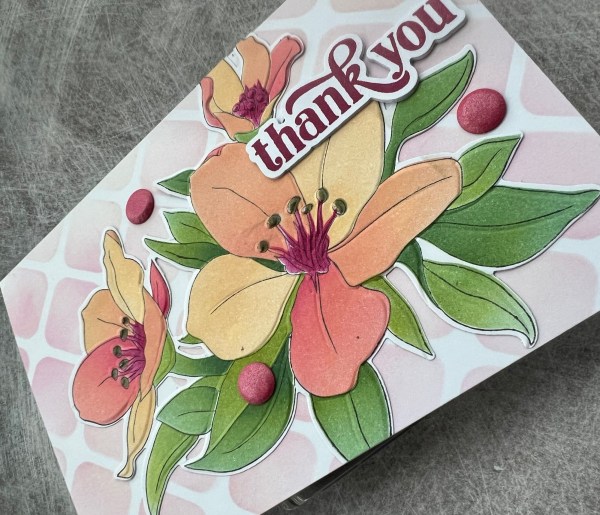
The new Altenew stamps and dies came out to play again this weekend … I ended up making a card for my parents for Easter.

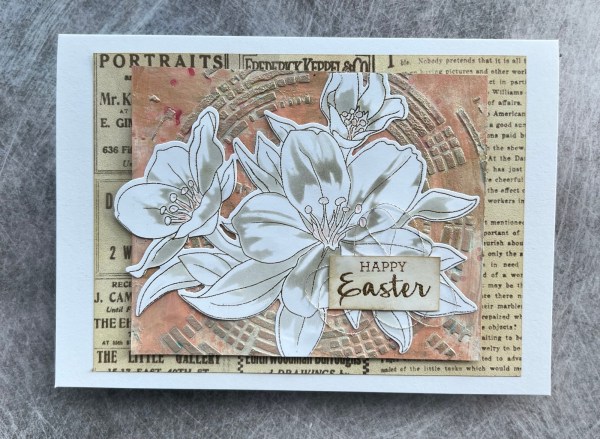
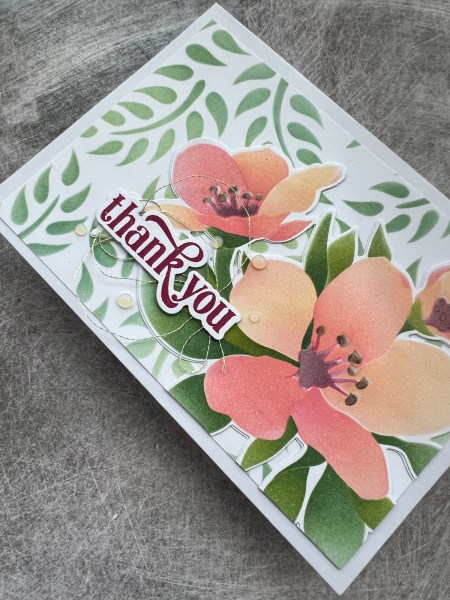
I started with a piece of paper that I had already stencilled onto using texture paste … I had previously got too much texture paste out for another project and didn’t want to waste it so used it on this piece of paper and left it to dry.

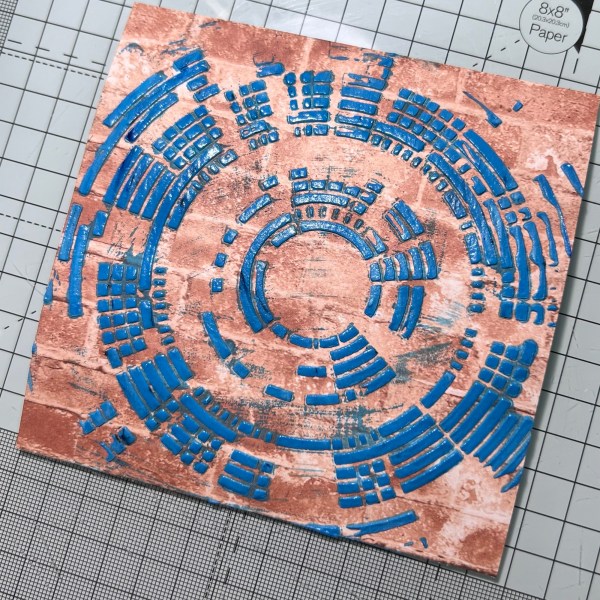
It wasn’t pretty but I knew I would eventually get around to using it!

First I took white gesso and gave it a coat of that to take away most of the colour and give the paints something to stick to.

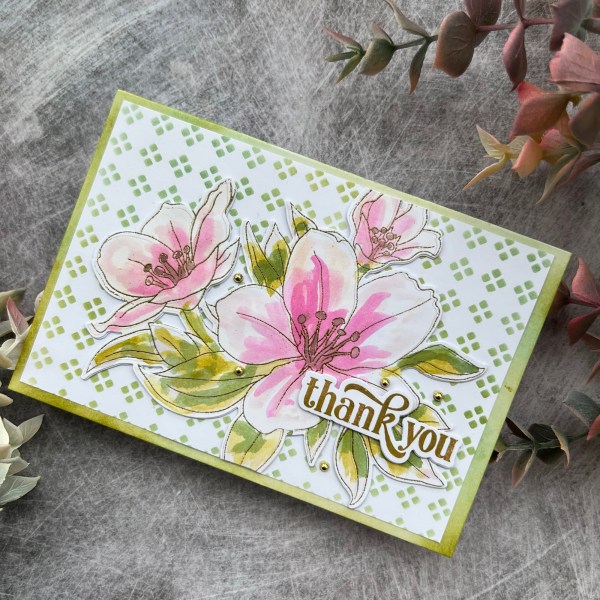
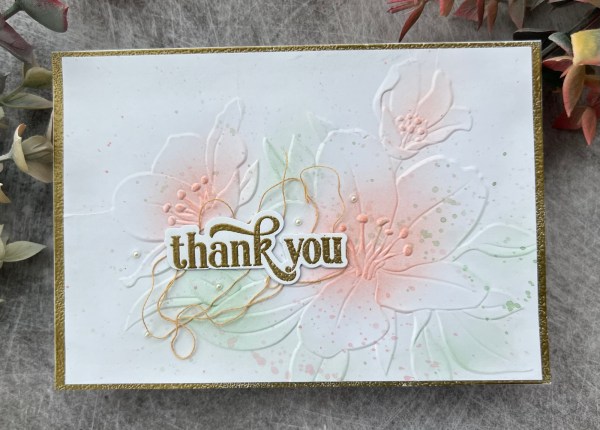
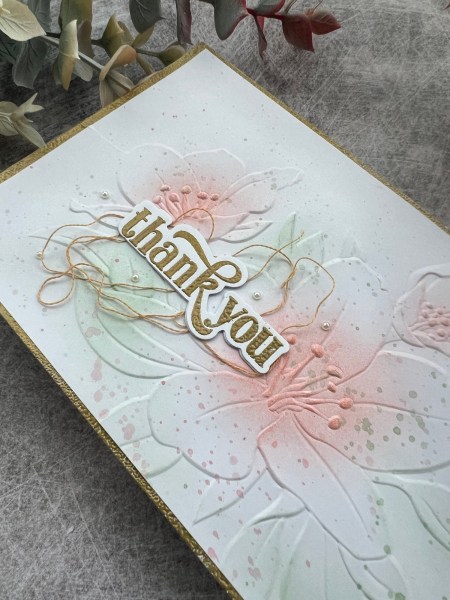
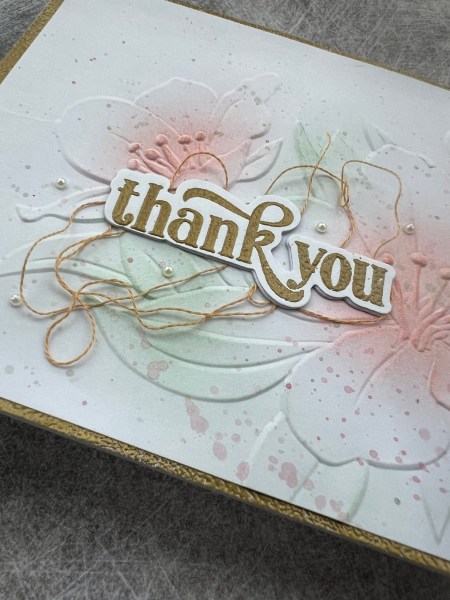
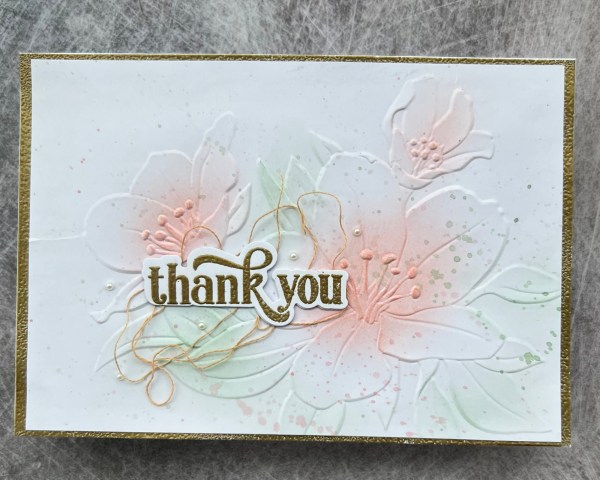
I took some acrylic paints and coloured the whole piece in a peachy colour … you can still see some of the blue tones on the stencilling but I thought they worked well together.

Then I rummaged around to find my sparkly paints and added a little gold to the background and splattered some pink.

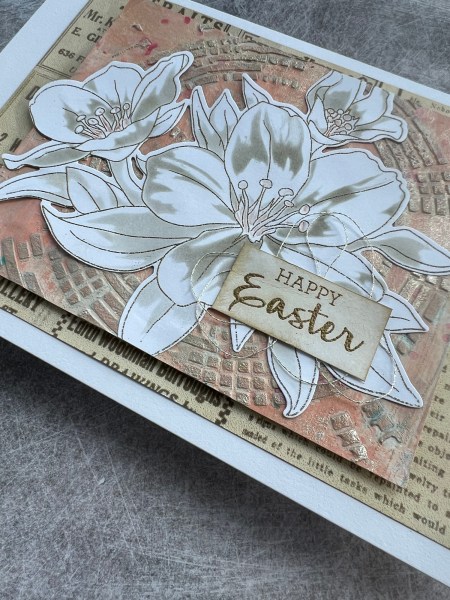
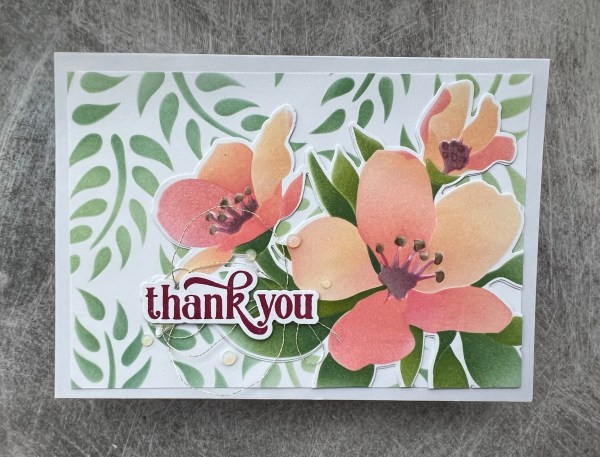
I decided this would do perfectly as a background to a more subtle version of the Altenew flower. I heat embossed the line art with gold and then used the final stencil layer and some old paper ink to add that.

I added a little colour to the stamen of the flower too using a watercolour pencil.

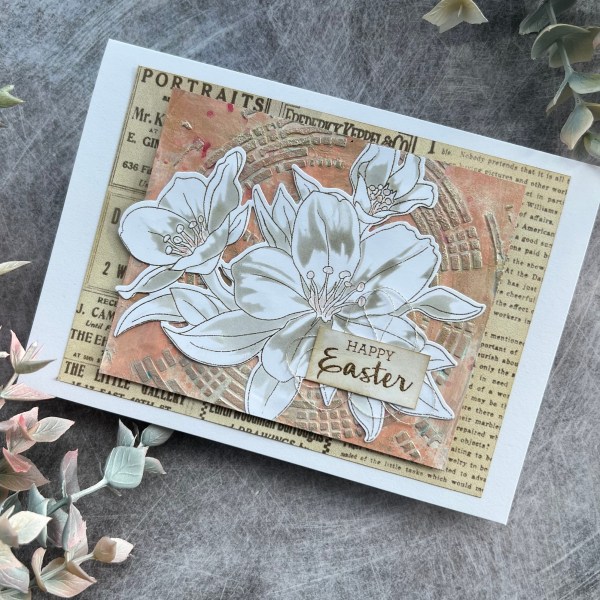
Then I die cut it out.

I cut down the background panel added the flower on top and trimmed off the top and bottom where I hung over.

Then I added a piece of the Sycamore Street text pattern paper behind which I had added a little subtle inking to using distress inks. I added foam behind the mixed media panel and then stuck this all together.

I then grabbed a sentiment and embossed it in gold and then cut it out and inked it.

I added some metallic thread behind the sentiment (this is one of my new favourite things to do) … and called it done!

Happy crafting!

Catherine

Another 18th birthday card

I made a separate card for Hannah for us to send (the one I shared yesterday was for Maya to send to her friend).

I decided to go with a big cake and greens and blues for this card so it doesn’t coordinate with the other one but I went with the mojo at the time of making.

I used the waffle flower stencils and dies for the cake. I then made a panel with the stars stencil for the background.

I also added a strip of the marble dsp to coordinate.

I also added the silver numbers and the sentiment embossed in silver.

Hope Hannah had a lovely birthday yesterday.

Happy crafting!

Catherine

Another 18th birthday

It’s a busy few weeks for 18th birthdays here … this is the one I made for Hannah who we’ve known for so long (13 years!) and what a lovely young woman she has become.

I went pink and peach for this with stencilling and ink blending.

I added a ribbon and die cut panel. I then die cut the sentiment too and the number die cuts.

I then found some pink gems for embellishment.

Just love how the Concord & 9th inks blend.

Happy birthday Hannah! Hope you have a lovely day today!

Happy crafting!

Catherine

Festive Friday

Posting early today as I’ve got the day off work and am not running around like crazy for a change and instead thought I would get some blog posts written, starting with this! Feel like the last few weeks have been a whirlwind and so it’s nice to take it slow for a change.

I still had some scraps of paper on my desk from the projects at the beginning of the month using patterned papers so decided to use them up.

I teamed the papers with the crumb cake cardstock panels and then some darker Kraft coloured card for the mounts of the sentiments and the stamped trees.

The stamped trees are from a Paperartsy Darcy set and I think they are so cute!

I stamped in memento and then watercoloured with the different green inks.

I kept the layouts similar but not the same and for each I chose a different way of embellishing.

I think this second one is my favourite with the gold thread and the gold enamel gem.

Simple to put together and a cute pair of cards for the stash completed!

Happy crafting!

Catherine

Thank you number 4

Today is the final card to share from this batch I made at the weekend …

I went back to the water colouring the image loosely and then embossing technique…

I didn’t use watercolour cardstock so the colours didn’t blend as well but I still think the effect I got was lovely.

I used the concord and 9th inks again and this time the very vibrant pink ended up being a little more overwhelming but I think when I added in the darker colour on the leaves that helped to balance it.

I chose an old stencil for the background and used a mix of the greens and also inked up the edge of the card base to frame it.

I stacked the floral image with three pieces of the cardstock in total to give it strength as the water colouring had warped the paper quite a bit. Stacking it made it stronger and helped give it more dimension.

I added some gold gems for finishing touches to surround the sentiment.

So that’s all four cards I made using this fabulous bundle of products from Altenew. I’ve got loads more ideas for using them – just need to find the time to do it! Also I didn’t mention it but these were slightly smaller than my usual size of card because I had bought some card blanks in a sale and so had to work with slightly different dimensions than normal … made me want to also make some slimline cards using these products too so I could mix up the usual way I make things!

Happy crafting!

Catherine

DT: Addicted to stamps and more – any occasion #464

Hello! Another day, another design team contribution. Over at Addicted to stamps and more our challenge is Any Occasion… but I went with birthday again for my card.

I chose to grab those gorgeous hanging houseplants stencils and make a collection of pot plants as my main focal element for this green and brown card.

After stencilling the plants and their pots I created a cluster of patterned paper scraps from the stash (these are very old bits of magazine kits – thought they worked well with the colours of the plants and pots) and some scraps of Kraft and created my card topper.

I added this to a panel of wood grain embossed white as again I thought the natural element of texture worked well with the images and the papers.

I then created a sentiment panel using the Treat Yourself stencil and stamp set from Altenew and the Biggest wish stamp.

I decided to embellish with three brads in different brown and greens … all three are different sizes and thought it looked quite cool.

Finally a mount of Mossy Meadow and a little bit of hand drawn lines on the Kraft to finish off. Perfect! Well that’s that I think anyway! How about you?

Happy crafting!

Catherine

Thank you number 3

Third card in my little batch made at the weekend …

This time something very different as it was just the embossing folder I used…

I embossed the white cardstock and then lightly added ink using the brushes and ink left on them.

I then splattered with the two light coloured inks too.

I decided to heat emboss the sentiment in gold and trapped some thread between the sentiment and the card front. I thought the tiny pearls also added a delicate touch.

To frame the panel I added heat embossing to the panel edges behind so it coordinated with the sentiment and decided that was all that was needed.

Simple and elegant!

Happy crafting!

Catherine

Thank you number 2

Here is the second of the thank you cards made in the batch I started sharing yesterday…

This is a more vibrant version of the one shared yesterday in terms of inking but also includes the line art stamping and to really add some ooomph I embossed it too using the coordinating embossing folder.

It’s difficult to show on the photos the texture and dimension that the embossing folder adds but it really is a nice texture and adds to the finish.

I think that the inking probably should have been done after the embossing folder but I didn’t think I was going to do that at the time and decided last minute. I also missed out the final stencil layer for the additional detail.

I used an old stencil from the stash for the background using up ink on the brushes for a subtle effect.

I stacked up the sentiment for some dimension and added the bright pink card Candi for the final touch and some fun embellishment.

Happy crafting!

Catherine

Thank you cards

I always think that thank you cards are important after you’ve received gifts or treats so made some for my daughter to send to the family members who sent her gifts for her special birthday. I also had got this Altenew bundle of stash in a recent splurge and decided to use this to make four different cards!

All use the same floral image but in different ways … and all four use the same Concord and 9th inks but again in different ways!

Given there are four cards I will split this over four blog posts but obviously you can see all four in the picture above!

Let’s start with this one.

This one I did a background using an old stencil from the stash that had some leaves on it and kept it quite simple with just the inks that I had used for the leaves on the focal image.

I stencilled the full image with no outline stamping and then die cut it, but when I placed it on the background decided to place it to the side and trim off the overlap at the bottom and the right hand side.

I decided to kept the card quite flat but did stack the image up with one extra layer to strengthen it a little as the cardstock I had used isn’t very thick.

I used the sentiment from the set for all four cards and die cut it three times so that is quite thick and sandwiched some silver thread underneath the sentiment.

I then added some drops of glossy accents to add a bit of shine and also had added wink of Stella to the stamen on the flowers.

There is another stencil in the set that adds more dimension to the flowers and leaves but decided to keep this quite flat … I also love the colour of these inks from Concord and 9th and how well they blend as they dry.

To me they look so peachy and soft!

So this is card number 1… three more blogs to follow to share the others in more detail!

Happy crafting!

Catherine

Festive Friday

Today’s project was inspired by a video I was watching on YouTube by Tina Zinck and I ended up with just a panel of inky debossed fun as a result…

I inked up the embossing folder with a dark purple and then embossed it. This pushed the ink into the debossed snowflakes. Then I used a pink and lilac ink pad to swipe over the top and a little spritzed water to just blend a little.

This created the background panel.

I mounted that onto Berry Burst. Then I took a scrap of Rich Razzleberry and embossed that with the same folder but placed it embossing side up.

I added the mat of white and a wrap of the ribbon underneath.

Then I die cut the tree from white card and did two layers of the Diamond dazzle embossing powder to make the die cut sparkly.

I then stamped the sentiment and cut it out and added it over the tree and added the card Candi in the three colours to finish off.

Quite simple to make really and good for mass production if die cutting from an already sparkly cardstock rather than embossing as those backgrounds take moments to make but look fabulous.

Thanks for the inspiration Tina!

Happy crafting!

Catherine