Wow May came round so fast – I think because I missed so much of April with being ill – so I went for an easy one this month for my patterned paper project!
I went with the black and white papers of which I only had a few left, and teamed it with a scrap of orange flowers leftover from some scrapbooking and that cute little digital stamp of the girl which was already coloured and cut out ready to go. Then I pulled in scraps of oranges and pinks to stamp on and that striped piece that is one of the panels I made a while ago when playing with scraps of cardstock.
And from these bits and pieces I made …
Just so cute and so easy.
Papers added to the red base panel that is slightly smaller than the card blank in the same colour.
Then the striped panel across and the girl image raised up on foam adhesive for some dimension.
The flowers were MFT stamps which I stamped with versamark and clear embossed and then the flower centres stamped on top with versamark and then added the gold embossing powder.
The flowers are then die cut out and arranged behind the girl top left and bottom right.
I added two tiny flower die cuts that were sat on the desk to the left of the girl and added glittery gold enamel dots to the centres of those and then used one of the Dina Wakely press plate sentiments and dies which I foiled using the glimmer – I am loving the glimmer foiling – at the moment mainly for sentiments but plenty of experimenting now going on for some of the other things I have to play with too! Yesterday I got some goodies delivered I bought on the Spellbinders sale – so expect more foiling adventures at some point soon (craft haul on YouTube if you want to see my splurge!)
Inside I added the final scrap of the orange flower paper and a strip of the black and white to a panel of white.
Love how this card finished up – really not bad for a bunch of scraps! and there is some of my Making Cards magazine paper used up. I have enough of the black and white left to do something with it – and that something is currently in the process of being finished – so you will see it soon! How are you doing with your patterned paper? Is it something you still have a mountain of like me?
Well I managed to meet my challenge for this month – albeit I left it until quite late as only made these on Sunday late afternoon! But I got there!
I challenged myself at the beginning of the year to make at least one card suitable for a male recipient each month and to film the process for my YouTube channel. So check out the process over there!
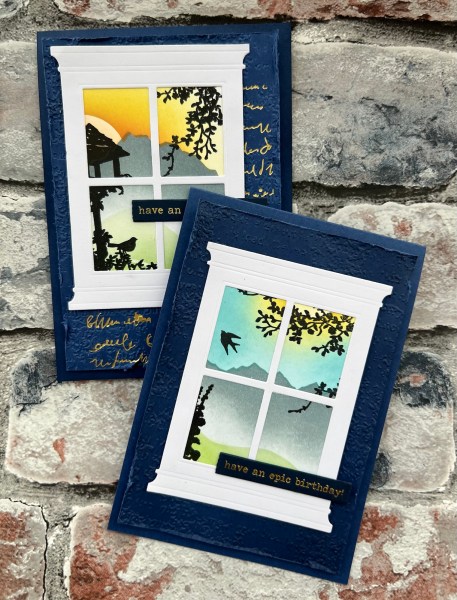
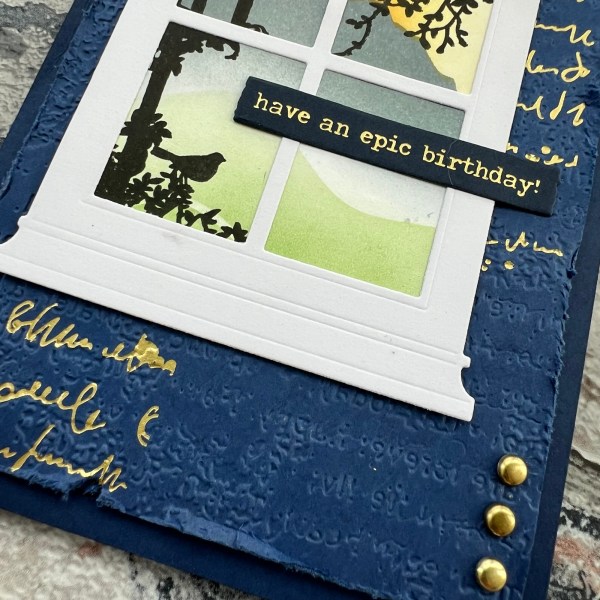
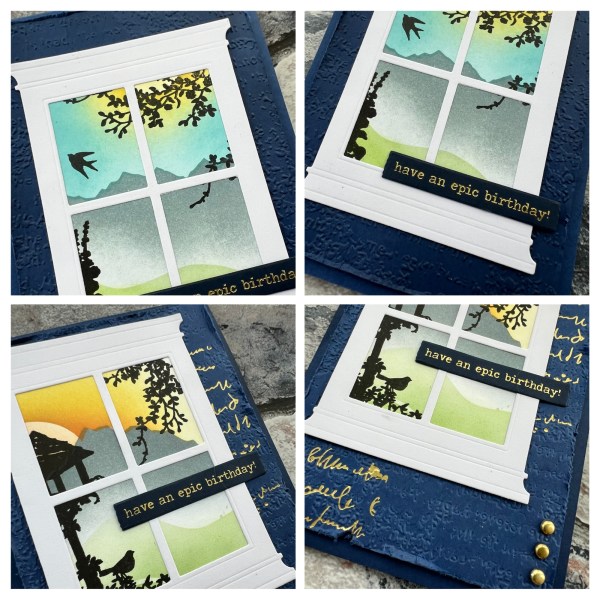
I gave myself the theme of landscape and because I follow the fabulous Deb Wheeler and her amazing makes with Claritystamps it gave me the idea to dig out the masks and create a landscape and then add some silhouette images to finish off.
I had also found these die cut window shapes in my stash when tidying a few days earlier and thought – oooh I could turn a landscape into the view from the window – so that’s what happened.
I made one landscape on a sheet of cardstock and then two different sky scenes for the two different cards.
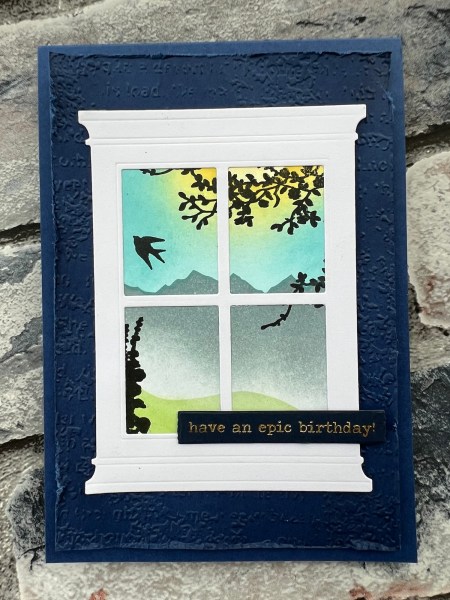
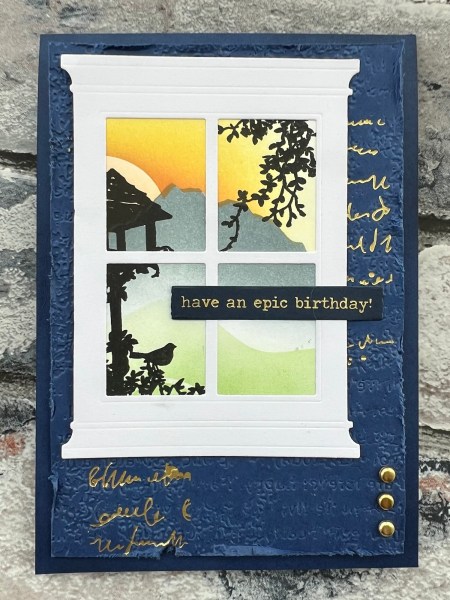
This one I added a small amount of foliage to on the left and a flying bird. It was more of a summer daytime scene and the other was more of a sunset with a birdhouse in the scene.
For both cards I chose navy as the card base and did a layered panel (as always inspired by Martin Mayhem designs!). I embossed both with the Timeworn Type 3d embossing folder but this second one I went a bit further and added the foiling too!
I added dimension with some scrap card layers under the window and then some fun foam as a layer between the base and the topper panel.
Both sentiments were foiled too – the first one is a shiny sentiment but the second one I used the satin foil like I had for the sentiment.
I added Night of Navy inking too which helped differentiate the layers from each other and distressed the edge of the topper panel.
I also added three brads to that second card – isn’t it fun to use things like brads when you’ve not even thought of using them for years! I always think they are a good alternative to gems when doing a masculine make!
This was my first use of that Dina Wakely scribble press plate and I love it – albeit I didn’t place it quite right – I imagine this will be something I will grab quite often for backgrounds both as a press plate image and foiled!
So there we go – two more cards for males done and dusted! I love these and it was fun to use really old stash and techniques I’ve not done for a while – I suspect I might keep those masks out for using more often now I’ve refound them!
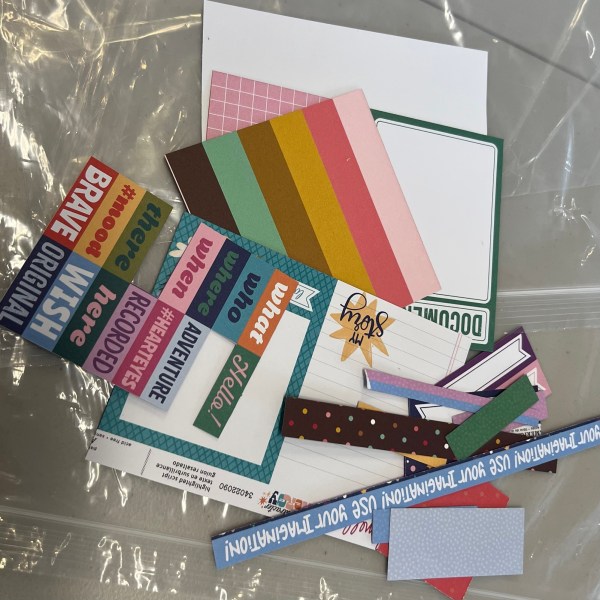
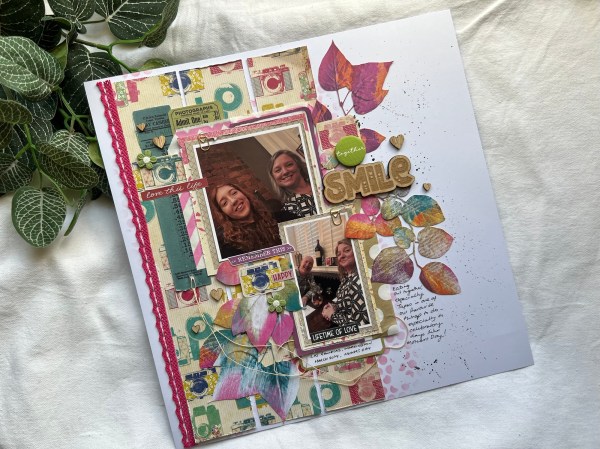
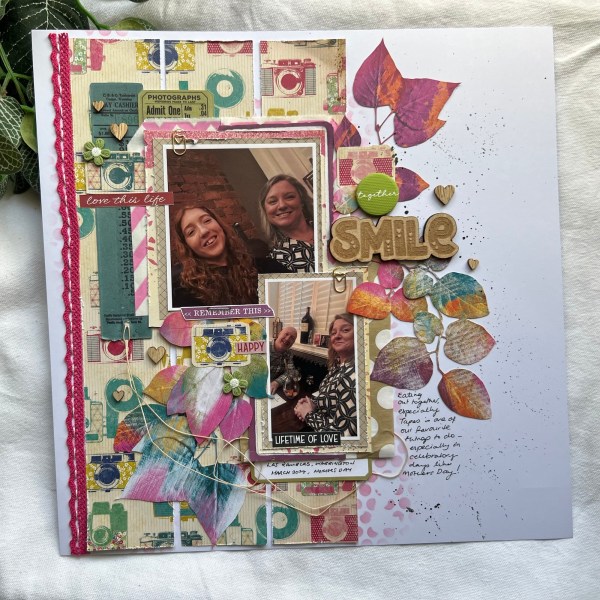
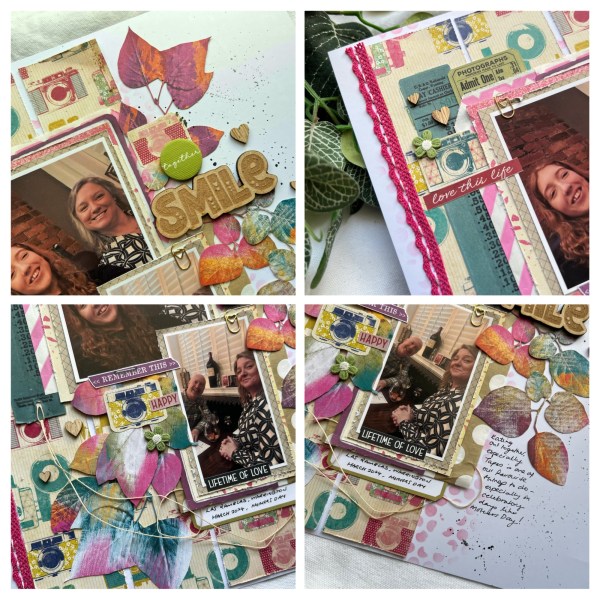
On Saturday I was at the crop that is local to me run by Sarah at Hey Little Magpie. I was so pleased to feel well enough to go and spend the day being creative and chatting with crafty friends. I also managed five scrapbook pages in total and as I have quite a few Scrapping Saturday posts already ready for the next few weeks I thought instead I would share them with you all in one go! For all of them the starting point was using page kits from Hey Little Magpie – although as per usual I did vary them a little and also two of the pages were scraps from the kits with just an additional coloured cardstock base from my stash – and embellishments from my box (or from the pop up shop I might have bought some stuff from whilst I was there! 🤣)
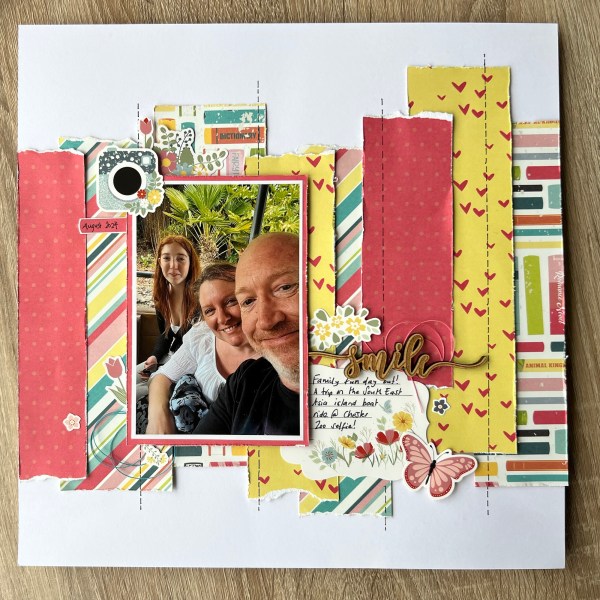
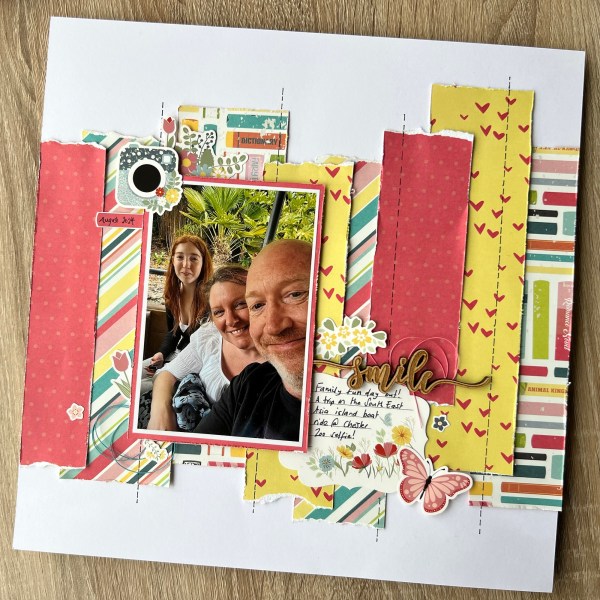
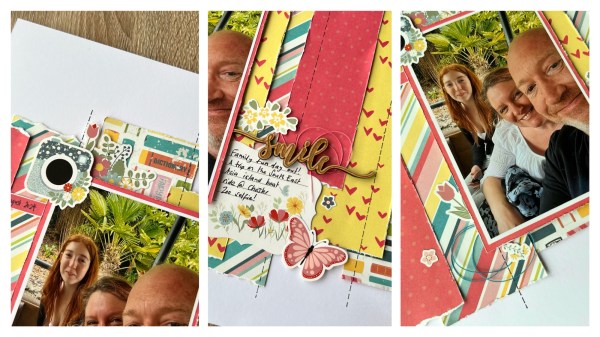
I started with this page and although I didn’t exactly follow the instructions – it is similar to how the page was designed. I did have to change up the title and a couple of embellishments to make it work with the photo – but it was very close to the original – to the point where friends were wondering what was wrong with me as I’d not gone off piste! 🤣
I loved the faux stitching and the bright colours of the papers – so lovely to use to scrap the photo of us at Chester Zoo on the boat ride in the South East Asia Islands section.
Straight after this page I took the scraps leftover and made this second page – choosing a card pink base.
When I tore the papers the white edge created a nice contrast for the darker background.
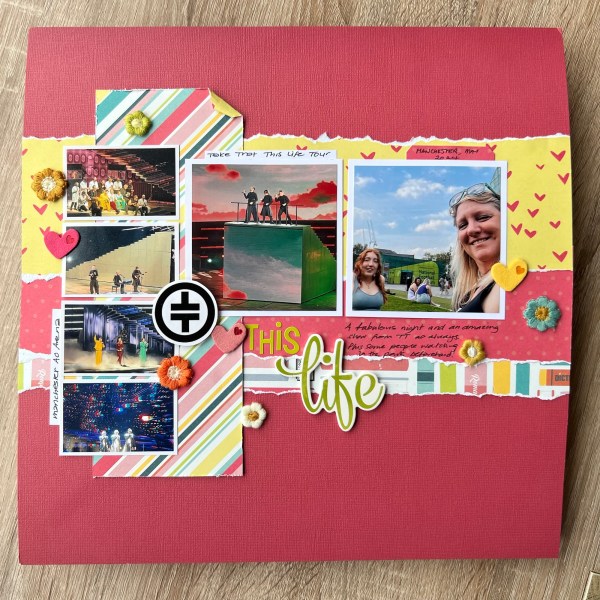
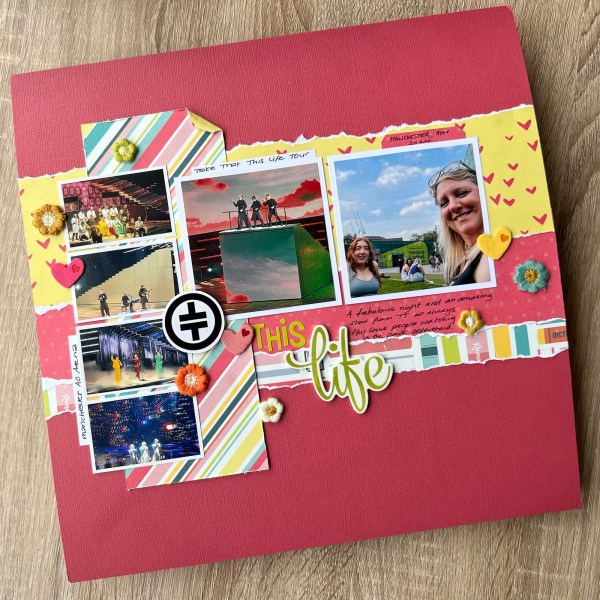
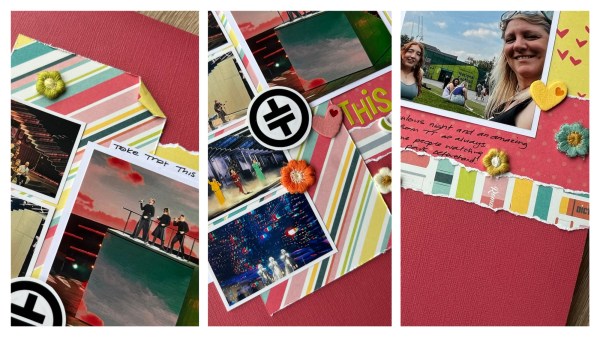
This page is unusual for me with all those photos – but having had the smaller photos printed as a collage – I managed to fit 6 photos on the page – along with the all important Take That logo ❤️
It was fun to add in the additional elements like the little flowers and hearts which I bought from the shop plus that Life puffy sticker was perfect for the This Life title – as that was the name of the tour!
Next I moved onto a different page kit and this one I added in stencilling and moved the main page element to the right rather than in the centre.
This meant I had to move some other elements around – but I think the original is still fairly recognisable. I love the textural elements to the page with the seam binding and the ruffled trim (although I had to borrow someone’s tiny attacher as I couldn’t stick the trim down without it – which has made me NEED a tiny attacher!)
I really love the stencilling I added – I thought the mowed lawn distress oxide worked well with the colour in the photo. And I love that cut file title (also makes me want a scan and cut – but that’s definitely not in the budget anytime soon!)
I then moved onto another kit as I didn’t think I had enough scrap from the one above alone to make a page.
This one was very different and I decided to change it up quite a bit. Firstly I made the panels of the paper smaller to give a frame to the page and also more of a gap between them. I also rotated the page.
I loved the bright panels against the black with the distressing and decided the colours worked well with my collage picture of the aurora borealis I took back in October 2024 in my back garden.
The rest of the kit had lots of cut aparts so I took ones that made sense with the picture and created my cluster around the picture and then went to town with embellishments and stickers around the outside. I kept the tag elements similar to the original – but mainly just had fun adding the bits and pieces I had with me. I think this page still needs a proper title but didn’t have anything with me at the time so will have to die cut the letters Northern Lights for my title instead when I get a moment before I put the pages into protectors and an album.
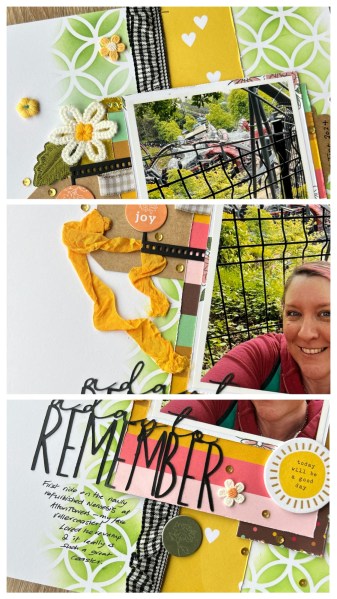
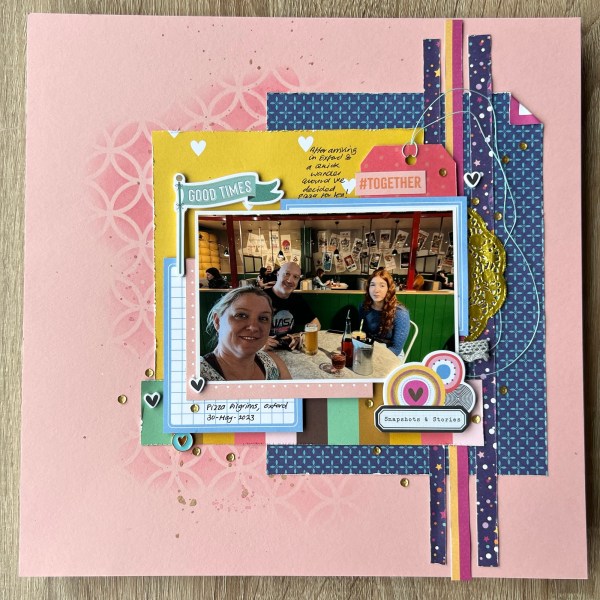
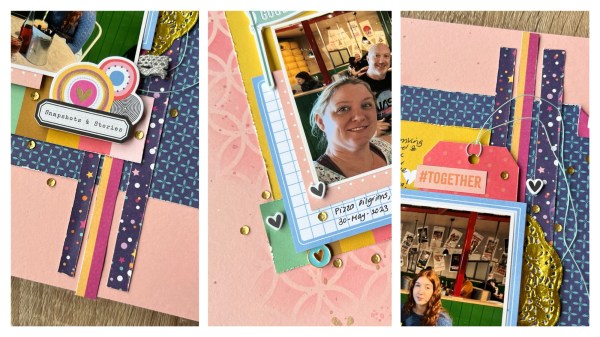
And finally I put scraps from all of the pages to use on this page, choosing the pale pink card as the base.
Again I added stencilling and this time some splatter too – I used both the pink ink for splatter as well as some shimmer spritz in magnolia which I had taken to the crop with me.
There were a lot of cut apart bits although I wasn’t sure I would use many of them so instead the reverse was that lovely blue pattern so I chose to use that as the main backing paper instead.
I know this is a mish mash of different products and designs but I think it still works well and given the photo was of us in a very eclectic designed pizza parlour in Oxford it sort of works with the colours in the photo too.
So a very productive Saturday and I was left from the three page kits with very little in the way of scraps …
… I have kept them though as Rachel challenged me to use them – so I will see what I can come up with for using these bits and bobs and let you see what happens!
And after that mammoth blog post … happy crafting!
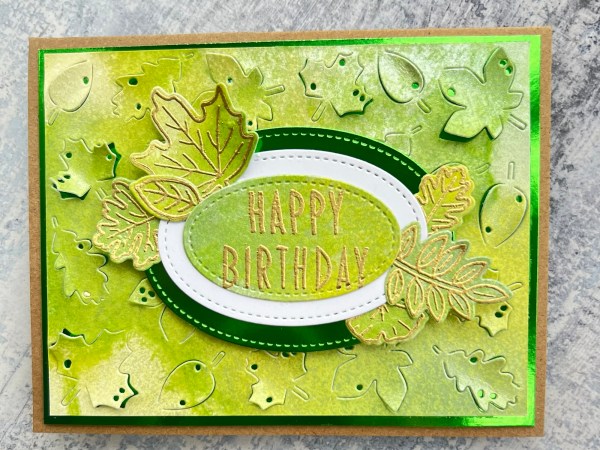
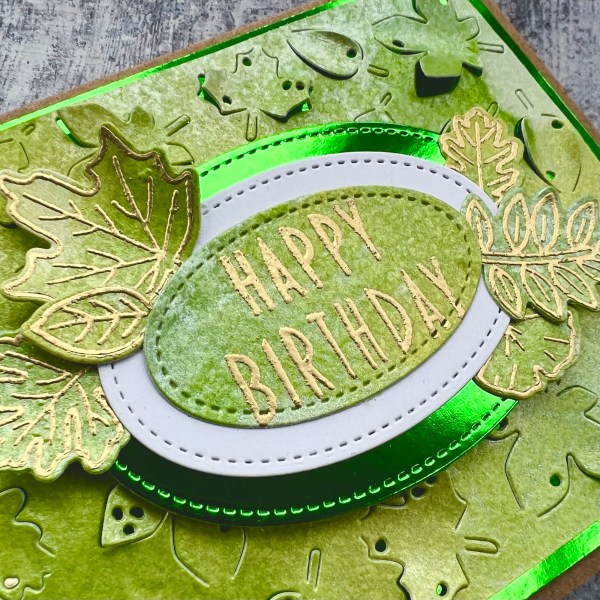
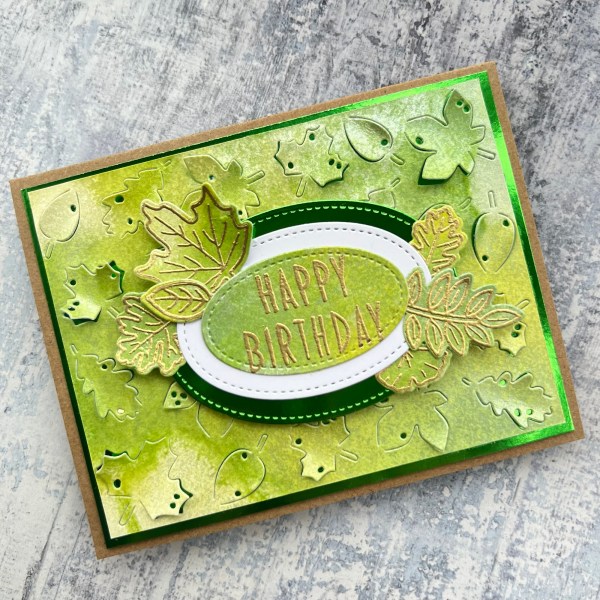
Back with another design team project and I realised this past week I’ve shared a lot of pink projects – so time for a change of colour! This I made for the design team showing off Kingston Craft rainbow shimmer spritz – this time I made a whole sheet of green coloured shimmer cardstock using the Fern and Lettuce sprays – they work so well together and the sheen on the dry panel is so beautiful!
I decided to add in the Kingston Crafts rainbow foiled cardstock too so there is a layer of the foil popping through the die cut panel and also framing both the full panel and the oval element.
I used the Waffleflower leaf panel to create the background making sure I bent up the leaves on the edges so that they were dimensional. I then stamped the sentiment and the leaves and embossed them in gold. I die cut the leaves and then used stitched shapes for the sentiment and the two layers.
I chose to sandwich the leaves between the layers of the oval for dimension and then popped the full oval cluster up on to foam adhesive so it sat above the texture of the base die cut panel.
I then layered everything up onto a kraft card base.
I love the shimmery handmade papers and I suspect that making a whole load of them will be a great thing to do when the mojo isn’t striking as I am sure when I see the finished papers I will be desperate to get creating with them!
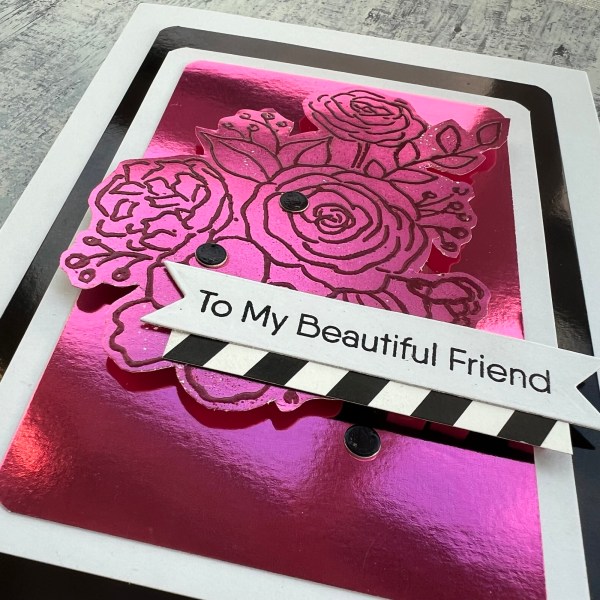
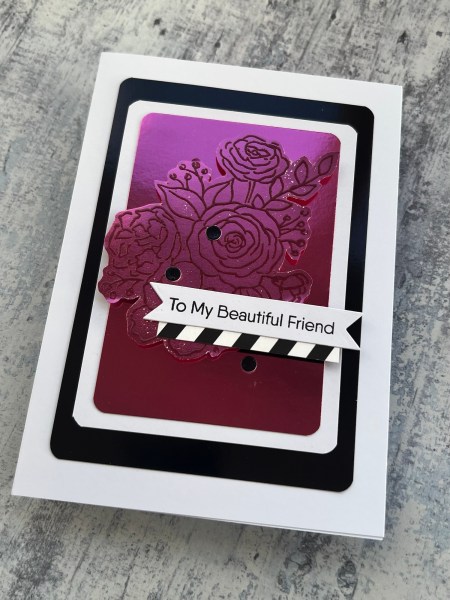
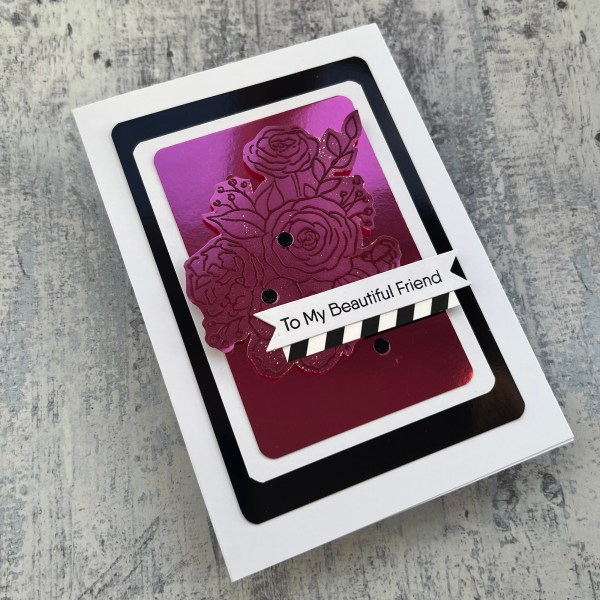
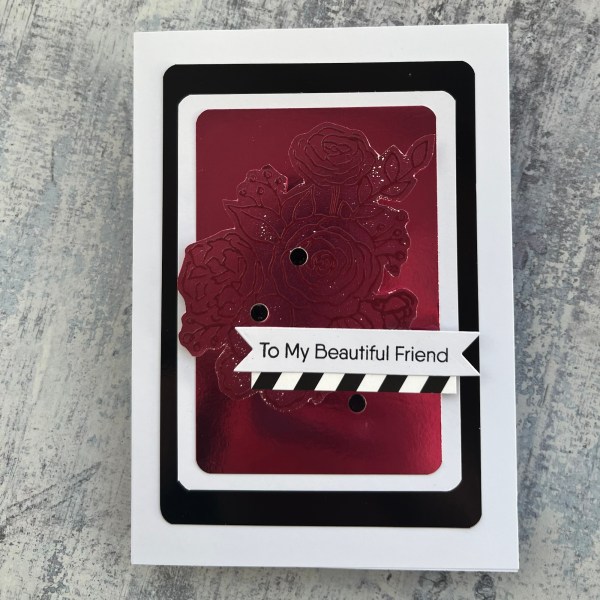
I made this card using the super shiny rainbow foiled cardstock from Kingston Crafts as one of my design team projects – it is probably one of the hardest projects I’ve ever photographed as the best way of seeing the card is not face on!
I think that is the best photo I have of it!
So I wanted to emboss the pretty coloured foiled cardstock with a floral image but not have it contrast in colour – I chose some powder that was just slightly darker than the colour of the pink cardstock – but as a result of both the shine and the tone on tone embossing it doesn’t show well on camera – but makes a lovely card in real life!
I took an old magazine stamp set and embossed the floral cluster image and then fussy cut it out.
I then created layers for under with the plain foiled cardstock and some white cardstock. I decided to round the corners and this created some lovely panels (NB I did gut the black where it can’t be seen as don’t want to waste any of it!)
Next I added a strip of the patterned black and white paper for contrast and stamped and embossed a sentiment which I cut out using a banner die.
I also die cut some tiny circles from leftover black foiled cardstock as little embellishments.
I raised the floral element and the sentiment cluster up on foam adhesive for dimension and then adhered it all to a 5×7 cardblank.
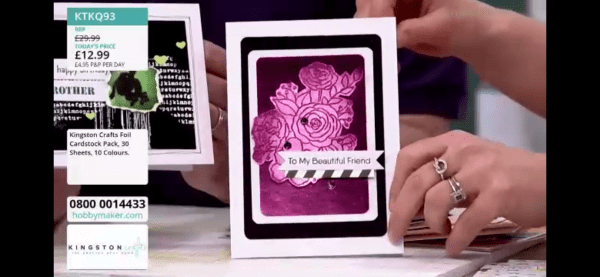
It’s a simple card but with all the shine it is so cool in real life – just a shame photographing it is such a nightmare! And of course I also want to say – “as seen on tv” because it did make an appearance a few weeks ago when Martin did his last Kingston Crafts show ❤️
Well it is another Saturday so another day to share some scrapbooking I’ve been doing – this was actually done about a month ago when I was poorly – so apologies like last week for the voice over on my YouTube process video!
I made this one with the challenge over at Hey Little Magpie in April in mind where the challenge is to use a tag, ticket and twine! Can confirm I did all three.
I wanted to keep going with the papers I had cut into for last weeks page and that was how this came about.
I grabbed those fab 49th & market embellishments plus the Hey Little Magpie embellishments and went quite heavy with the gorgeous leaves and then some other random bits and pieces.
I even did a bit of sewing to adhere the trim down the left hand side.
Loved scrapping these photos from Mother’s Day last year.
I’m off to our local crop today with zero planned on what I am taking as yet so best get up, get ready and start packing some stash ready to take and play along with! No doubt whatever I end up making will end up being shared here!
Well I survived the shorter week at work but will admit I finished early today as was really flagging! But definitely a lot better than I was and hoping next week I will be back to full strength and energy levels!
Having said that I’ve had zero energy to craft or do anything after work each night so been pretty much going straight to bed after tea – so glad I had some projects still to blog that meant I wasn’t worrying about missing my challenges – talking of which – it’s time for Festive Friday!
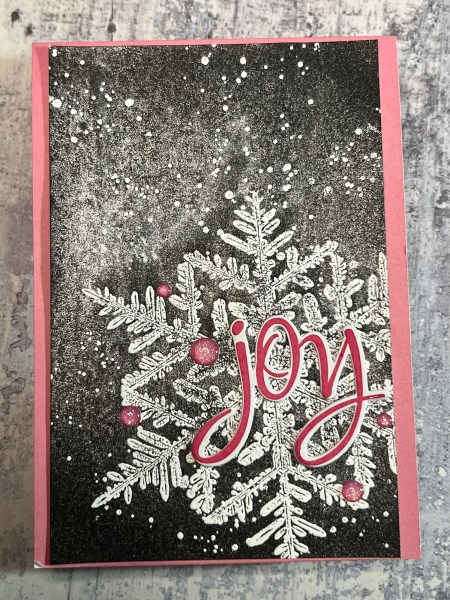
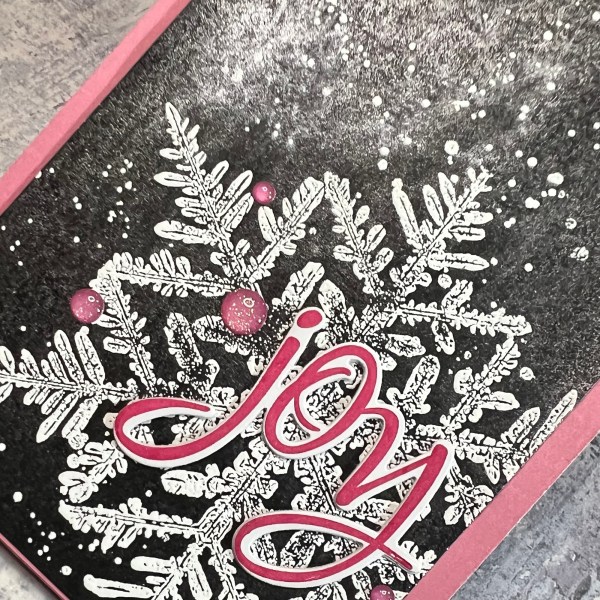
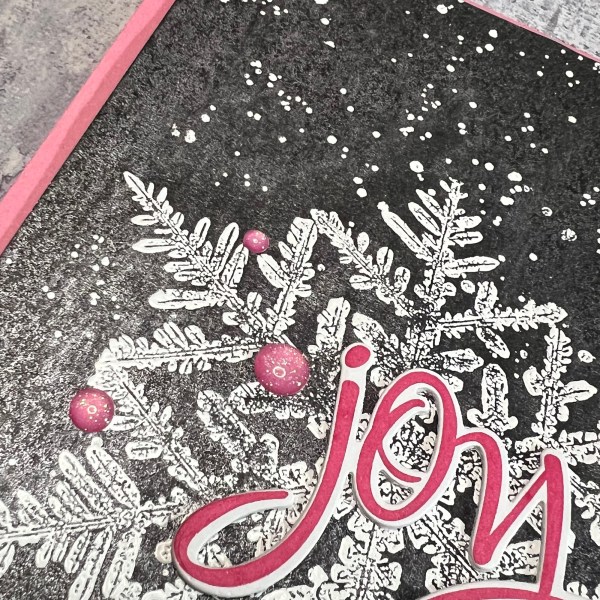
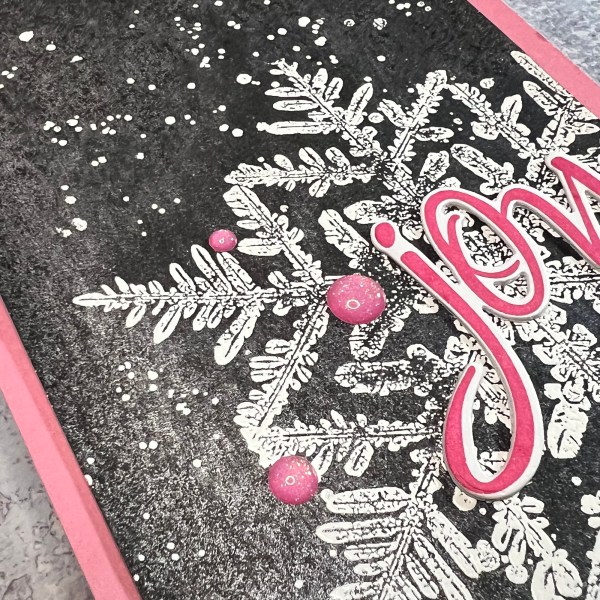
I wanted to play with the shimmer spray onto black cardstock as the mica still adds shine and a tiny amount of colour even on the black cardstock – so of course I chose to go with one of my favourite Christmas themed stamps! I didn’t end up including this in the samples I did for the DT though as I made too many and decided this time of year most people aren’t doing Christmas even though I do it all year round!
I heat embossed in white the Snow Crystal stamp and the gorgeous grunge splatter over the black cardstock. Then I sprayed it with lots of the lilac coloured rainbow shimmer spray.
I added the stamped and die cut sentiment and the pink gems and then added it to a pink card base – this helps to bring out the colour in the shimmer.
I know the colour and shine never looks as impressive in the photos but I love how special this makes a piece of black cardstock.
I am off to a crop tomorrow so hopefully will get a few projects done so I have blog posts prepped ahead of time again as running out of them now after so long of not being my usual self – onwards and upwards now though! That’s the plan!
Todays design team project is this super fun card I made using the rainbow kit
🌈
I started with the pink solid cardstock and created both a card blank and a panel for topping it. I used my distress tool on the top panel and then added the diagonal panel – which I had cut along the diagonal so it covered the panel at an angle.
I then took one of the die cut pieces that is a rosette shape and added a pink die cut circle from the foiled cardstock and added that to the top.
I also added a bow from the twine.
I raised this up on foam adhesive – and the same for the whole topper panel onto the cardstock so lots of dimension to the card.
I then took another of the die cut pieces with the word Horray! and added it to the rosette but then decided I wanted to also add something else so stamped and mat the little strip sentiment too.
Then added the gems from the kit for finishing embellishments! A cute and very bright celebration card!
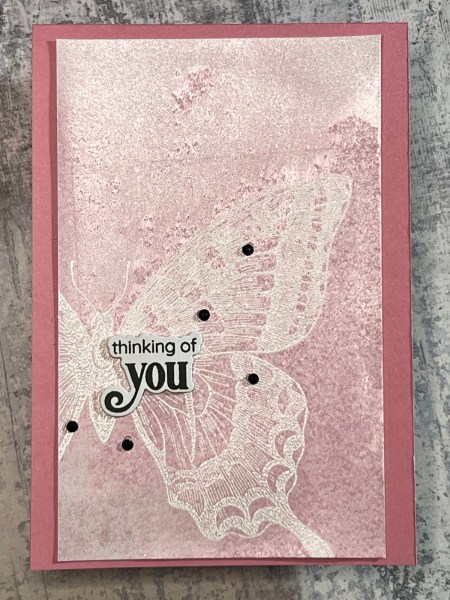
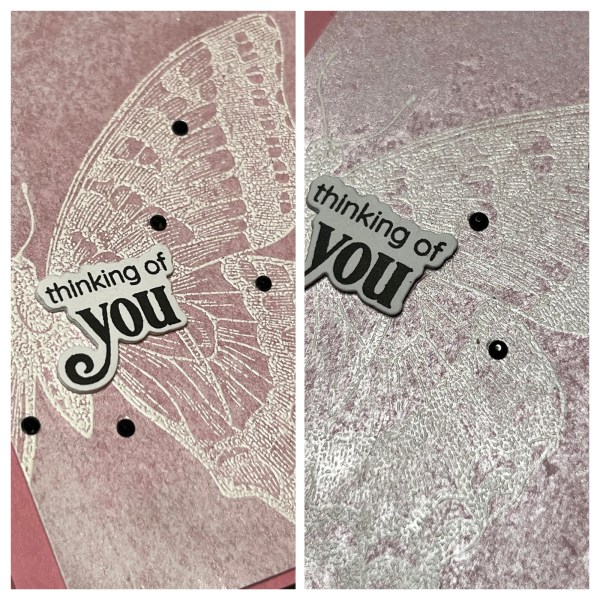
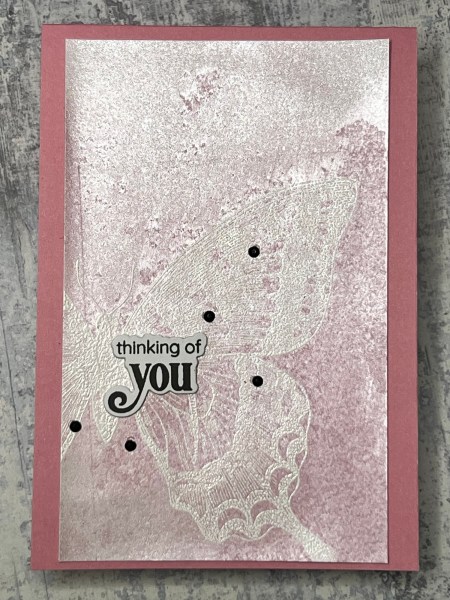
I started by embossing in white the Swallowtail stamp onto white cardstock.
Then I took the lilac coloured rainbow shimmer spray from Kingston Crafts and sprayed a heavy amount over the cardstock.
This created a beautiful and super shiny effect.
I wiped the spray off the stamping so it stayed white for the finish – but in some light it is very subtle and the shimmer has created its own texture to the cardstock too!
I mounted the panel on pink cardstock and then added the stamped and die cut sentiment and some black gems to add contrast.
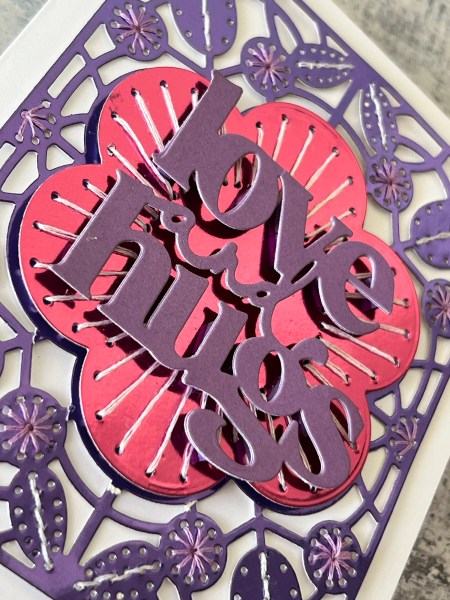
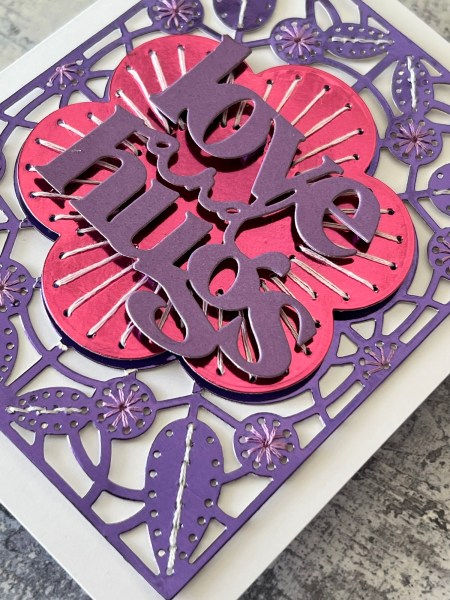
I knew when I saw the pink and purple colour of the foil cardstock that was in the Rainbow foil cardstock pack from Kingston Crafts I wanted to die cut it with the sewing dies and make a pretty but packed full of interest card.
I started with the purple for the base panel and added sewing with white thread and lilac for the small flowers.
Then I cut the big flower from the pink but decided against the sewing central section as I knew I wanted to add a focal die cut sentiment.
I chose white thread for the flower petals and raised it up on foam adhesive to give dimension.
Next I took a die cut sentiment from a magazine kit I bought a few weeks ago and chopped it apart a little as it actually says sending love and hugs but it was too big for this card – but easy to alter.
I cut this from Kingston Crafts Everyday cardstock as I felt it needed to be matt finish against the super shiny foil cardstock!
I cut the sentiment out twice and stacked it and again used foam adhesive to raise it up so it is a super dimensional card and … well I think so pretty!
Loved making this card and it has reminded me how much I love those sewing dies – must make more use of them! especially now I have all the gorgeous colours of foil cardstock to try them with too!