Well here we go – I did it – 52 festive Friday projects throughout 2024 – I have no idea how many actual cards I made though as sometimes I did more than one per project – but suffice it to say with that and Christmas in July, the 30 day Christmas card projects and all the other random Christmas cards I had a large stash to both share with my parents and to choose and send out from us – plus donated some to a friend to sell for charity!
So the final Christmas card of this year … I decided to celebrate with a video and also used it as an opportunity to use up some leftover bits up from other projects!
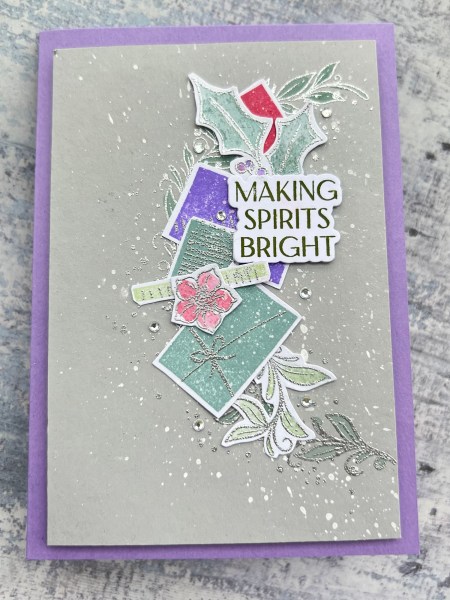
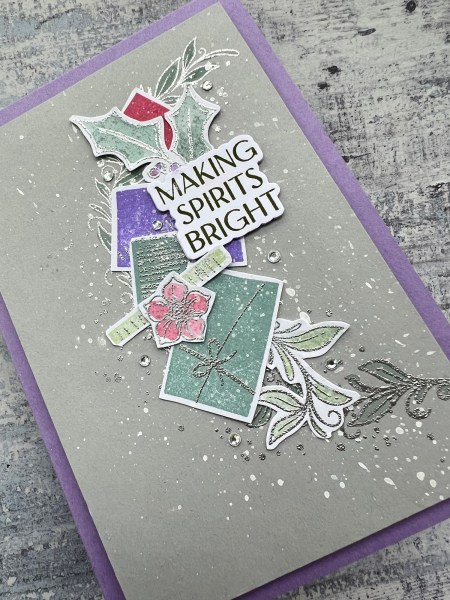
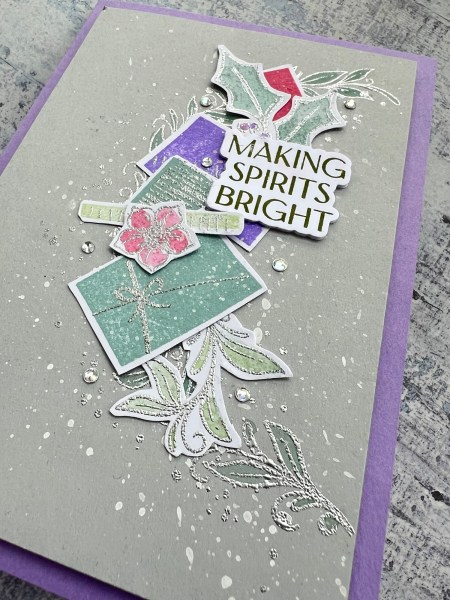
Firstly some scrap grey cardstock )there was ink on the back of it from putting it on a stamp before I cleaned it in error.
I added some stamped foliage and then used the cut apart presents and foliage leftover from another project.
I added lots of splatters and then the sentiment.
Added the panel on adhesive foam to give it dimension over that bright purple cardstock blank.
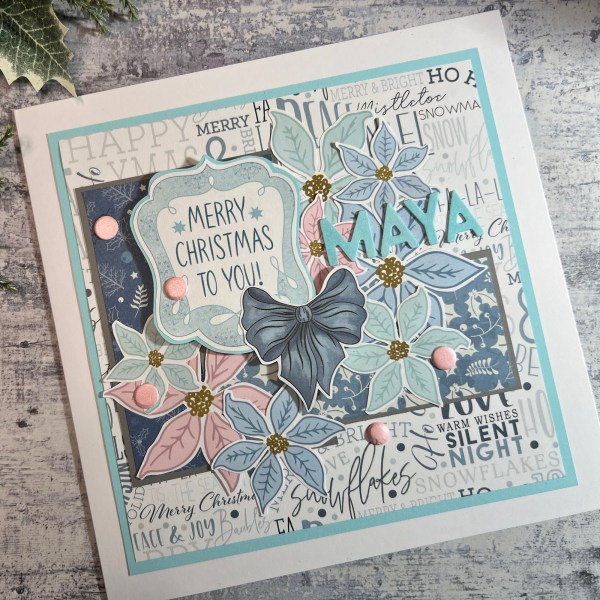
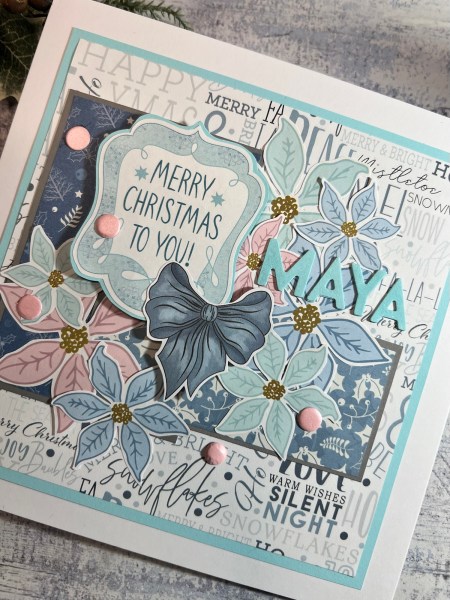
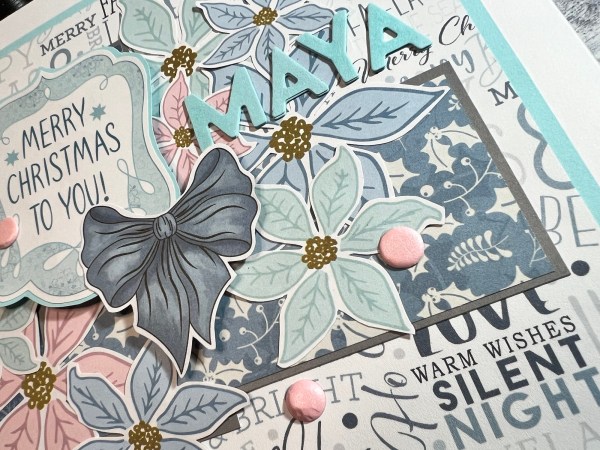
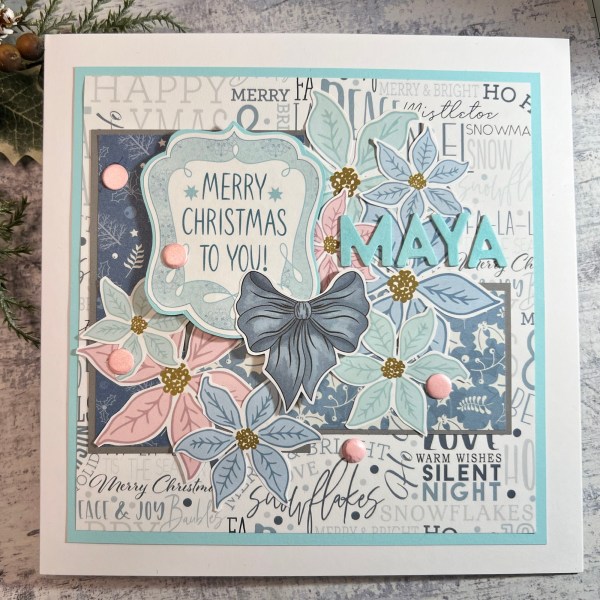
Today I have the card I made for my daughter this year and for some reason I went full on patterned paper which is quite unusual for me but the colours just drew me in!
So it took panels of the papers and mounted them on some pale grey card. Then I added the biggest piece to the panel of blue.
I then fussy cut all the floral elements out.
I layered them around the card and cut out the sentiment panel and layered it onto the blue and cut that out too. I added the foam adhesive under that to give some dimension.
I added the fussy cut bow for the top element too.
I decided to add the die cut letters for her name and then some pink card candi for embellishment!
I did add a little shimmer with the wink of Stella pen on the bow and the letters.
So that’s my card for my gorgeous girl for this Christmas!
Hope everyone has had a lovely few days – we are off for tea out tonight which I’m looking forward to!
Hopefully might get some crafting done in the next couple of days too!
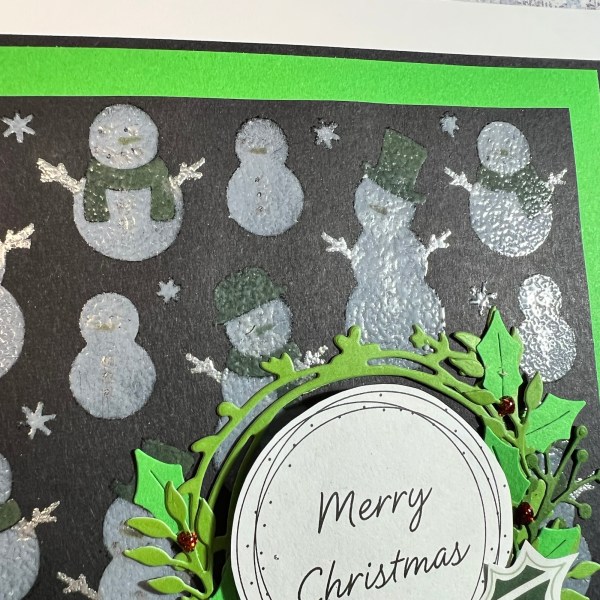
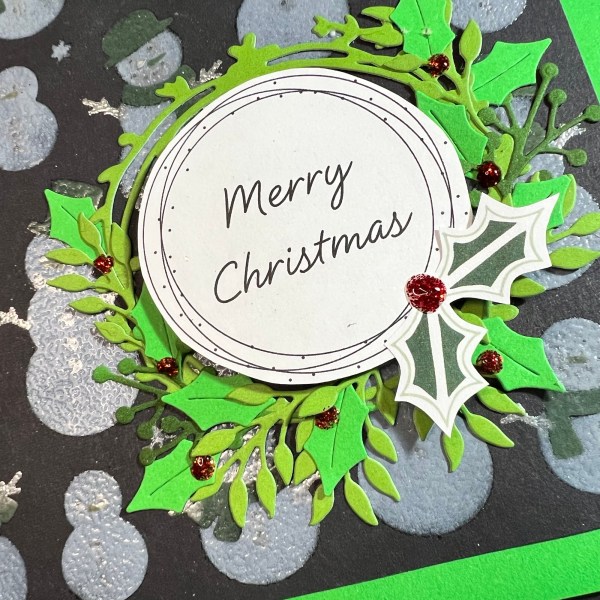
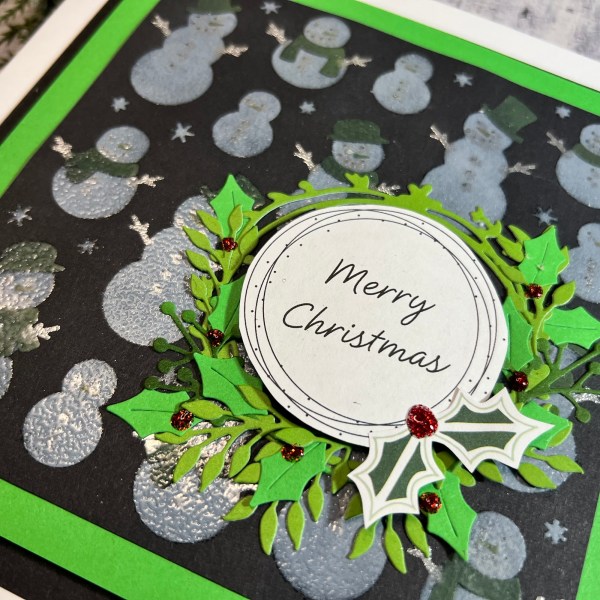
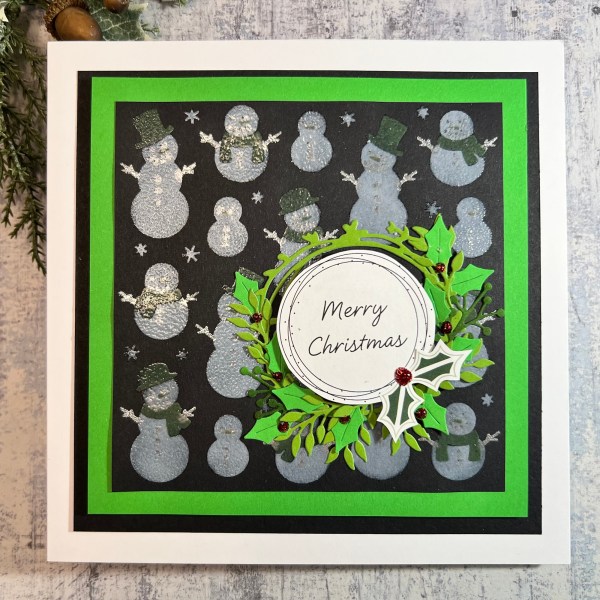
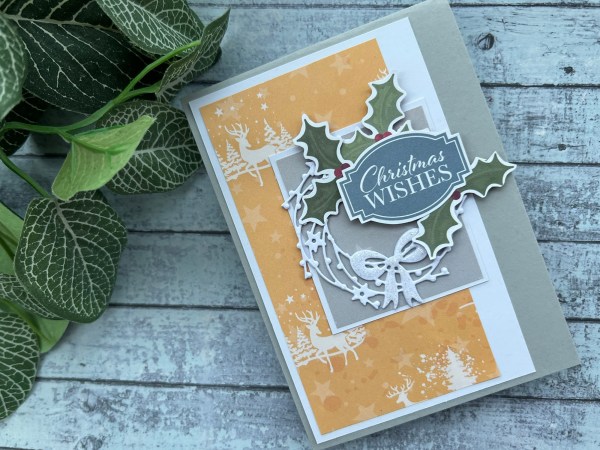
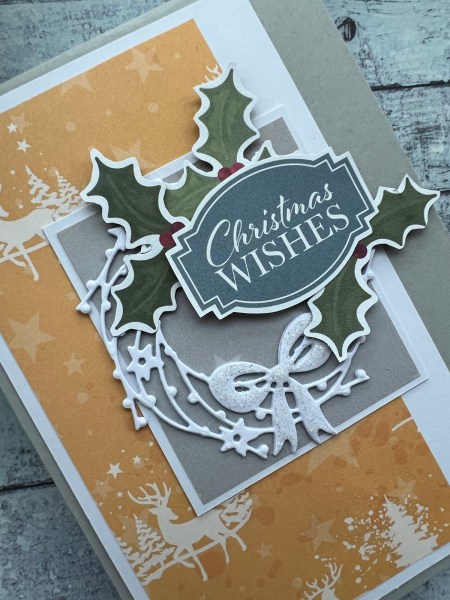
Merry Christmas dear blog readers … just popping on to wish you all the best and to share the last card I actually made for Christmas this year … the one for my lovely hubby! I went for cheery and fun with this card…
I started with the snowflake layering stencil I got from Pink Fresh Studio but hadn’t got around to using. I used white pigment ink for the base and then green distress oxide for the next bit – I added a little orange oxide too but didn’t show so well. I then added the clear embossing powder to the top which gave it a lovely finish. The third layer I added the versafine through and then did silver embossing.
I added the green base panel and then black panel for the bottom layer.
I then die cut some green cardstock with the wreath and then lots of festive fauna.
I then used the cut apart from the magazine kit for the sentiment panel.
I also added the little holly leaves.
I used the glitter glue for the berries!
I added panel to the card blank and called it done! Something a bit different but hopefully hubby liked it.
So hope you have a lovely Christmas and the rest of the festive period! I’m just getting ready to start the cooking and welcome the parents to our home after quite a chilled out morning of gift opening, coffee drinking and pain at chocolat eating!
Sorry I’ve not been around for much this December – I did intend to slow down a little with the crafting after a few busy months of blogging but turned into a bigger break than expected as I got a nasty cold/flu that made me stay in bed a week and then life got busy trying to catch up from that and crafting was almost non-existent! I did however manage to get a couple of hours here and there to get some last minute Christmas projects done!
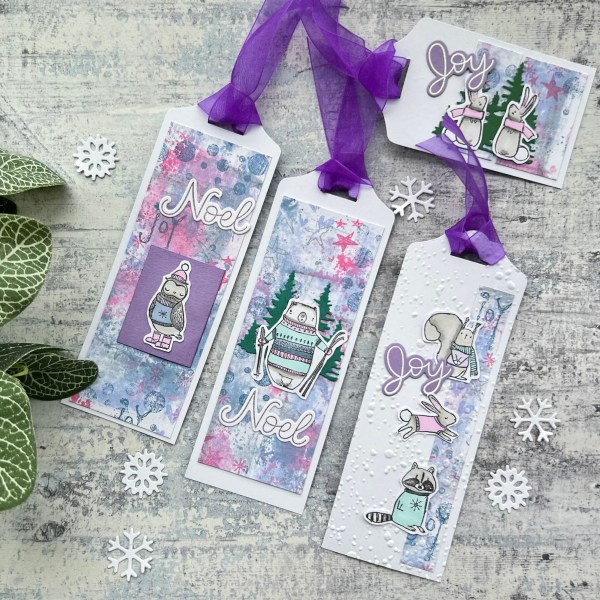
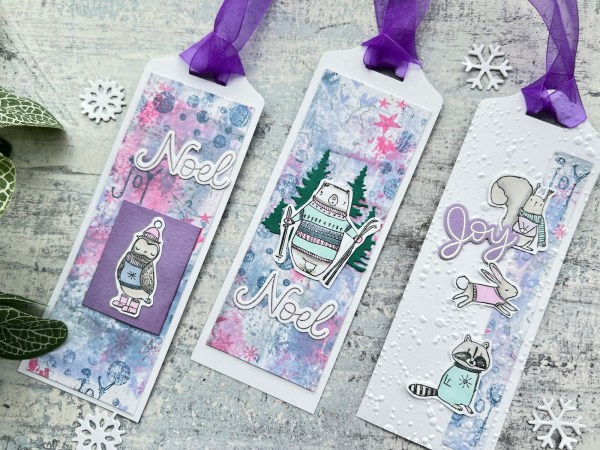
I found the pouch of leftovers from the Forest Friends themed cards I made for the 30 day challenge and decided to make some last minute gift tags.
I started with some 2” strips of white cardstock and punched the ends with the tag punch.
Then added the panels of the inky stamped background I had made using distress oxides.
I had two full strips, one skinny strip and two little offcuts so make three longer tags and one smaller one.
The skinny one I ran through an embossing folder for more interest.
I then added the little forest friends – some with the tree die cuts from the stash!
And then some purple ribbon on the top.
Then I grabbed the Pretty Pink Posh stamp and die set and stamped and die cut the Joy and the Noel as they would both work on the tags in terms of size.
Decided this would do perfectly for my last minute set of tags for gift wrapping!
I have one more Festive Friday project for you next week – but wow I made it all the way up to Christmas!
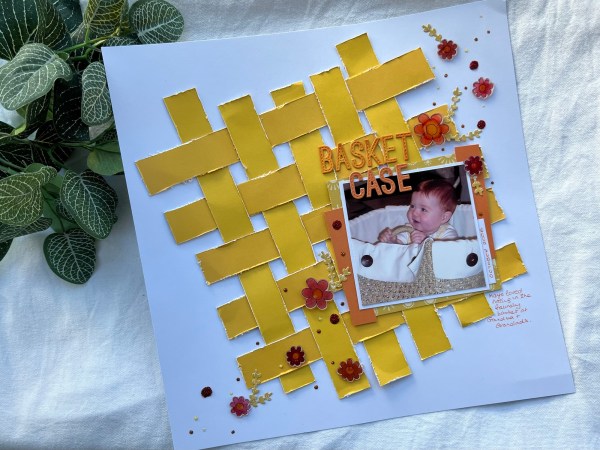
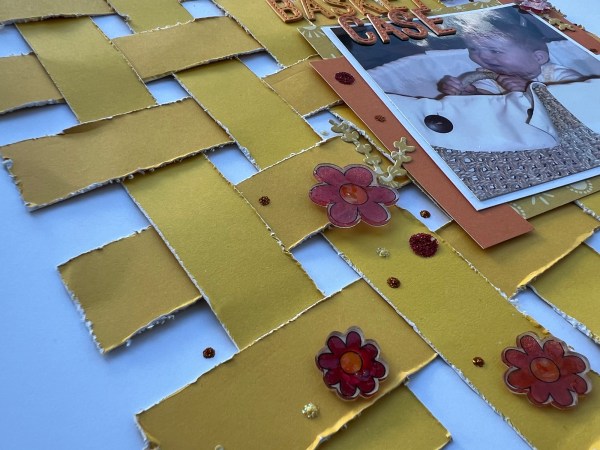
I’m back to using the spring themed shrink plastic kit from Kingston Crafts for my design team projects and this time I decided to a whole set of the cute flowers to use as embellishments for a scrap page.
This was the project part way through…
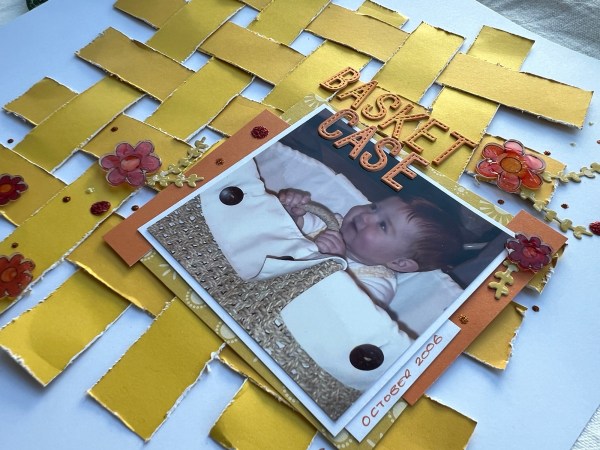
I had decided to create strips of the everyday cardstock for the main background for the page. I then distressed the edges to expose the white core and created a basket weave as it went with the theme of the photo (my daughter as a 6 month old sitting and playing in the ironing basket!). The everyday cardstock is two toned with one side slightly lighter than the other and this worked perfectly for creating some additional but subtle tones to the background.
I mat the photo with white and then a panel from the Summer collection papers and some strips of orange.
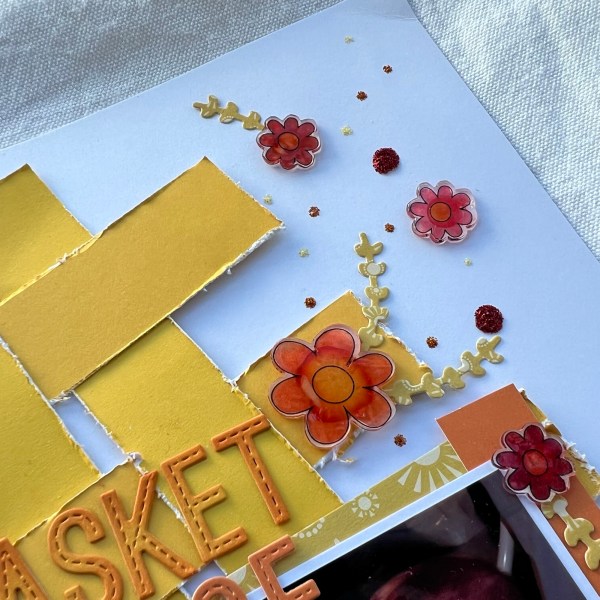
I decided to place the woven strips on an angle and then the picture to the bottom right then created a scatter of the flowers from top right to bottom left. I had coloured the flowers with my stampin write markers in a mix of the orange and pinks to bring in a bit of bright contrast. I then dotted the yellow and orange glitter glue across the same diagonal.
I also added in just a few larger spots of the red glitter glue once the first lot had dried as I wanted some larger bits of sparkle.
Next I worked on the title for the page and went with basket case as it just seemed fitting – I used the everyday cardstock and die cut the letters and stacked them. I decided the yellow ones needed more definition to stand out (I had originally thought they would go under the photo in the white space but changed my mine to put them onto the woven pieces). So I inked them lightly with the coral ink and this helped bring them out. The orange ones for case didn’t need the inking as they already had enough contrast.
I then decided to take some of the patterned paper I had used under the photo and die cut some little leaf sprigs to sit behind the flowers. This just added a little more pattern and texture and helped connect the flowers across the page.
I then added in my journaling and called it done!
With all the woven panels and those cute shrink plastic flowers I didn’t think it needed much else and the important part is of course it was another story told and preserved – which is what scrapbooking is about for me.
I did find a use for the last bits of the paper I used at the beginning of the month to make one more Christmas card.
This time I teamed it with grey cardstock and those lovely holly leaves I fussy cut from the magazine kit.
I added a panel of white too as it felt like it needed another layer.
I added the die cut wreath and added glitter glue to the bow element to add a bit of sparkle.
I raised the sentiment up on foam adhesive to give it some dimension especially as it was over the die cut and the different levels on the front of the card.
So that’s three cards made from that leftover paper I had already cut into last month for one of the colour challenges Martin had set.
Hello! Quick project for my design team contribution for ATSM where the challenge is birthday.
I chose to use some papers up that I’d had in a pouch on the desk for some time and then added in some other papers from another stash where I had already fussy cut the flowers from them!
I added the strips of the patterned paper to the black panel, then the squares of the bright yellow on the top.
Then I added those fussy cut flowers in a trail down the card and left space for the sentiment to go in the middle of them!
I added some sequins for the finishing touch!
I added the panel to a green card base and inside added the panel of white with the yellow square and the two leftover flowers.
So this got some bits used up off the desk – and made a cute birthday card for the challenge!
Quite different with the bold patterns and the black but with the bright green and yellow and blue I think it works nicely!
So this card I made inspired by one of the Online Card Classes. I decided to sign up for the classes but couldn’t justify the price of shipping the kit to the UK so I’ve been doing some stash shopping to see what I could do inspired by the classes even if I couldn’t exactly play along. Then I had little time at the point the classes went live to play – but on day 5 I did manage to grab some time to make this card inspired by something Kristina Werner had made! So now I am sharing it as a Festive Friday card!
I used two stencils but I had to do some masking off of both the border and also the two sections to use one pattern in the bottom part and a separate pattern for the top.
I started with the bottom part where I inked through the small section I had left open with Versamark and then used a green embossing powder. After heat setting that I masked the other section and then inked through a snowflake stencil using a darker green ink. I kept this as a flat card so was doing this directly onto the card blank.
Then I grabbed the Lawn Fawn die cut sentiment and added that in red cardstock (well it’s a dark coral / light poppy red colour).
I then grabbed some snowflakes I die cut from white scraps and added those too.
I then added clear glitter clue to the snowflakes and the die cut sentiment as I felt it just needed something extra given it was (for me) a very simple card! I
I feel I could have added a little more white – maybe a white gel pen border around the stencilled panel? But I do really love the two stencil panel – it’s something a bit different!
Hello dear blog readers! I’m back with another design team contribution – this time for Creative Knockouts where our challenge is full on festive with ‘time to be merry’.
The challenge is sponsored by Mirtillamente stamps and I am using About Christmas No. 1 but only one part of it as it comes with six images in total – but I made an error in printing (must not have used my brain cell!) and it printed larger than I expected so decided to use just the one image on this card!
The line art is so fun for the images and easy to colour – but even better it is good for adding in fun elements like this puffy enamel accents for the hat!
I added some really quick watercolour to the image to bring in the colour and some shading in the beard and then fussy cut out with a wide border around the image (I think with thick line art the wider border looks more proportionate).
Then added the satin white puffy enamel accents and set it aside to dry. This part is important – no prodding at it with your fingers – you will only make a mess!
I looked through the stash of the patterned paper left in my Christmas box and found this fab bold stripe. Perfect for a simple background that has lots of detail.
Then I die cut a scrap of the light green card twice with the label die. I inked up the edges lightly with green ink and then stacked and die cut it with the texture plate die from Waffleflower. This gave it a fun background for the Santa to sit on.
I added a mat of the black and then added it to the 5×7 card. Then added the Santa image and the Tim Holtz sticker sentiments to bring the black into the front too. Again the bold line art meant I wanted the black to go throughout the card front in a few ways.
Decided with the texture from the hat no further embellishment required.
Now to decide what to do with the other images in the digital stamp and how to use them! But first off to see what everyone else did with their cards on the design team!
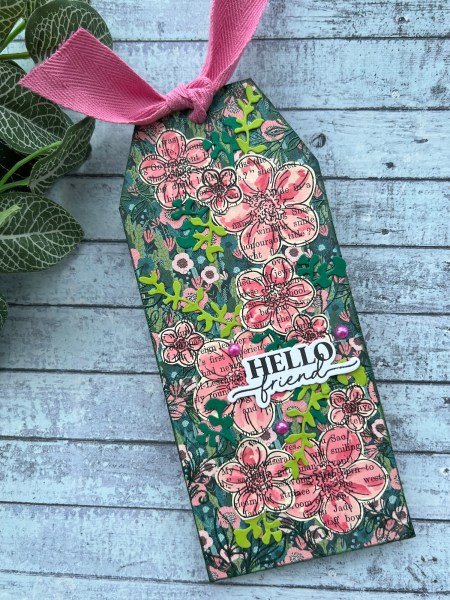
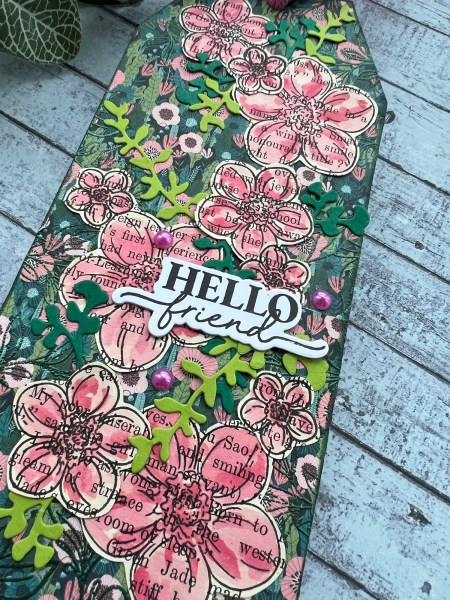
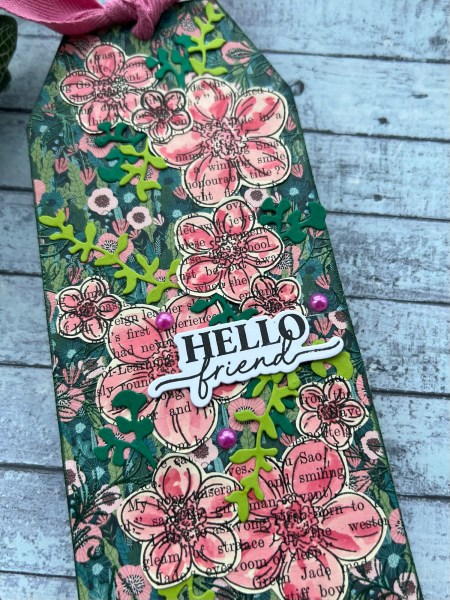
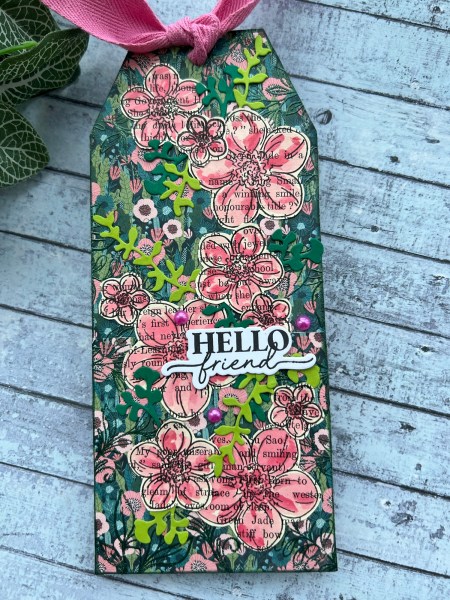
Decided to join in with the decorated tag swap over at UK stampers forum again. Although this is a December swap because we don’t actually swap until Jan I went floral rather than festive with my design.
I started with a tag cut from waste packaging and covered it with patterned paper that was sitting on the desk waiting for use – turns out its use was this tag!
When I was covered I inked the edge with Tranquil Tide ink as I felt that went with the colour of the paper. Then I stamped some leaf stamps all around the edge in versamark and embossed with the dark green powder.
I know it ended up pretty much covered up but up close you can see the texture if nothing else.
Then I took some bookprint and stamped lots of the flowers which were in a magazine kit. I then coloured them using my paint brush, water and ink. I chose a few colours of pink to make them look more interesting and try and keep similar to the colour of the background paper.
I fussy cut them out (they were easy shapes to cut) and then glued them down. I added the die cut leaves which were pre diecut from scraps and with the two colours of green I used this kept them similar but also fun. I also liked them going both under and over the flowers.
I finished off with the sentiment, three pearls and the ribbon.