Festive Friday 2025 #15

Once again I am glad that my Festive Friday was a little ahead – I actually made these when I was feeling a little unwell with a cold – except that’s now turned into two weeks of barely being vertical with what we think is Covid! Yesterday I managed to stay awake for six hours before needing a sleep so improving but pretty fed up! Anyways here is the blog post all about those cards I made almost two weeks ago!

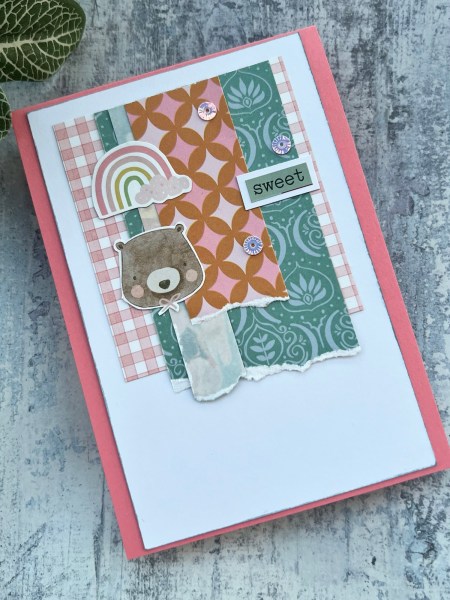
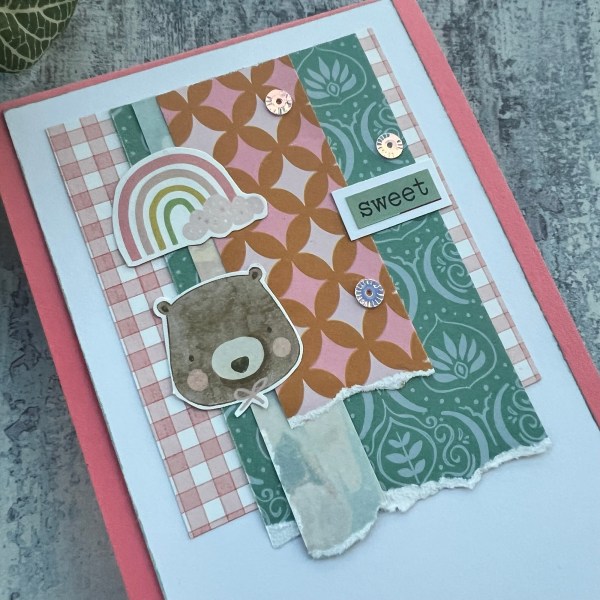
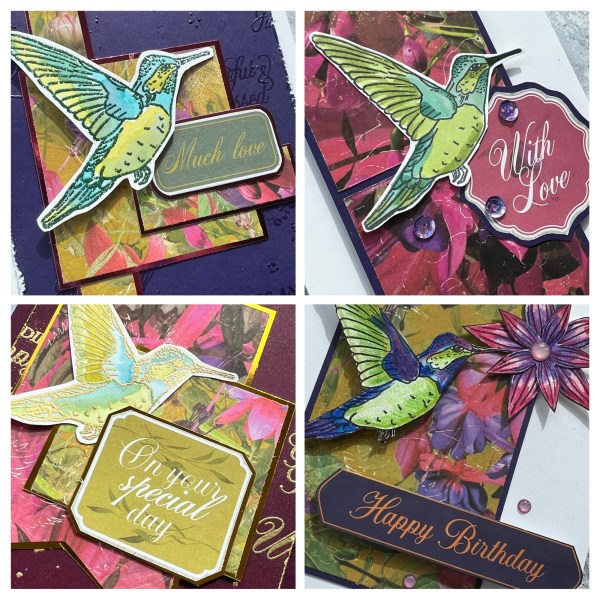
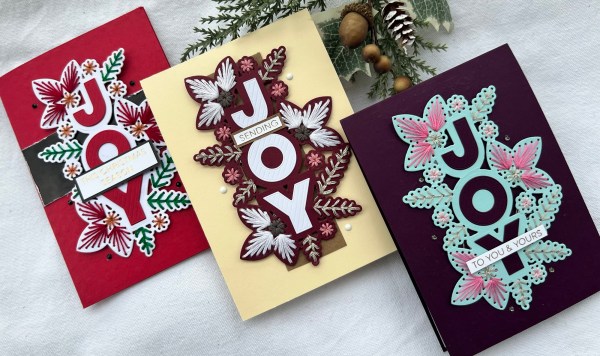
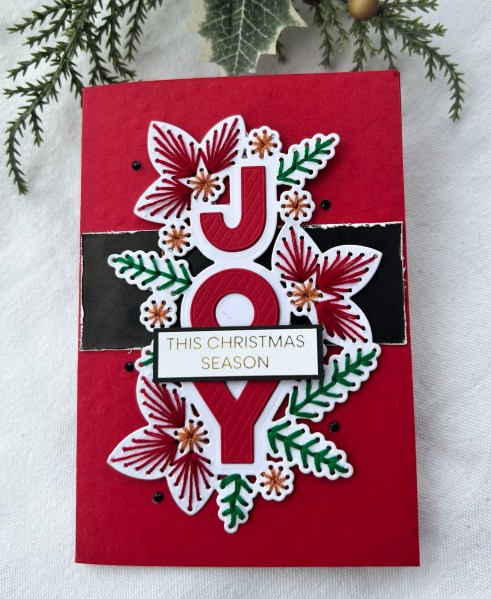
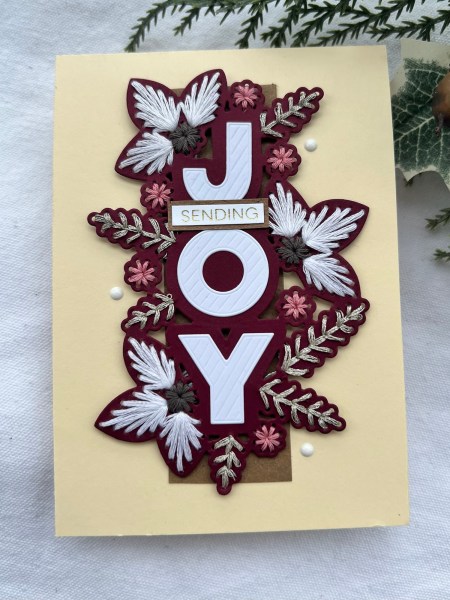
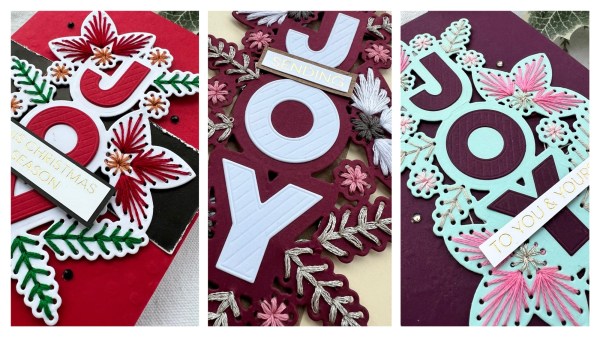
I know I’ve been doing my magazine kit challenge recently so I am not really surprised that I then decided to pull out the Christmas magazine kit that I got a few months ago and make some more cards from that for todays Festive Friday – I just went with some of the papers I had already cut into and then some of the cut apart toppers and decorative elements. I ended up with a few cards as a result. So that’s a couple of Fridays on the run I’ve shared multiple cards! Definitely well on track with my makes for this year!

I mixed in some lilac and grey card stock for both the bases and sometimes mats. I tried to pull in any scraps I had to not cut into new card where possible.

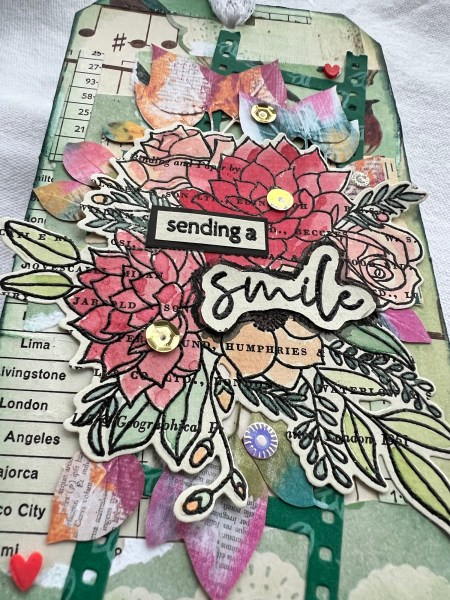
I sometimes added in some dimension too raising elements up on some foam tabs.

Bits of scrap ribbon also got pulled in where I had used a tag – after all my friend Helen says “can’t have a naked tag”!

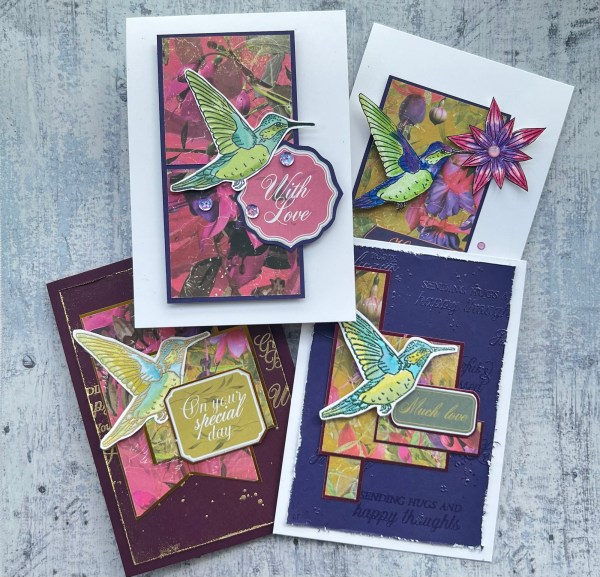
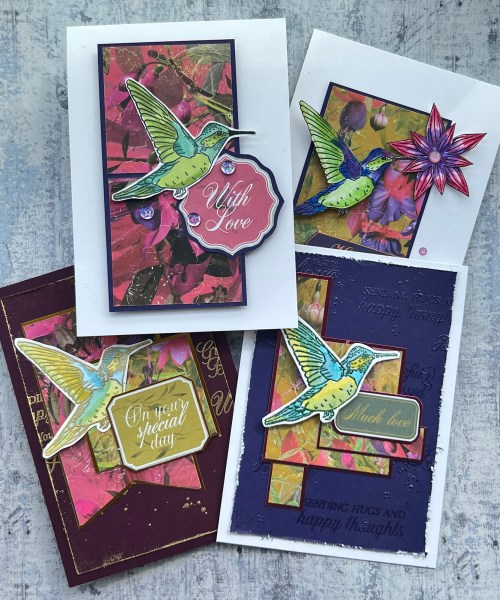
So there you go – four cards – all pretty much cut and stick type of designs – but cute and fun to make. And only a few scraps left of these particular papers – although loads left of the actual paper kit so expect to see more of these cards at some point!

Happy crafting!

Catherine

Baby card

When I was at a crop in February one of the lovely ladies I was sat with gave me the challenge to use up my scraps (at this point I had made two scrapbook pages and my Mum’s Mother’s Day card all from the leftovers from a couple of page kits) and see if I could get anything else made…

… and this was the result!

I did wait until I got home to get the pink card blank made up to add the topper to – but I managed to fussy cut the images and the word from scraps and then layer up the little leftover bits to make a cute baby card.

I love how sweet this is and I am pleased to say it also has now made its way to my friend Jayne, whose daughter has recently given birth to a gorgeous little girl, Romy.

Not bad for the little puddle of scraps leftover from some page kits! I think I did pack just a couple more bits away when I finished at the crop but definitely there were not enough pieces to make a project from – so they will just go into the generic scraps pile!

Happy crafting!

Catherine

DT: ATSM – #490 – die cuts and/or stencils

I decided to do my design team contribution for Addicted to Stamps and More using bits leftover from other projects – and this totally was leftovers!

The die cuts are leftover from the spellbinders stitching die set which I die cut lots of and then popped in a pouch to be used at some other point!

The paper for the background is leftover from a scrapping page kit I got from Hey Little Magpie back in autumn!

And the cardblank is made from leftover cardstock from other projects!

So once I had arranged the flowers onto the notecard and glued them in place. I then stamped and die cut the sentiment from Lawn Fawn.

I stacked the hugs sentiment up a few times to give it dimension.

So it turned out to be a simple card to make because the die cuts were already done! Love how cute these flowers are and now I’ve used up the ones that were in the pouch it’s time for another die cutting of the scraps session!

Looking forward to seeing what everyone else on the blog has been up to!

Happy crafting!

Catherine

UK stampers forum decorated tag swap

I pulled together some scraps to make a fun background for this tag.

I then inked it up and added the die cut frame. As it is for the UK stampers forum swap I needed to stamp something so I stamped and embossed the floral image on the book print paper.

I watercoloured the floral image (My Favorite Thing) and die cut it out. I then added some of the 49th & Market leaves for more colour.

I then added some sequins from the Feb Hey Little Magpie embellishment kit.

I then chose the sentiment and embossed that too!

Added some lace for the tag!

Happy crafting!

Catherine

Happy Mother’s Day!

Yes I know mothering Sunday was last weekend in the UK but we ended up postponing it a week thanks to a revolting cold that got me and bizarrely my daughter wasn’t well either. I didn’t feel up to venturing out and certainly didn’t want to risk passing it on to my parents (my Mum has had a lingering cold for a few weeks already) so we postponed and decided that we would do Mother’s Day a week later instead. As it turned out I still wasn’t well – I did feel well enough to get out of the house for a couple of hours – got straight back into pjs as soon as we got home and straight back to bed with pain relief as felt dreadful again! It’s been a pants 10 days of being ill! 😷

Anyways … I rescheduled posting this card to now so at least Mum could see it first!

I made this card using leftover papers at a crop in February and then set it aside and finished it off as my Mother’s Day card for my Mum!

I love the cute papers and how cheery they are.

I chose the bird embellishment from the 49th & Market kit of ephemera.

I also added the sequins and twine from the embellishment kit from Hey Little Magpie.

To finish off I added the die cut letters and the stamped sentiment to make it a perfect card for my Mum!

I am hoping by the time this post is live I have managed to survive a day of working and can safely say I am on the mend!

Happy crafting!

Catherine

Use up a magazine #3

Today’s episode of my use up a magazine series has four finished cards … and the next episode should finish off the full batch I prepped for with another five! And that is because I did a one sheet wonder with one of the pieces of paper in the kit. Here is the plan I made – it doesn’t quite go across a full width of A4 because I know that the magazine page would be a rough edge at one side where I tore it out and that way it wouldn’t be a problem to make it narrower.

So as with all in this series I’ve videoed the process so check out my YouTube channel.

I decided to try and keep things easy for myself by using the same focal image for all the cards – the hummingbird. So I stamped all the birds and coloured them all as one thing and then cut them out – this made the assembling part of the cards easier. I did colour them in different ways though to make them a little different and enjoyed putting some different techniques to the test.

Card one I went in with some additional embossing on the background using the stamps from the set and the splatter embossing technique. I also distressed the edge of the panel as it was the fab Kingston Crafts cardstock with the white core. Always love distressing this cardstock.

Card two was super simple – two 6×6 cm squares mat onto the dark purple cardstock and raised up on foam tabs for dimension.

Using the sentiments from the printed kit is also helpful to keep it simple!

Card three I went back to the embossed background with the sentiments – although admittedly covered most of it up – I also went a little crazy with gold embossing powder and the gold foiled cardstock that is the mat for the panels. Shiny! ✨

The final one I did do fussy cutting to the image to get rid of the white border and also added in the flower. As this one I had coloured using prismacolours I also added in more pink and some purple so it worked with the papers better.

It was so much fun making these and I know the final five will also be easy to put together as the papers are cut, the focal image is coloured and cut – they just need to be assembled- although obviously I sometimes make that a little more challenging by adding to the background a little more! You’ll have to wait and see what I come up with!

I’m finding this series a good challenge at the moment to think creatively on how I might put something together and make the most of the kit rather than always grabbing for other supplies – you never know though, I may end up teaming this kit with other supplies as the series goes on!

Happy crafting!

Catherine

DT: Kingston Crafts – Rainbow kit – scrapping Saturday

To say I love this rainbow kit from Kingston Crafts is an understatement and of course the first thing I had to do with it was scrap the pictures of my rainbow hair! 🌈

I mean – this paper kit was made for these pictures!

I had so much fun using the kit and the whole page was made from the kit and a tiny amount of white cardstock to write the journalling on.

So many fab die cuts to use.

And those papers – just amazing!

The kit is so generous and I know I could make so many pages from it so looking forward to sharing so much more!

This page got quite a bit of air time – clearly my hair is a little bit of a talking point! Although as I’m currently blonde Nigel did seem disappointed to hear that so maybe it is time for colour to come back to my bonce?!

Happy crafting!

Catherine

Festive Friday 2025 #14

Today’s festive friday project was a quick one because I already had the sewing done! But obviously if I had been sewing these as well as assembling them it would have been a longer job! So please take this as a reminder that you don’t always have to make a project start to finish – do them in stages so it makes the final job of putting them together easy!

And easy was needed as I put these together last weekend when I was feeling rough with the start of the cold that then knocked me out for days and wasn’t able to sit for long at the craft desk but wanted to get a bit of making done!

And so three cards made!

I had to die cut the letters for the centre of the joy which on the red one I stacked a couple of layers for dimension – but the other two I kept flat.

I started with this one – the pale colours pop against the dark blackberry bliss background.

I actually dry embossed the background but didn’t quite get the sandwich right in my spellbinders platinum 6 so it is only subtle – I am still learning how to do each sandwich for the many types of folders I have!

I then kept it simple – glued the sewn piece into place and then added a foiled sentiment which I used a spellbinders press plate to create and then trimmed into the strip. I added some scrap cardstock under the strip to just make it a little dimensional above the sewing.

I then added some dark grey gems that I thought worked with the sewing.

Next I chose a red card base for this more traditional looking card. Again I embossed the card front – this time I think the sandwich worked better with the shim I added and so more of an impression – this time some dots.

I added the band of black cardstock which I distressed to reveal the white core.

The sentiment (same foiling with the press plate) I added onto a layer of the black to bring connection to the background.

And of course the black gems.

Finally this one was very simple – a cream card base and a panel of Kraft under both the sentiment and the sewn element.

I think with the bright white letters and some of the sewing it added a nice contrast with the cream card.

Adding the white enamel accents also helped to keep that theme going.

So three cards that were simple to put together – but mainly because all the impact comes from the sewing and I did that months ago so they were ready to grab and get assembling!

Now I just need to feel better so I can sit in the craft room again – not managed more than a couple of hours awake at a time for most of the week – it’s not been fun!

Happy crafting!

Catherine

DT: Creative Knockouts – embossing

Today’s challenge at Creative Knockouts is to use embossing – so I did both types for my card. I used a digital stamp from Sheepski designs who unfortunately no longer is selling their designs – sad to see a creator close their business – but you can still follow their creativity at their blog.

Anyway I used the butterfly image that has the cogs and steampunk type design – so I created a background using the cogs stencil in my stash. After inking it I added clear embossing powder to it which gave it a fun texture.

I then took a separate piece of card and inked it with the same colours but heavier inking and ran it through an embossing folder with the letters. I then inked over the top of that to bring out the dimension and texture.

I coloured the image with stampin blend markers and then die cut it. I added two more die cuts behind it to stack it up and then lightly inked the edge.

I then used the die cut thank you that was already on my desk which is one of the dies that came with the spellbinders machine.

Simple and I think quite fun!

Happy crafting!

Catherine

DT: Kingston Crafts – foil cardstock stock

A black and white picture is always fun to scrap because any colour goes well with it – so I chose this selfie I took New Years Eve 2020 and decided to scrap it with all the colours of the super bright and shiny foiled cardstock from Kingston Crafts (except the silver and gold).

I kept it simple with die cutting some rings from each colour in a few sizes and then worked out how I wanted to arrange them onto a piece of white 12×12

Next I decided for the background I wanted to stamp happy using a few different stamps in shades of grey.

Once I had done this I glued each foiled circle down in place.

I also added some coloured stamping with the little crosses from the Biggest Wish stamp set.

I just used colours of distress ink I thought went with this rainbow of colours from the foiled cardstock and scattered them over the page.

I then framed the picture with the black foil and raised that up over the circles with just a small piece of the black and white patterned paper to the right with the tab I also cut from black paper and hand wrote the date on it.

I die cut the New Year from an old Waffleflower die set from the black foiled cardstock and then the letters for the title from the same – that black foiled cardstock is fabulous! I can see I will run out of that first!

I added my journalling with pen all about how I was glad to see the end of 2020 but how we celebrated having survived the first part of the pandemic (my hubby and I had spent most of December poorly with COVID-19 so this was us being grateful to be feeling more human by this point! – it’s odd that I am blogging this now when I have been so poorly the last few days with another cold virus that I am suspecting was actually Covid!)

I also die cut some tiny hearts from the black foiled cardstock and added those as little tiny embellishments all over the page.

Shiny cardstock isn’t normally my thing for scrapbooking but this page may well have converted me! It is so shiny and really brought the fun to my page!

I hope you like this! And it is one of the ‘as seen on tv’ projects … so funny to see my own face popping on the tv!

Happy crafting!

Catherine