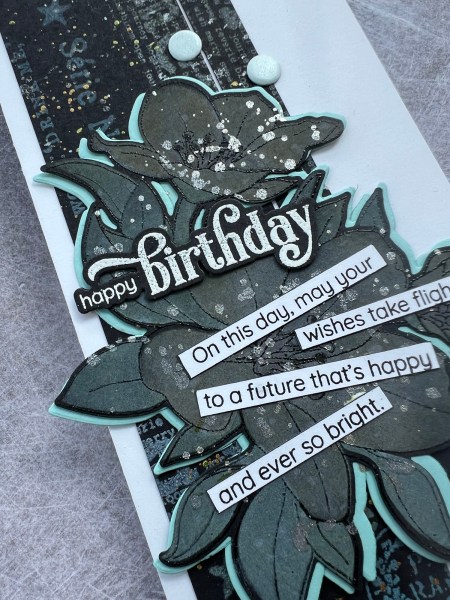
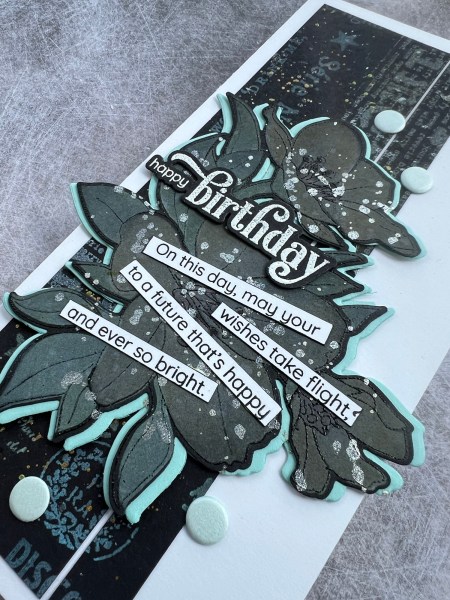
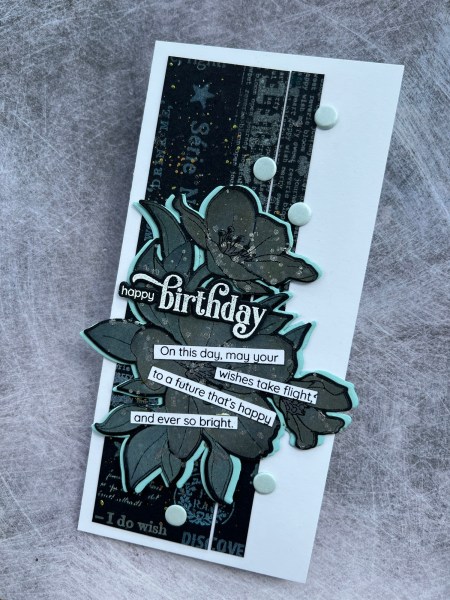
Last year I took pieces of dsp and cut them apart and popped them into pouches so they were ready to make up some cards for my monthly patterned paper challenge at the beginning of the month… well I found one of the pouches when having a tidy up and decided to pause the tidying and make a card!
Entering this into the anything goes challenge at Crafty gals
I chose all the blue flowers and then grabbed some pieces of Starry Sky dsp from the stash and made up a background panel… then made a focal piece using another piece of the dsp and the big pink flower.
I then stamped and die cut and stacked up the sentiment from the Waffleflower set and sandwiched some thread behind it before glueing it into place on the card.
A week or so ago I made a tag from a black background I had been experimenting with and I had a little bit of the background left so I made a card using it. I also used the same Altenew Splendid bouquet stamp for the focal point but this time I did colour it differently. I wanted to see what black embossed lines would look like as opposed to the white ones. Well it certainly gave it a different look.
I also used the distress oxides direct into the black without a layer of white pigment ink… that made it significantly duller and more subtle in colour… but still a fun effect. I decided to also splatter it quite a lot with a gold shimmer.
I also added two layers underneath which I offset slightly to frame the image not just stack it for dimension.
This brought out the blue tones in the background I think and gave it a different look.
To add to that I added blue card Candi for the embellishment.
For the sentiment I thought that I would add both the bigger sentiment and the extra sentiment cut into strips. This gave the card another focal point rather than the flower and I like how this brightened what was quite a dark card.
I say dark but with all the sparkly splatter it is quite shiny when the light catches it … but all in all a fun different way to use this amazing floral piece I am obsessed with and can’t stop grabbing… and pleased I found a use for the leftover strips of the background I had made!
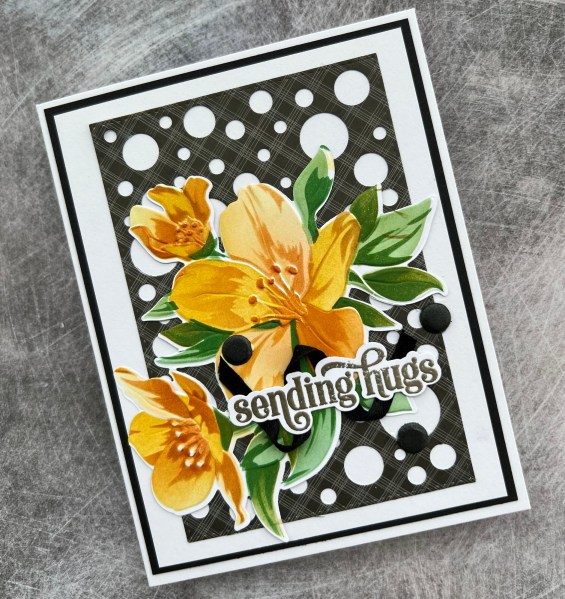
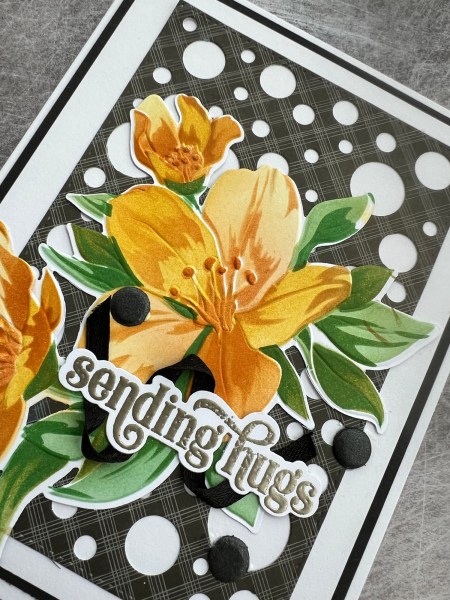
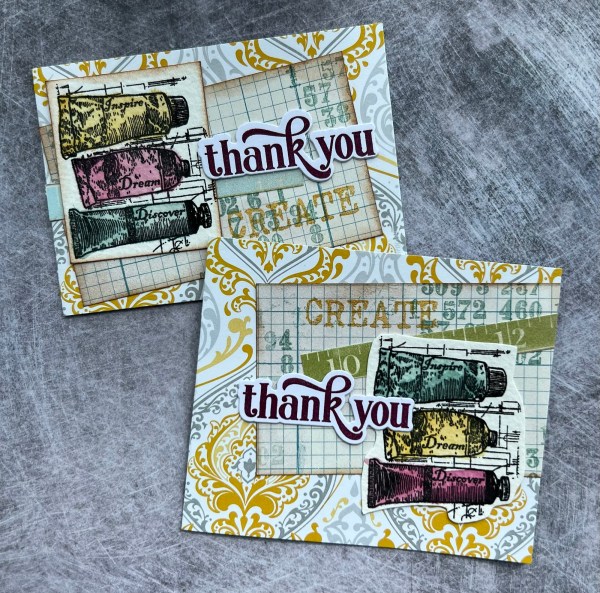
Today’s card I made using the fabulous Altenew Splendid Bouquet bundle.
I started by die cutting the floral element out and then embossed it with the 3D embossing folder. Then I added the ink using the stencils.
I just love how easy these stencils make it to add colour perfectly. I chose to use the fossilised amber and the wild honey distress inks for the flowers and the. Peeled paint and lucky clover for the leaves.
I decided to use a panel of dsp left from another project and die cut it with a gummiapan cover die to create a fun background.
I then embossed and die cut the sentiment, sandwiching a piece of ribbon between it and the focal flowers.
I finished off with the panel of black beneath the white behind the die cut panel.
I also added some black card candi to finish off.
I think this looks pretty dramatic and like it’s been lots of work but really it just is the layering stencils that do most of the work!
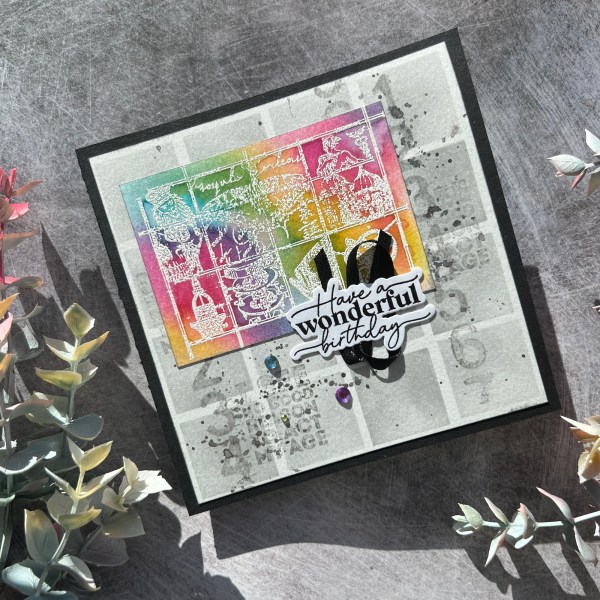
Now it’s the turn of the second card. This time I went to town with colourful stamping on some cardstock to create my own background paper. I used the same colour distress inks but sometimes stamped them off so lots of different shades. I also added in the Hickory Smoke too for a subtle grey.
I mat this panel on to block cardstock. I then used some of the same black and created a panel I ran through the big shot with the Old paper embossing folder. I then used the shimmer paint and brayered it over the texture so just pick up a bit of the shimmer on the raised elements. I placed this onto the panel to be a contrast for the focal element to sit on.
I then created the sentiment using the Waffleflower stamps and dies and die cut it a few times to stack up. I love the white sentiment on black.
I finished off with the blue gems in different colours and sizes to add that bit of bling!
Pleased with how both cards ended up – and it was fun to try a different technique for creating a rainbow with a difference … still want to have a go at a floral image like Amy did but for now this was fun to do and good to make me move away from Altenew florals if only for a short while!
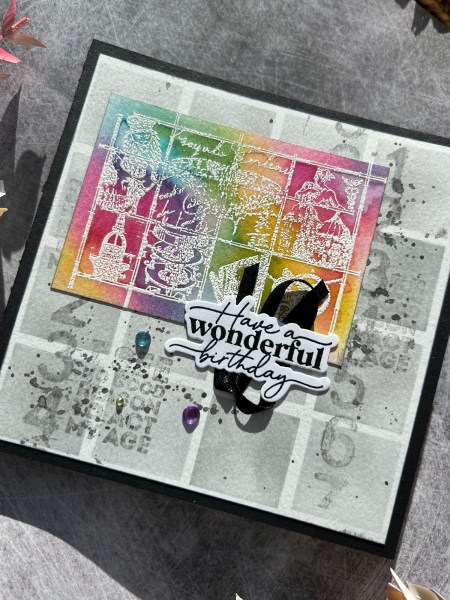
The cards I will share today and tomorrow I made because I was inspired by these cards that Amy R made using an interesting way of getting the rainbow effect. I didn’t however choose to go floral as I had been maybe overdoing it with flower cards recently and so went stash shopping in my older stash and found a Paperartsy stamp I thought would work well for giving it a go!
I heat embossed the tiled image using white embossing onto mixed media cardstock. I did it twice because why not!
Then I ink blended using Fossilised amber, picked raspberry, mermaid lagoon and then used a water brush and the inks smooshed on the glass mat to colour them in. The technique of blending first makes the blending more organic and less structured to create the rainbow colours … although on one of my panels I did blend in stripes rather than patches just to make them different.
Once embossed and coloured I then trimmed them down and edged them with the Hickory smoke to create a subtle border.
Then I had to decide what to do with them.
Amy had gone for a grey stencilled background for her flowers so I decided to go grey for the first one but used a stencil to create the squares. I then stamped some of the other stamps in the same set to create a grungy background. I added some splattered Hickory Smoke and Black Soot too… and then grabbed some sparkly black paint and splattered that too! After all it isn’t an Amy card without some splatter!
I decided to add a birthday sentiment on this and stamped and die cut the Waffleflower one from my newer stash and added a scrap of black ribbon behind it to add a bit of texture.
I then hunted through the gems to find three different coloured ones (my gem stash is rather depleted and needs replenishing soon so had little choice) and added those!
That was card 1.
Will share how I finished card 2 tomorrow for you.
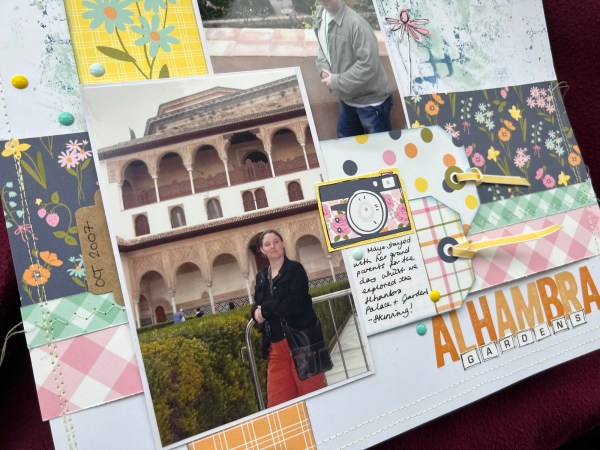
My lovely and talented friend Helen is celebrating surpassing her 500 subscriber milestone over at YouTube so I joined her with making a page with a few instructions.
Use tags
White background
Stitching
2 or more pictures
Mixed media / doodling
So here is what I made …
I videoed the process and have that up on my YouTube channel.
I used the kit I got from Hey Little Magpie at the crop last weekend and had lots of fun playing putting this together!
Some distress oxide playing on the background and lots of sewing around the edges.
Love the little tags and those cute flower die cuts too!
Hope you like what I did and also go support Helen with her celebration!
Today’s card is a use up the scraps on the desk card … just because that’s what needed to happen and it’s pretty much all I had time for to create this! Plus I have a thing about adding strips of patterned paper to cards at the moment!
The strips were cut ages ago for a different festive Friday project and just sat there … so I put them together to show stripes of each side of the paper and then cut a panel that would work on a card front… with an angled finish. To be honest if I had thought it through I would have adhered them the other side up so the angle was the other way as that works better in my eyes but sometimes that’s not how it goes!
I then created a little focal topper from a stamped image and then added the little snowflakes and unfortunately when I created the mat from the red I got a spot of red on the topper so decided to go for a blended ink finish.
It’s not perfect but it’s still cute!
I added some die cuts from the stash underneath to create a cluster look to the focal point and then an embossed sentiment to finish off.
I say finish off but I then decided to add glossy accents to the centre of the snowflakes … not sure it adds much but some days you just end up doing these things.
So my project is done. I feel good for making use of the scraps but I won’t lie it’s not my favourite card I’ve ever made. Sometimes it just goes that way and I’ve learnt the point of me crafting is sometimes just the doing not the final product! And I still think it’s ok… just not one of my favourites!
So I had a very lovely few hours making lots of backgrounds whilst watching Tim Holtz on YouTube – I just played with distress inks and distress oxides and made lots of backgrounds as works in progress for me to grab as and when I fancy to make cards from.
Well I grabbed this one and started transforming it just by playing and grabbing stuff … no plan to start with and certainly wouldn’t have guessed where it ended up!
So I can see blues and greens and stencilling in there and I’m guessing a mix of oxide and ink but who knows? I think I used most of the colours in my collections during the play just grabbing them randomly!
So I started by grabbing a stampin write marker and adding definition to the leaf stencilling.
But then I was less keen on it … so needed a way to cover it up! out came the zero waste leaf die from Altenew and white cardstock.
Hmmm … still not happy .., but then I spotted a pouch of cut apart dsp that I refound whilst tidying the other day and put it on the desk to get it used… and hey presto a card came together!
Most of the background is covered but it is still visible in some spots and the colours went well with the greens of the leaves and the contrast of the red.
And I used up lots of the dsp left including all the cut apart pieces so I was very happy to put it to good use in a way that surprised me!
Added two gems from the stash and also a sentiment I had die cut and stacked (Waffleflower).
I say this is the final set because this is where I got to … but doesn’t mean I won’t make more as making these quick and easy little projects using up stash and scraps is so much fun!
These ones I grabbed pre coloured digital images and fussy cut them out as the focal images. I also added these black chalkboard type stickers I found in the stash!
What has made these projects so easy too is the sentiments … I just stamped lots of the sentiments in one session and embossed them and die cut them and stacked them … all from my scraps and have them sitting there ready to use. In this case silver embossed the Waffleflower ones!
And then one more with scraps of the scraps all made into a little collage …
Then the stamped image and the sentiment … in this case I also added some staples to add to the collage effect!
Normal cardmaking projects to resume tomorrow – but I did enjoy playing with scraps and much loved old dsp to make these little notecards!
Following on from yesterdays I got in the zone and made more little notecards from old dsp …
Some I added die cut flowers which I cut from scraps of cardstock and then added the sentiment…
Others I added the little stamped image I coloured with ink and water…
I also added a little stamping to the panel of grid dsp on these.
I kept going just using up the dsp I couldn’t bear to throw out but knew I needed to not hoard any longer!
This final one for today was simple.
Throughout these projects I’ve been refusing to use anything but scraps and managed to almost clear out the little pouch of small scraps to make them. impressed with myself!