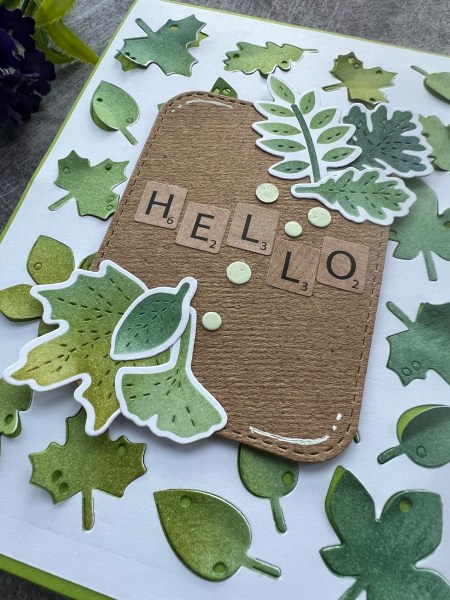
Another card using my new stash and this time I did the die cutting first and then added the stencil which meant it lined up well!
This created a lovely clean background with the die cut elements that add lovely texture.
I decided to add the extra leaves with the diecut texture and just added the colour through the stencil.
I decided to add a panel of a die cut rounded rectangle. I raised it up on some foam to give dimensions.
I then added some stickers for the sentiment and some die cut circles for the embellishment. I also added some little doodles in white gel pen for the finishing touch.
I love the stitched details on those dies plus all the texture created by that background panel.
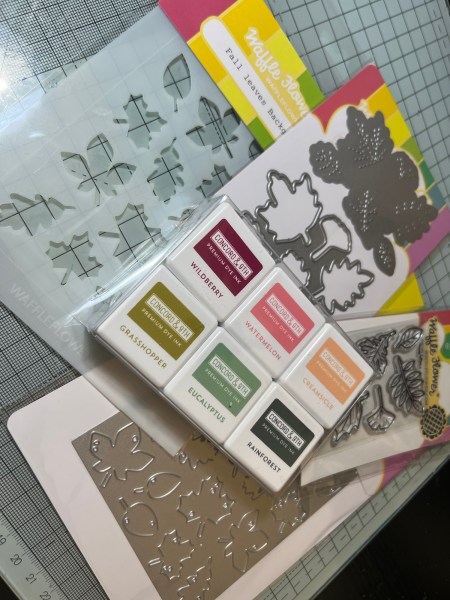
Love this collection of supplies and love the Concord & 9th inks. They blend so nicely. Looking forward to playing with the other colours.
Firstly new inks from Concord & 9th and then the fall leaves collection from Waffle Flower.
I started with a card that didn’t quite go to plan …
I started with the stencil and added the three green/blue inks but then realised I should have die cut first as it’s impossible to line up and didn’t manage to get it straight.
So to make it less obvious I decided to then ink up the background too including some splatter!
Next I stamped the images and then blended over the top of them using the small stencil that does with the individual dies and then cut them out.
I decided to use the Kraft flower from the stash and then added those stamped leaves around the flower. Next I added the sentiment strip with white embossing and some gold thread for the final embellishment.
I added the panel to a green card blank.
Love the dimension across the central panel and the little bits of movement with the background die cut panel.
I then made a second card using similar supplies but this time doing it the right way round … but you will have to wait till tomorrow to see that!
I made this a little while ago using old papers and a card blank from an old kit that I had lopped a bit of one end off but never ended up adding it to the blog so I gave myself a week off making Christmas stuff and decided to eventually post this! Really need to get some more Christmas projects planned into my next few weeks or will be continually be on the back foot having set myself a challenge of weekly festive projects … anyways … on with this weeks card.
Always fun to put simple cards together from leftover stash!
The card blank has been foiled which makes it lovely and shiny so all it needed was a strip of patterned paper down one edge and then the cluster of papers and cut out paper elements down the middle.
Pop of red helped to make it fun and then the Tim Holtz sentiment cut out finished it off!
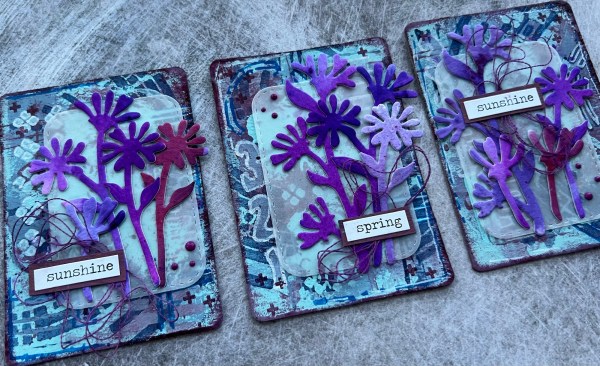
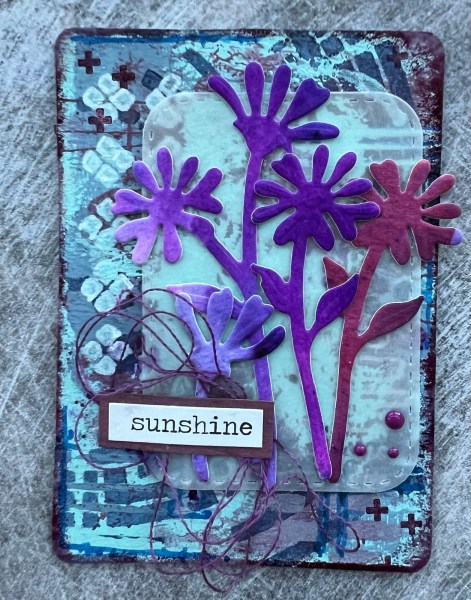
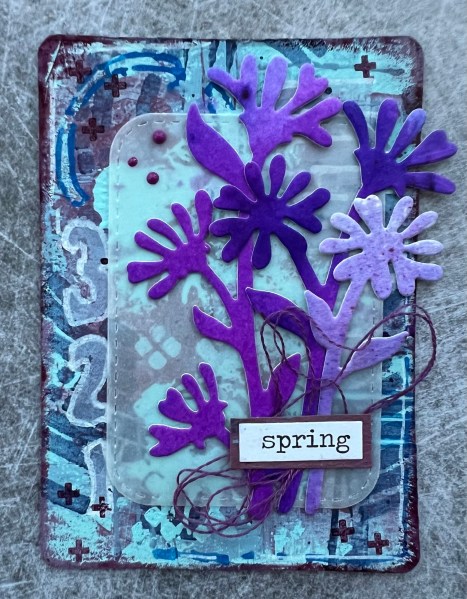
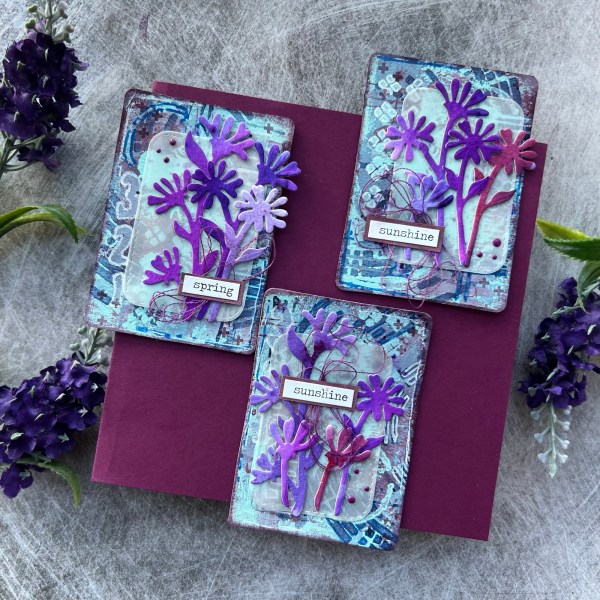
The theme at UK Stampers Forum is Spring Flowers and I decided to join in again this month as I got in the mood to get painty and this is what I fancied making!
Admittedly at first glance these may not appear particularly spring like (usually would have gone yellow for daffodils or white for snowdrops) but my mojo wanted to play with purples so let’s think I was inspired by purple crocus instead even if the shapes of the flower are far from crocus like!
Ah well some days you just got to go with the mojo and where it decided to go and forget the rules!
Also the rule for UK stampers forum is stamping and whilst there is stamping in the background it is barely visible from the way I ended up finishing the ATCs. Oops! Again it is where the mojo took me and I went with it!
The backgrounds were made individually using four different Paperartsy paints, some Dylusions spray inks and posca pens with some stampin up ink used for the stamping and the edging. Whilst the dye ink sits on the paint at first it will eventually settle and dry but be warned if using a dye ink on paint it can smear – not really an issue for this style of making but worth noting regardless.
After making the three backgrounds I added die cut vellum and the flowers that I die cut from some watercolour cardstock I had coloured using both the Dylusions spray ink and brushos giving them different purple colours.
I added some thread in a purple colour underneath the sentiment for each – these were sticker labels adhered to some painted paper and cut out.
Then I added the purple enamel accents as final embellishment and called them done!
I did also make a card using the piece of paper I had been using as a palette but will share that another day!
Happy crafting!
Catherine
Last minute edit … the photos I don’t think showed the colours well so the next morning took this which seems more true colours … well that’s what I think anyway!
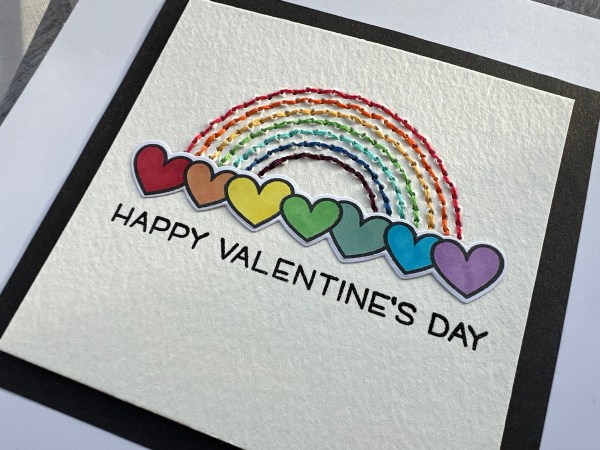
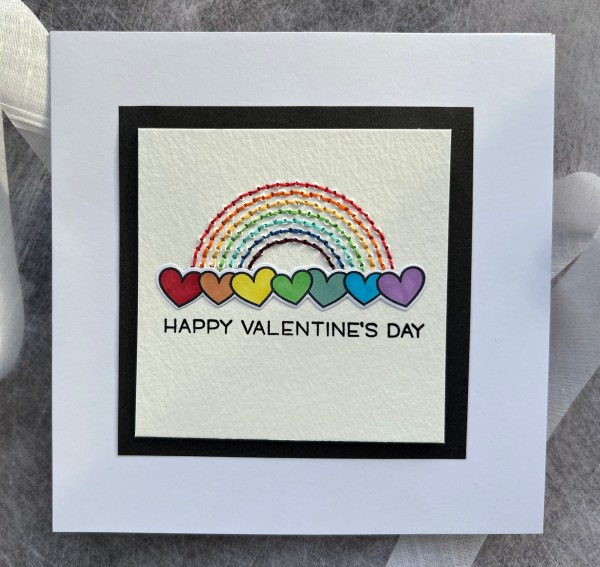
Today I’m sharing the card I made for my hubby for Valentine’s Day.
I went rainbow themed and kept it quite simple! Well I say simple but the sewing took a little while!
I used a punching guide and pokey tool to create the rainbow and then did the sewing with the different colour threads.
Next I took a Lawn Fawn stamp and die set to create the hearts … which perfectly have 7 in a row to do a rainbow effect
I coloured them with promarkers and then die cut them out.
I worked out where I wanted the hearts and then stamped and embossed the sentiment from the same set below.
Then I added the hearts on the top with some pinflair glue to make sure they had strength behind them.
I layered the panel up on black using plenty of glue and double sided tape and some extra card so it would be raised at the same level all around (the sewing adds bulk so you need something to balance it out).
Then added to a larger 7×7 cardblank to finish off!
No extra embellishment needed as the sewing does the job perfectly!
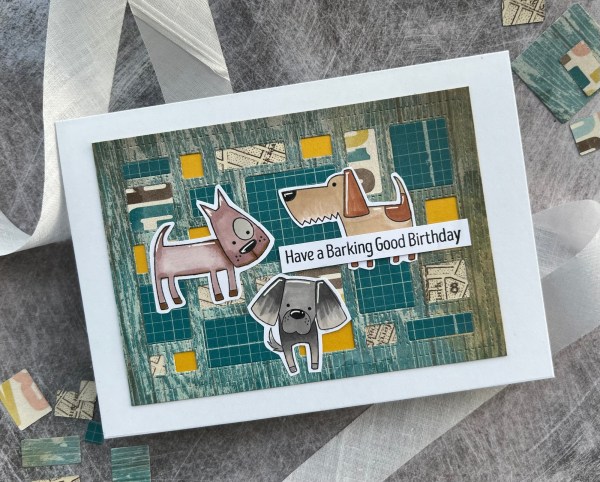
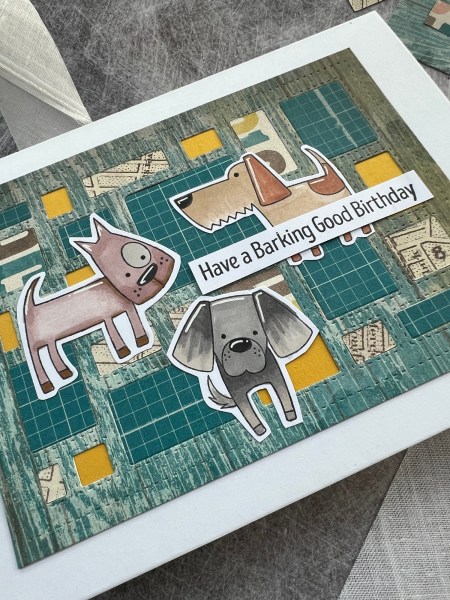
Made a card for my cousins son and as we all know I struggle making cards for males. Decided this time to go for a dog themed card for James.
I used the Creative Expressions coverdie and cut out two pieces of the Sycamore Street dsp and then backed the panel with a mustard cardstock. I pieced the panel back together with the different pieces of paper and left some as they were so the mustard was showing.
I then stamped and using promarkers coloured in the cute dogs from a set I got (my favourite things stamp set). After colouring them I added some little highlights with white gel pen.
I cut out the dogs and added them and then stamped and added the sentiment.
Inside the card I added the little paw prints to finish off and keep in theme!
Now as per usual I am late in posting the card so shhhh… don’t show this to James before he receives it!
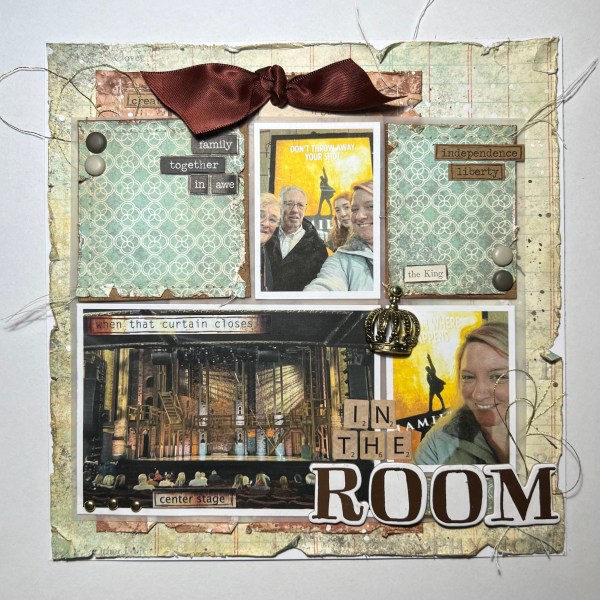
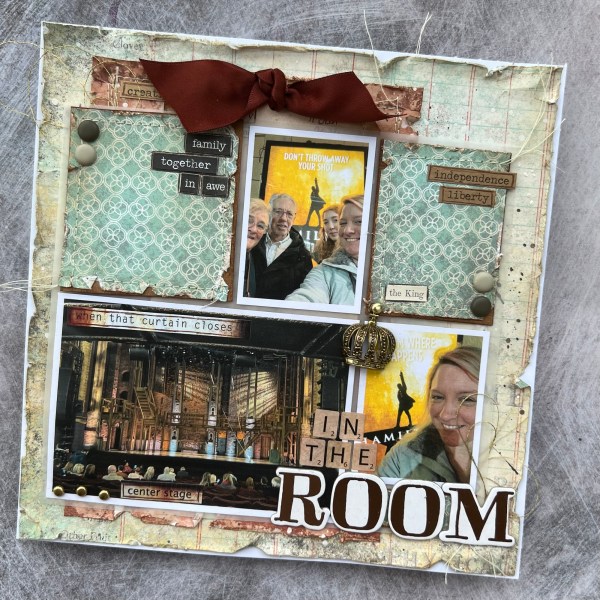
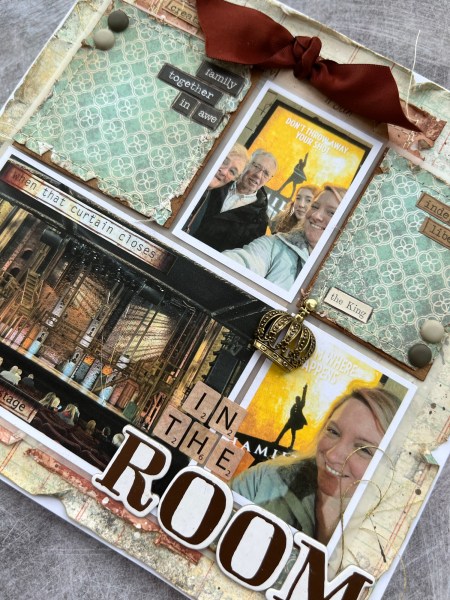
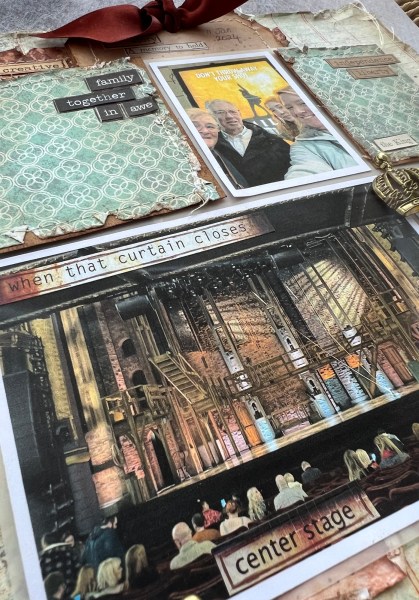
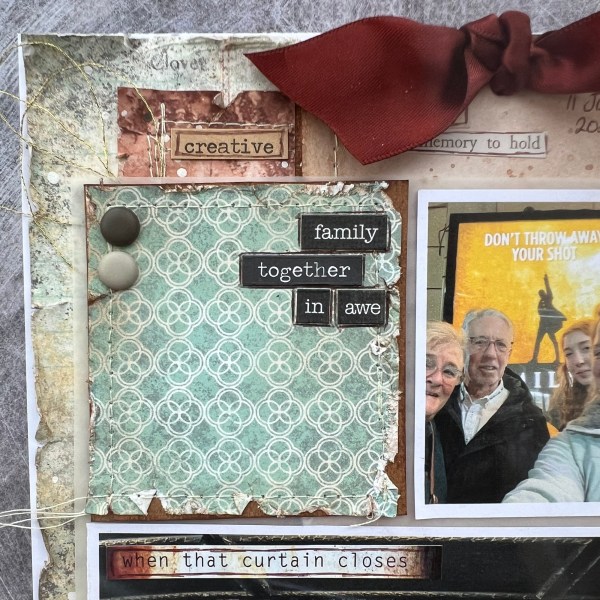
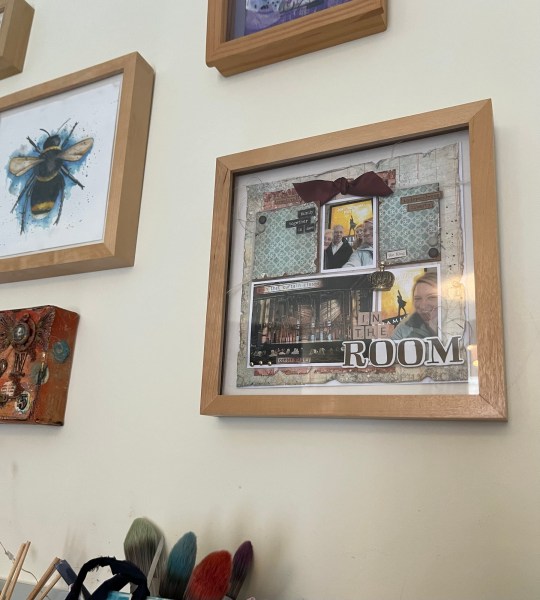
It has been years since I did any scrapbooking but at the weekend I got inspired to have a go and created this page…
I was inspired by my lovely friend Helen who created the sketch that I used for this for the Hey Little Magpie Facebook group.
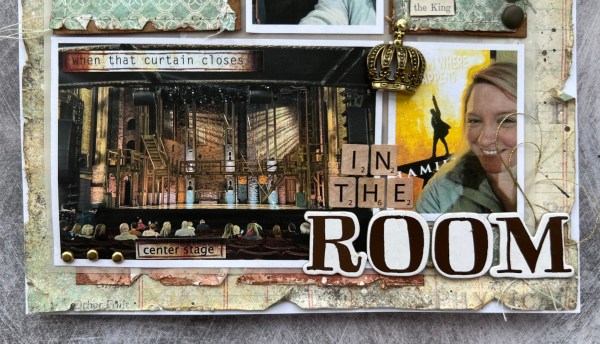
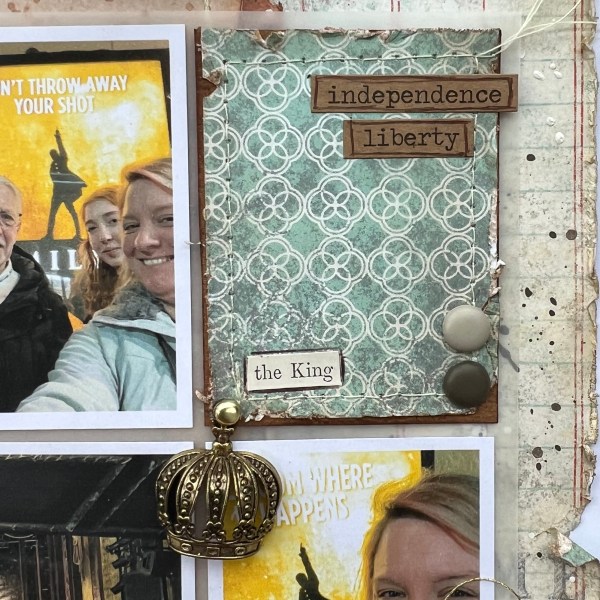
I decided to print out the pics of our trip to see Hamilton in January and use those for the page… I also decided to go for an 8×8 page for a change rather than the traditional 12×12 size.
I did have to adjust the sketch accordingly as two of the pics were portrait rather than landscape.
I decided to go for distressed for my page in keeping with the rustic brickwork of the set for Hamilton.
I went with some old papers from the stash and then went to town with my distressing tool, my distress inks (vintage photo got some heavy use!) and some splattered gesso and Paperartsy paint.
I then sewed lots of it up rather than using adhesive.
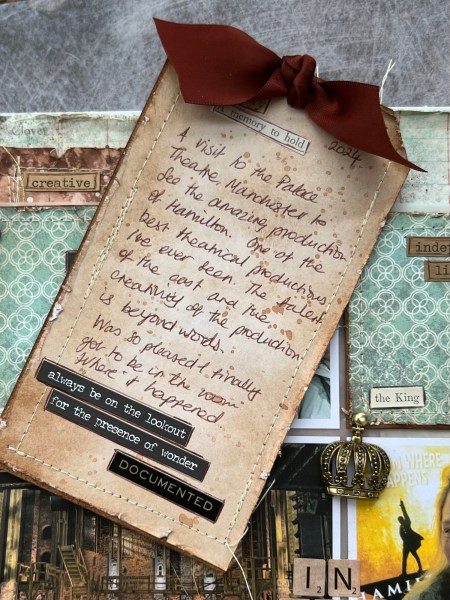
I layered up the photos and the pieces onto some vellum to create a pocket for the journalling tag to sit behind the photos.
I used brads to adhere the vellum panel into place. Then I went to town with the stickers and created the title and all the words around the page.
I also added the crown charm to represent the King (for those that don’t know it is a very important small role in the show and the actor we saw nailed it perfectly!).
I added some pen outlines to the stickers and then my journalling.
Also added some gold thread too.
Thanks so much Helen for the inspiration pushing me into some scrapping!
Oh and the reason for the smaller size … I wanted to pop it in a frame on my wall!
Sadly my friends mum passed away a few weeks ago and so I made her a card to let her know she is in my thoughts at this difficult time.
I always think a clean and simple card works best for sympathy cards so that’s what I did!
I used an Altenew stamp, used a light ink to stamp it and then added shimmer watercolour paints in light colours. Then I re stamped it using versamark and gold embossing powder.
Sorry the photos are a little darker than normal but this is what happens when it’s night time making and photographing the card.
I added a mat layer of Kraft and then embossed the thinking of you sentiment in gold and added that to a layer of Kraft too.
The shimmer on the image is beautiful.
Inside the card, and on the edge of the envelope I stamped again but using a light brown ink.
Hope that this brought my friend a little comfort and made her smile when she opened it.
I have another stitched flower card using the blooms I stitched a while ago … this time I used three in total. I made up the card just over a week ago but only just got around to blogging it because of the virus. Good news is I am feeling better. Although I type this in bed at just gone 1pm I have managed to be up and be productive most of the morning and been for a short walk outside so much improved on the previous days even if now I am back to being tired and in bed again! Fingers crossed I’m almost back to being healthy again.
On these I had kept to the same peach coloured thread so I added some rose gold splatter to the background I had inked and stencilled lightly. I also stamped the sentiment in peach and added the peach sequins too.
I raised the background panel up on some foam to give the card dimension too.
Still got lots of ready stitched blooms to play with next time I decide to make some flowery stitched cards.
Happy crafting!
Catherine
PS found that ribbon after I had finished the card and wish I had found it earlier and added some under the sentiment … ah well … it made it into the picture even if not onto the card!
Weeks like this I am so glad I craft a little ahead of time and get lots of projects done over a couple of days because this week I’ve barely left my bed thanks to a horrible virus. So the cards I’ve got to share were actually made a week ago when I panicked because I hadn’t got anything made for Festive Friday! Thankful to have been ahead for this week as otherwise it would have been a week off the challenge. Fingers crossed I am over the worst of this virus and should be back to being vertical next week!
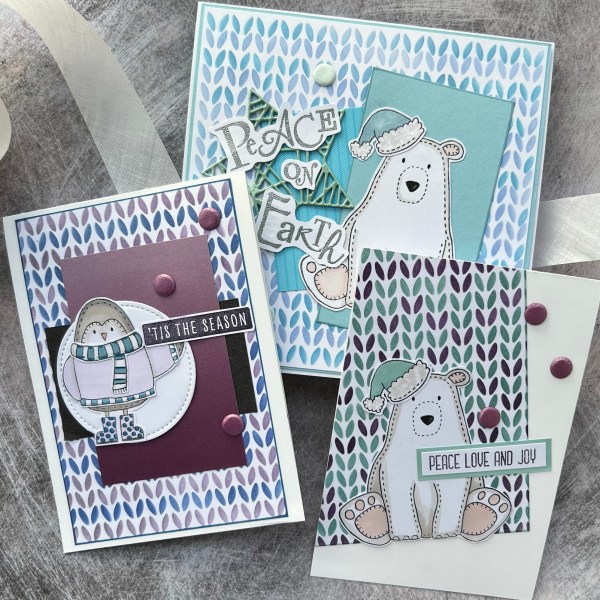
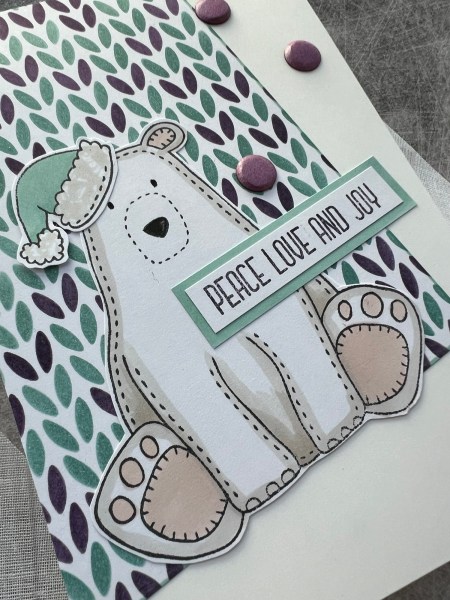
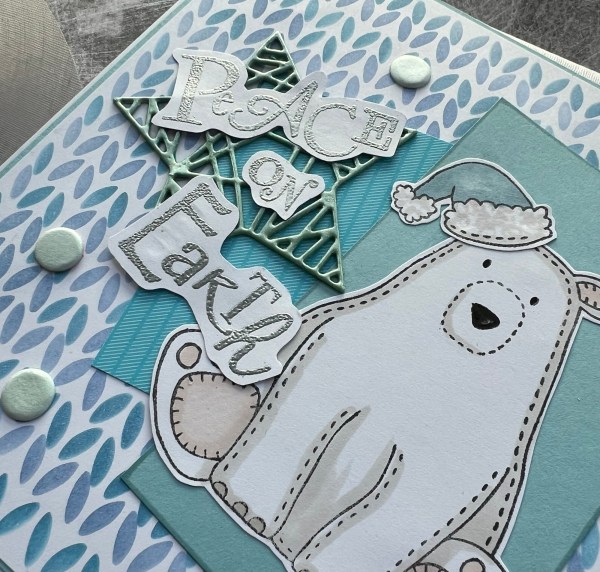
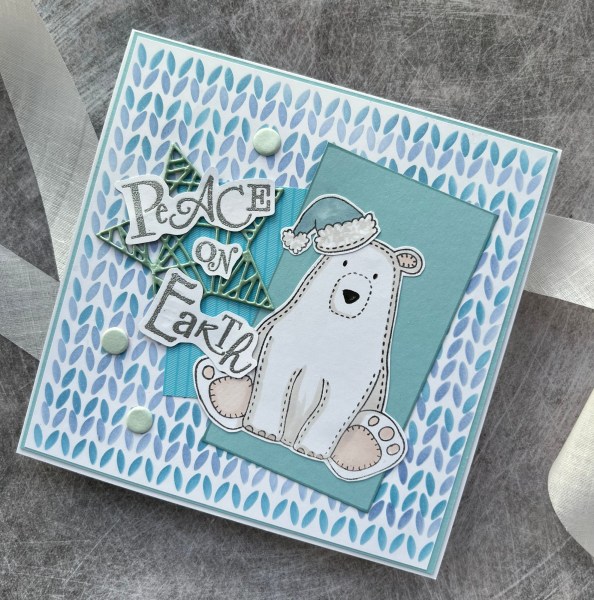
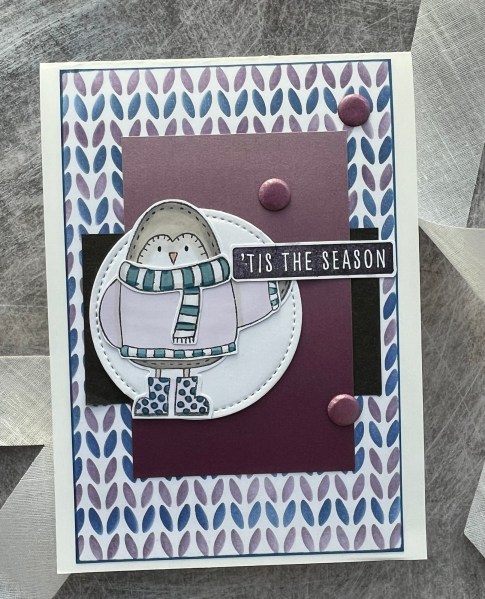
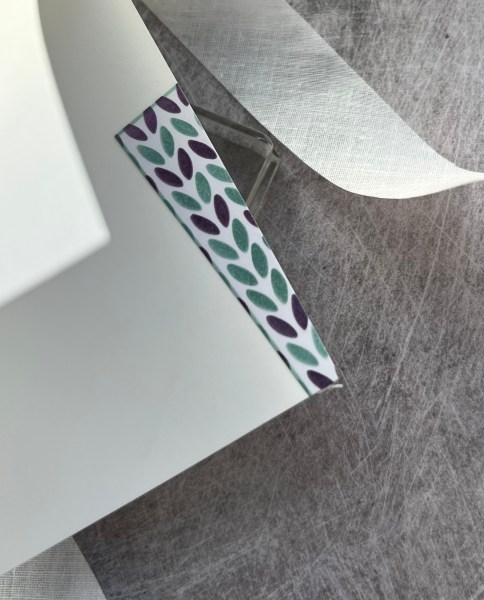
Today I have three cards for my stash of Christmas cards. I had so much fun playing with a new layered stencil and so ended up making three cards. I also used the same set of stamps from an old Creative Stamping magazine set for the focal images because I thought they worked perfectly with the knitwear themed backgrounds.
I spotted the cosy knit layered stencils from Altenew and thought they were so cute so decided to treat myself to a little crafty splurge. There are two layers in the set and they create a lovely pattern with the different colours. You can of course add more colours with masking but for now I stuck to two colours for my panels.
I did one 6×6 and then the other two were more suitable for standard 6×4 cards.
I grabbed a mixture of blue, purple and green coloured inks and very quickly created the three backgrounds … I think I would have kept going if I had had more time as it was so cute revealing the different ones!
I then stamped out the two penguins and two bears with their winter clothing/accessories. The bear also had a couple of jumper options but I didn’t end up stamping those and instead stuck to the hat!
I coloured them all with my promarkers and then fussy cut them out and added their clothes etc too.
Then I made up the three cards. First the larger one.
I created a cluster in the middle of the card of blue cardstock and some blue paper scrap that was on my desk. I had also reclaimed the star embellishment off the card I made for my hubby (we don’t keep them after Christmas as so I always recycle or reclaim elements I think I can use again) and I thought it would work well on the card.
The sentiment is a Claritystamps one which I heat embossed in silver and fussy cut.
I finished off by embellishing with some blue card Candi.
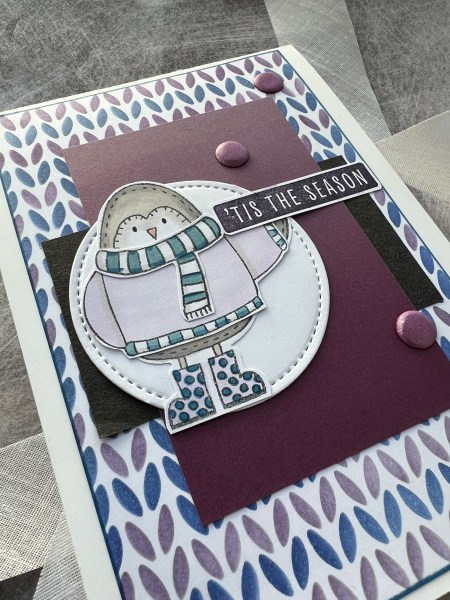
The purple themed card I used the penguin on and I decided to make it quite bold with the black panel and a panel of ombré purple (again a scrap off the desk). I then added the white stitched circle die cut under the penguin and added purple card Candi to embellish.
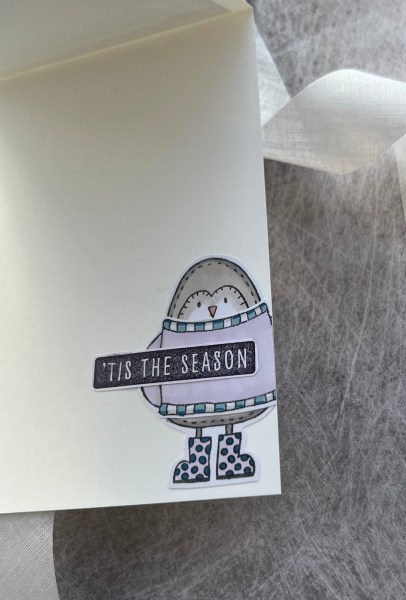
The sentiment I stamped twice and added it on the front and then inside the card I added the second penguin and the second sentiment.
The last card I changed it up and added the panel on the edge of the card at an angle and then just added the bear on the top. I added the sentiment onto a mat so it had a frame and again card Candi to finish off.
Inside this one I just added another piece at an angle to tie in with the front.
Love how these three cards came together and in love with that layering stencil. So much fun to use!