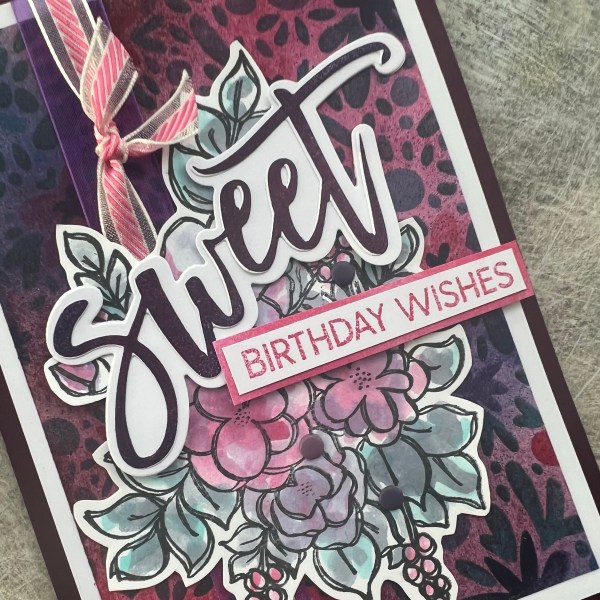
I grabbed the Layered flower and leaf stencil again, this time on a background I had already inked up … this gave it a completely different look…
The purples and blues I used in the background made for quite a dark piece of patterned paper so I mounted it onto white to brighten and then decided the focal image should also be bright and cheery. I settled on this image which I had stamped from Alpaca Pals and added a loose watercolour to it using the same colour inks as I added with the stenciling .
I added two layers of ribbon to the background panel and then the floral image and then used more new stash for the sentiment with the lovely Oversized sweet stamp and die with the shadow die stacked three times to give it dimension.
I added three Matt purple enamel dots for the embellishment and then mounted onto the BlackBerry Bliss card blank.
This week was exam results for my daughters AS levels and I am pleased to say she deserved the card I made for her!
We are definitely proud parents!
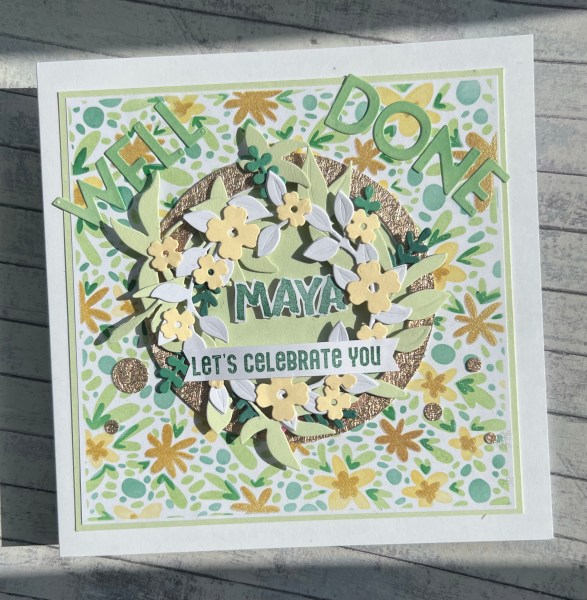
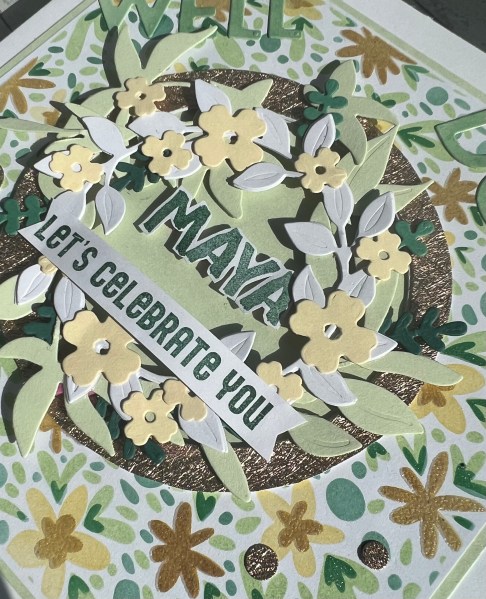
And it uses the piece of that layered stencil background that I made and only used the central piece from in yesterdays blog.
Along with an over the top wreath and some letter die cuts and stamps … and a stamp from the Treat Yourself set!
After die cutting the centre from the background and making the card I shared yesterday I was left with the 6×6 background missing the centre so I layered it up onto the Soft Sea Foam card with a little white trim around the edge. Love how this looks. But then couldn’t work out what to do … I made a frame for the ‘hole’ using a piece of rose gold speciality paper I’ve had for a long time.
Then I decided to make a wreath.
I used both the Wreath builder dies and some leaf dies I had cut from the zero waste leaf die that I had bought and used bits of the leaves chopped up in the background along with some cut from scraps using both forever flourishing dies and the wreath builder dies to add variation in colour.
The flowers were also from the Wreath builder dies. I went a bit overboard with the leaves and the flowers to really fluff out the wreath and the raised that onto foam so it stood a little higher than the frame.
I then die cut letters out of the inked cardstock so they had a colour variation and stamped both the sentiment stamp and the letters for her name using the Tranquil Tide and added those. Used a scrap of the rose gold to die cut some circles for embellishment and then mounted the panel onto a 7×7 card blank.
Love the stencilled background so much (see yesterdays post for all the reasons) and although admittedly this isn’t the best wreath I’ve put together I still love it!
And once again well done to our princess on her results … onto A Levels we go … and then all the joy of uni applications etc! My baby girl is all grown up!
Yes my no new stash in 2023 is well and truly over! Bought some more new bits and pieces (craft haul video) … and here is the result of my first play …
What is new? Well the layering stencils that I used to make that pretty background circle … and the wishes sentiment stamp.
I am absolutely in love with the layered stencil piece but it took some time for me to put together this into a card.
After enjoying the effects of the full 6×6 piece … I ended up die cutting the circle and just using that piece for this card. I will set aside the outer piece for another card … along with other things I originally tried for this.
I decided to add the little flowers and sprigs from the stash of ready cut die cuts, and the birthday sentiment die cut.
I also used the Painted texture embossing folder on the crumb cake panel.
The final bit of the sentiment was from the waffle flower stamp set I also bought at the same time!
But really this card is all about that layered stencil background… love that you can do any colours you fancy and add texture and shine with embossing or pastes… so cool!
And left from this first play is this excellent frame of loveliness…
This card was once again made using the scraps off the table … some mop up paper and then prestamped sentiment, flowers and leaves … oh and some scraps of cardstock and text paper too!
Part of me wished I had thought to emboss the background panel but I started sticking things down early … but never mind… end result is still pretty!
Love the twine and the sequins too! Blogging early today as I expect I will have more stuff to blog later today too!
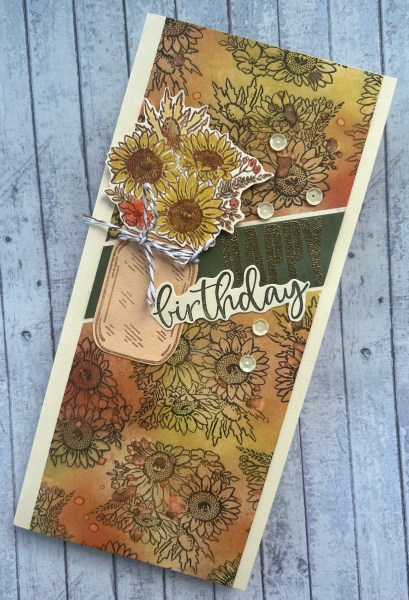
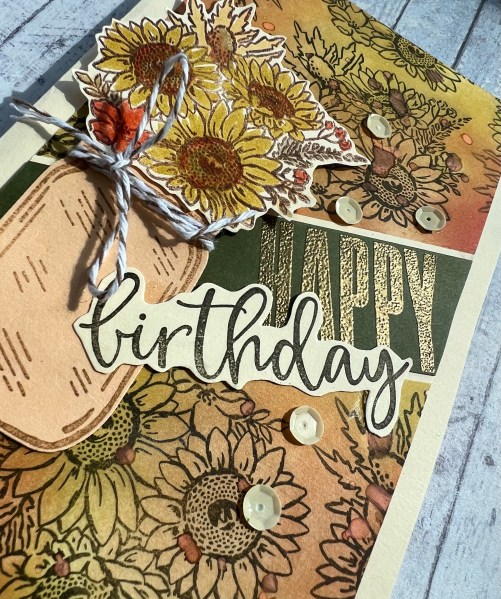
I’ve been enjoying making DL shaped cards on and off for a while and so decided to grab older stash and play again with the idea that the card my daughter made for my birthday again …
This time I went overboard with inking the background and also created a masked off area for the sentiment.
Unfortunately as I took the mask away the paper tore so I ended up having to add a strip of the cardstock over the top but I think it still worked well.
The jar I punched from the Pale Papaya cardstock and the flowers I coloured using stampin write markers.
I used my well used and most grabbed for sentiment set Biggest Wish (I’ve seen that there is a Christmas version of it in the new catalogue from SU so clearly I NEED that too!).
I embossed the happy into the mossy meadow strip and then fussy cut the birthday to add that separately.
I added sequins and twine to finish off … but really pleased with this card.
I’ve been in a bid to tidy and clean up the desk and also made another few simple scraps cards.
This tiny card was made using scraps of die cutting that were leftover from a design team project that I made a week or so ago.
Just die cuts, a stamped sentiment and some sequins on a tiny notecard.
Simple and sweet … the different colour variations from the original gelli plate play make them special! Note to self … Projects do not always need to be complicated!
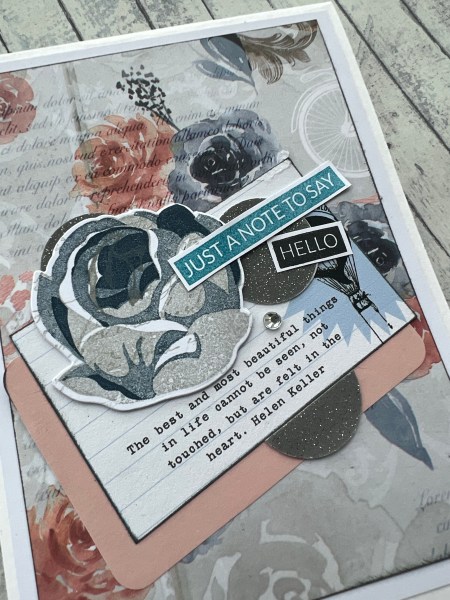
My lovely friend has gifted me a pad of 12×12 scrapbook paper and it is truly gorgeous … so I’ve started making with it. Can’t share everything I’ve made just yet but thought I would take a piece left on the desk and make a card with it, along with some bits on the desk.
Firstly the little journaling card I cut down and then used a piece of sticky note to mat it as the colour worked fabulously … so this created part of the topper. I then added some punched circles out of the sparkly silver. These have been sat in the ‘scraps’ plate for ages!
I decided what would work well was one of the roses from the Rosy Outlook set … so used Smoky Slate and Night of Navy inks to create my rose and then layered up a couple of dies cuts to make it a stacked die cut.
I added some AveryElle sentiments and a sparkly gem to finish off!
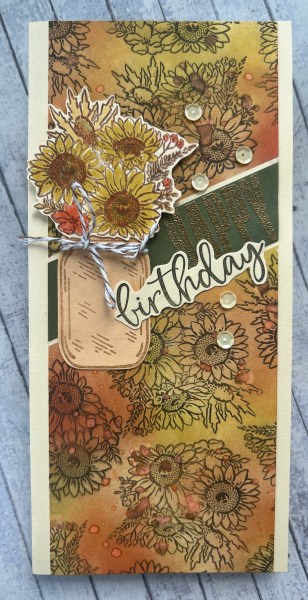
Todays card I am sharing was made using leftover pieces that had been sitting in stamp boxes for quite some time waiting to be used.
It is only when I have gone through in a bid to have a clear out I discovered them and decided to put them on the desk so they would get used.
In this case … flower from the Cottage Rose set, leaves from the Forever Fern set. I also added a leftover die cut from another crafting session.
I then used a scrap of paper I had stamped for another project using the Jar of Flowers stamp. Then some scraps of cardstock and some music print.
Next I embossed the front of the card with the fern folder and then layered up all the little elements scavenged off the desk! I did stamp something specifically for the card … the sentiment using Biggest Wish stamp set.
Added a couple of flat enamel dots from the stash to finish off. Then called this done!
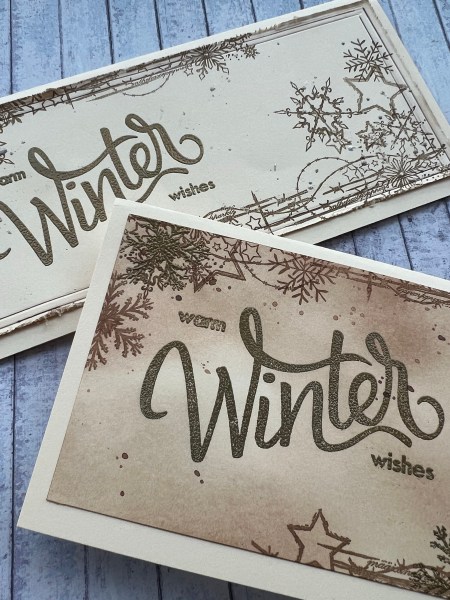
Hello … I stamped four cards in total with the Hello Winter large sentiment stamp however I only finished the first two in one session… the other two I finished off a few hours later but used a different set of stamps .. this time the Indigo Blu stamps were pulled out to play with.
I finished each card slightly differently.
One with more blending and some embossed snowflakes on top.
The other I roughed up the edges, inked it and then debossed and used my pen to add some lines around the outside.
I splattered both with ink and shimmer ink to add a little something sparkly.
Love both of these … think I prefer the none ink blended one more … what do you think?
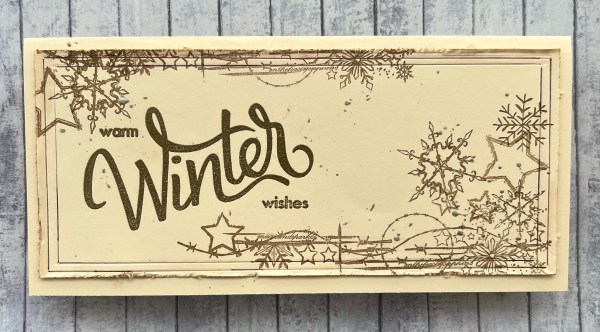
Decided to break open one of the other sets that I had bought and went for the Hello Winter set because that font is beautiful!
I decided to gold emboss the word onto cream cardstock and make some DL sized cards. After embossing the sentiment I then stamped lots of foliage from a magazine set all the way around.
On this first one I also splattered some gold shimmer ink all over. I then heat embossed another layer around the edges so that I could layer them up and have a gold border.
This one I actually edged the panel itself with the versamark which gave it more an organic edge.
I added them to the card blanks and called them done!