I am an on-the-side and increasingly up front papercrafter who loves nothing more than getting inky and creating pretty things with paper and stamps!
I am also a wife to lovely hubby and mummy to a wonderful 14yr old princess.
Back with another pair of cards made using the Kendra’s card challenge – this time it is sketches 2 and 4.
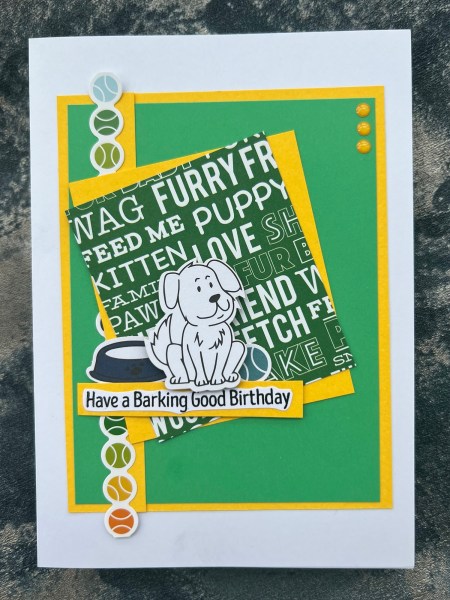
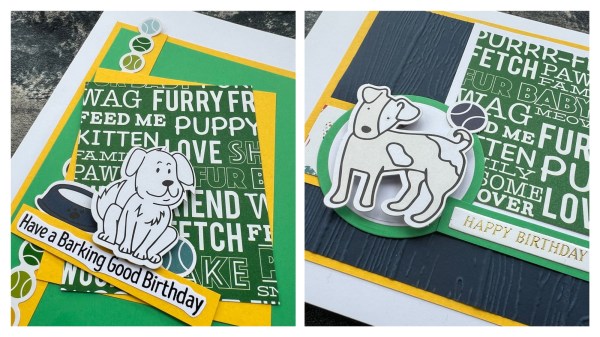
For both of these the focal images were die cuts from the ephemera die cuts that came in the kit.
To one I added the sticker that is all the balls and had it hang off the card topper slightly at top and bottom and the other one I added some of the die cut balls as my embellishments.
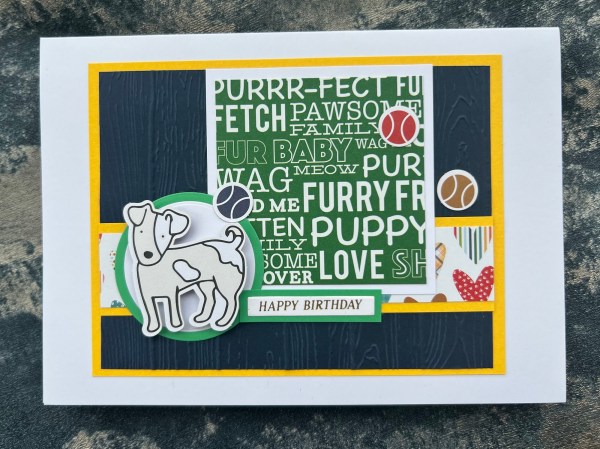
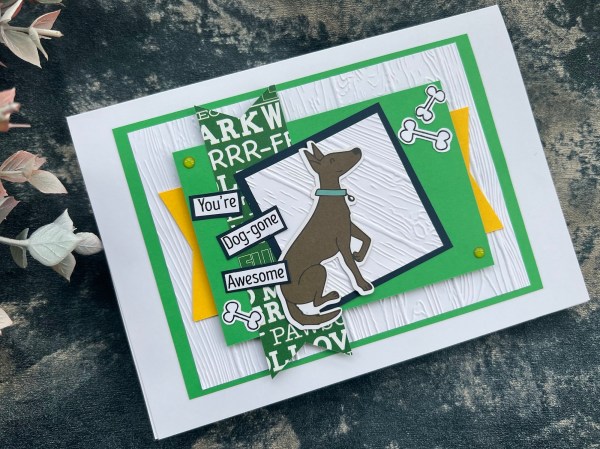
This one I kept fairly close of the original sketch – I did add in some texture to the background using the Pinewood planks embossing folder. I popped the little dog up on adhesive foam to give some dimension. The sentiment is a foiled one which I had already got made from a spellbinders Betterpress set.
I love the pops of yellow that the mat layers added to this one along with the cute die cut puppy!
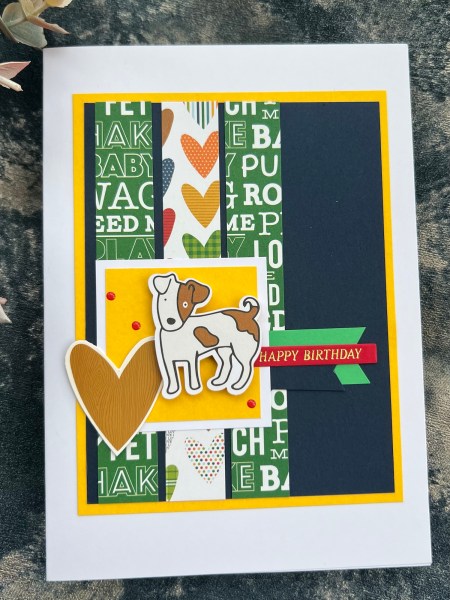
This second one I did vary the sketch by turning it from landscape to portrait and also moving the strip to one side as it worked better because my paper had direction to it – Kendra does give you an indication of the direction a paper will need to be used on her guides but I forgot to check that when choosing a directional pattern!
I wish I had added a little texture to that green panel in the background on this but already stuck things into place when I thought of it! Doh!
The sentiment is embossed into the white and fussy cut. It is a stamp from Amy Favourite Things.
I love how these both came together – I am not sure I would have ever found a good use for that wordy paper as a full sheet of 12×12 – but when you cut it into smaller panels like this it works well to create a cute card!
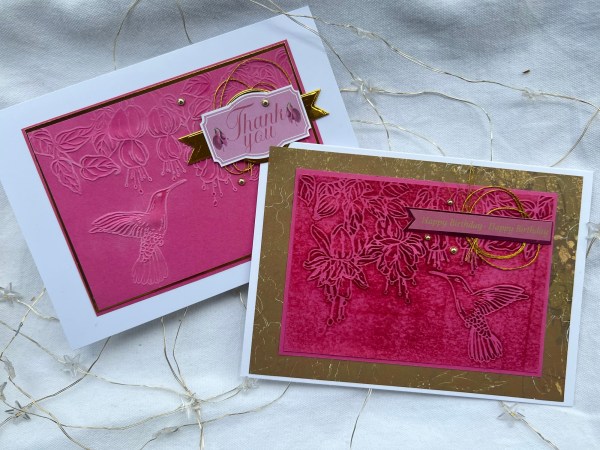
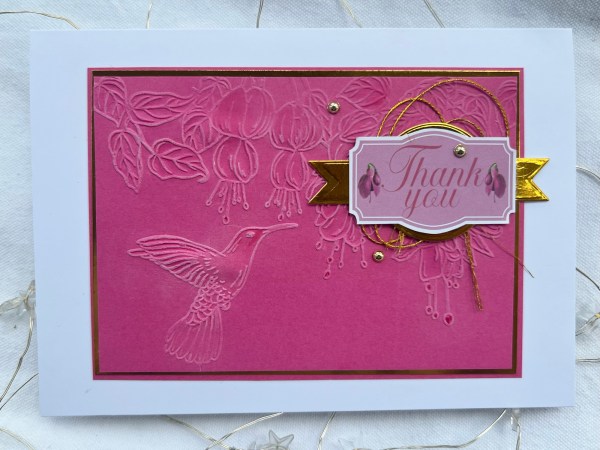
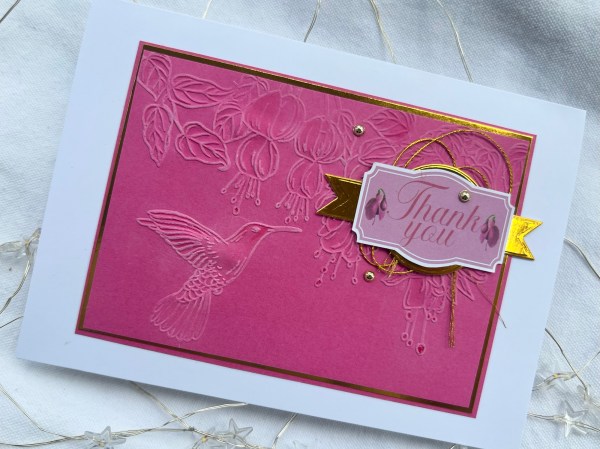
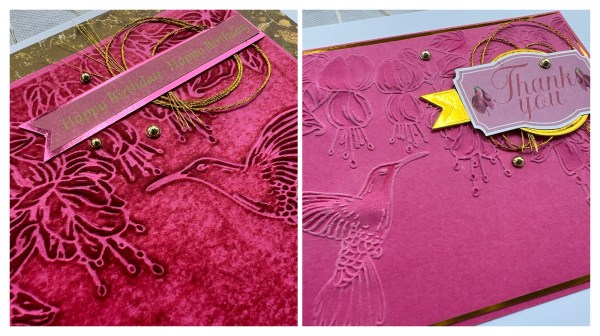
The first is using the embossing folder straight onto the pink card and then using white ink to highlight the line art and then painting the image with a pink ink to just give it more definition.
I also added wink of Stella to the bird to give it shimmer. Then I created a cluster for the sentiment and added in the gold coloured foiled cardstock to add some shine and richness!
I think it is pretty but was also really easy to make.
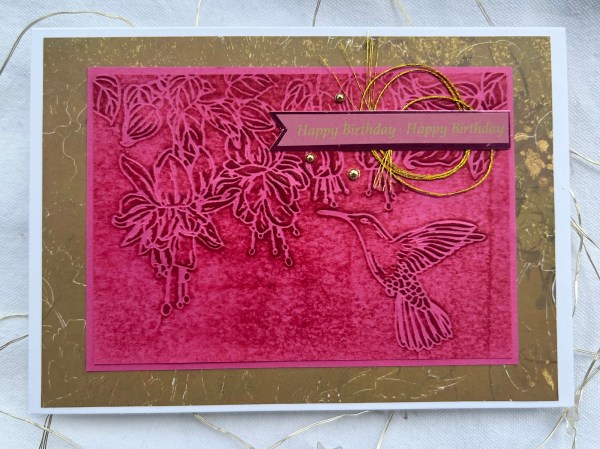
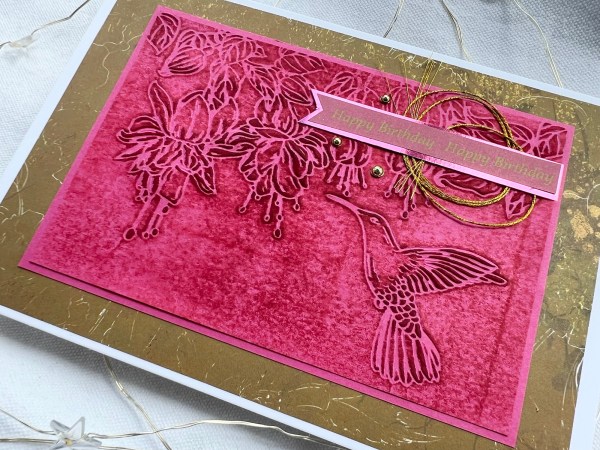
The next one I flipped over the folder and then added ink to the elements that were not debossed to darken the panel. I think this added an interesting finish and I love the texture my messy brayer added!
This time I did add some patterned paper to ground the panel on the card and again a little bit of foil to the mat of the sentiment to add a different texture.
For both I added gold gems and the gold thread which I think helps add some softness to the cards.
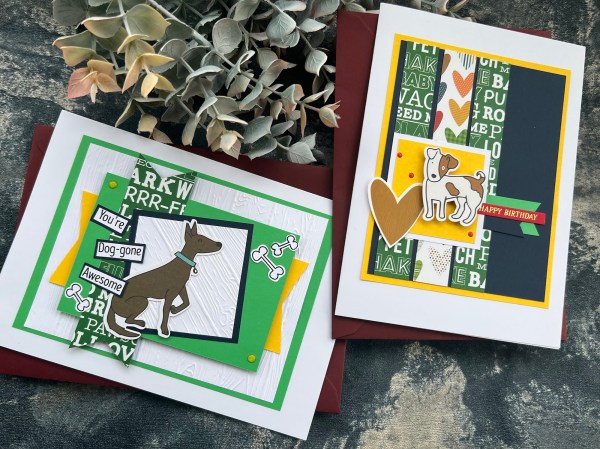
So the last four cards in this Kendra’s card challenge are a bit different as they actually only used one piece of patterned paper cut into four different angled pieces – so I made four thank you cards and sneakily added in another pattern for some using the Best Friend laser cut paper from the Kingston Crafts pet collection kit.
For two I added in the kennel and dog die cut pieces, for the other two I added in the heart banner from the die cut pieces and a stamped dog from a My Favourite Things stamp set.
I added some dimension to all the cards by popping elements up on adhesive foam and also the die cuts are stacked up too. In this case I chose sentiments from the pouches where I make them in batches from scraps to have some elements of my cards easy to do with grab and go elements.
For this one I added dimension to the dog so he is raised above the background which I kept simple with the white mat, the yellow card with the laser cut, the patterned panel and then the die cut elements and one of the hearts I cut from the packaging.
This one I added more dimension as I raised the patterned paper, the kennel and the dog up on the adhesive foam to lift it away from the panel of laser cut paper. I added white behind this one with a yellow mat layer.
This one I decided to add just a small panel of the laser cut but added that with the foam tabs – I did have to cut the tabs to be half size so they didn’t show through holes in the paper but it worked well. I also added foam to the left hand side of the heart banner so it was the same height as the laser cut panel and then glued the rest of it in place.
I die cut the yellow circle twice to stack it for a little dimension behind the little stamped dog.
I hadn’t run out of the laser cut sheet but this one I decided to keep a little simpler with the background panel being embossed instead and a little orange ink blended behind the panel of paper. I lifted the banner of hearts up and then some of the same foam adhesive behind the dogs head and one of his legs so he sat at the same level.
I did vary this one a little too by adding in a brown mat layer – I originally was going to be doing a navy layer but it didn’t look quite right when I decided to use a kraft card blank so swapped it out for the brown instead.
I love how all four of these cards worked and it was a good reminder that even one piece of 6×6 can stretch quite a way and make the start of an interesting card when you cut it at an angle.
It is also good to mix things up sometimes and it was good to bring in the Kraft bases for two of these. You might also note I did flip over the paper for one of these cards and use the larger print – that’s one of these cool things about Kingston Crafts papers – it is the same but differently sized pattern on the reverse – so you can choose the right proportions for your project!
Obviously I did not make all my cards for the Kendra’s card challenge in one go – batching them into different groups makes it a less overwhelming task – 18 cards in one go would be a lot of effort! But happy I got another four cards made. Think I still have 10 left to share with you (some of which at the time of writing I have yet to actually make but know I will get there soon!). EDIT: now I am getting round to posting this I can confirm I did finish them all!
Back with another scrap page I made using the fabulous rainbow paper kit – it is so cheerful and I love it – although for this one I only included a tiny bit of rainbow and instead focused on the sunshine paper.
I went with the dark red base and then added a corner triangle of the sunshine – I did double up though to show the cool thing about the Kingston papers is that it’s the same design on the reverse just in a different size of pattern – so the bottom layer has the small suns and then the top layer the larger suns.
I distressed the edges of the panels and the same with the tag on the right hand side which because the paper is so thick it gives a great finish with the white core exposed.
I then added some pops of pink with the mat for the photo and the scattered hearts.
I did add in some of the foiled cardstock in the orange too just for a different texture.
The title was one of the die cuts in the kit and it was just perfect for my page – after all the hubby and child are my sunshine! ☀️
I added some twine to the tag on the bottom (again one of the die cuts in the kit) after all – my friend Helen tells me you can’t have a naked tag! 🤣
I then went in heavily with splatter with white gesso as the base panel just needed some mixed media! I am not good with a naked background either!
Love how this came out and once again I have to say I love this kit!
🌈❤️🌈
And once again – it was an ‘as seen on tv’ project – funny that Nigel thought it might have been a stock photo – clearly my pair looked like models! 🤣❤️
A few weeks ago I shared some little notecards I made for my design team contribution for Kingston Crafts – well I did an extra one for my Festive Friday challenge too!
Grey cardstock, a mask made by die cutting a circle from another piece of cardstock and then sprayed the shimmer sprays through the circle and left it to dry.
Then I added the die cut and used the same shimmer spray but this time painted it onto the die cut bow.
I used a Tim Holtz sticker for the sentiment and doodled a frame for the panel before adding it to a 4×4 card blank.
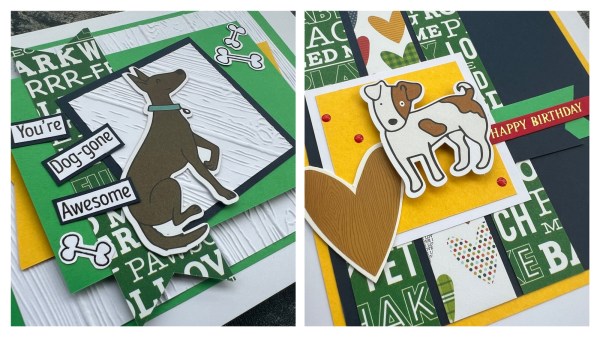
Hello! Back with another couple of cards I made using the Kingston Pet Collection kit and two of the cards based on the Kendra’s Card Challenge.
I love this kit so much as it’s so cute!
I really like playing with the sketches for the cards and the little sections of the paper that Kendra puts together to create cards that are a little different from what I might ordinarily put together.
I added three different colours of cardstock to go with the papers (as I had no solid left in the kit I just went with random cardstock from the stash) and created these bright dog themed cards using the embellishments in the kit and some other bits and bobs.
This first one I added a foiled sentiment to bring in a pop of red.
This one I stamped and embossed the sentiment and the bones from a My Favourite Things stamp set.
I also added in texture to this one with a wood grain embossing folder.
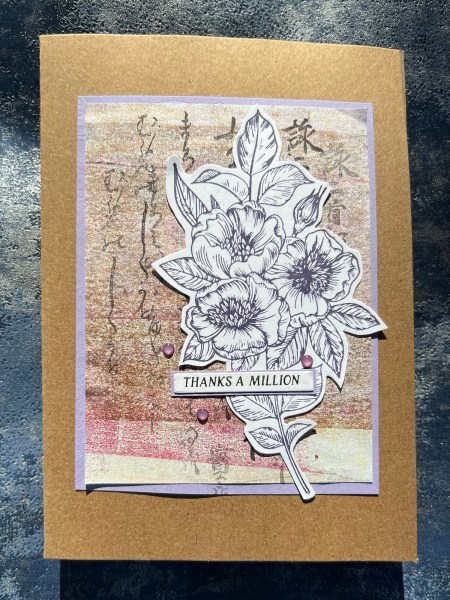
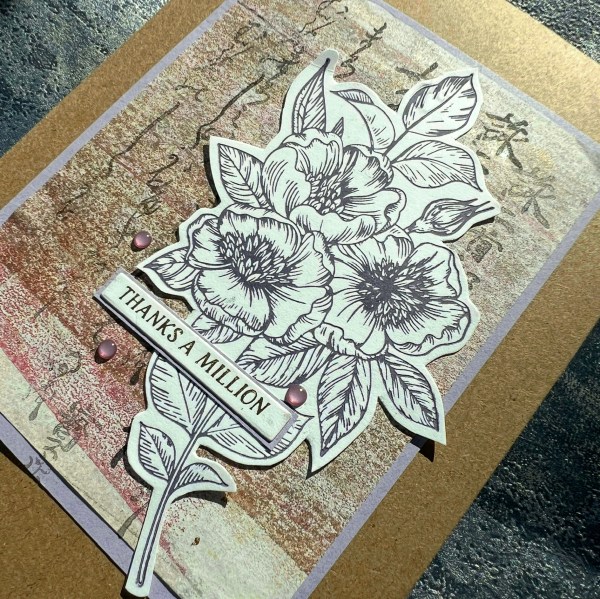
Sometimes the detail of a betterpress or a large floral element is perfect for contrasting with a bit of painty scrap! And that is what today’s card is all about.
The painty scrap is from the pouch of backgrounds made when I did loads of gelli prints. It this is a wipe off paper where I cleaned my brayer rather than an actual print.
I kept it simple and just added some stamping – an old Japanese stamp I’ve had for years – and then mounted it onto lilac scrap cardstock. This might have seemed an odd choice but I knew that I had this Betterpress print using purple already done in the stash and I wanted to add this to the print and the lilac frame worked with the purple print.
I added a simple foiled sentiment with a lilac mat layer. I then added the purple gems.
I thought it would work well on a white card blank but then I grabbed the Kraft one and was really happy with how that looked so used that instead.
I know a couple of corners have curled so will need to pop a dot of glue to get them to lie flat before I pop this in the box of made up cards. Otherwise a lovely and simple arty card.
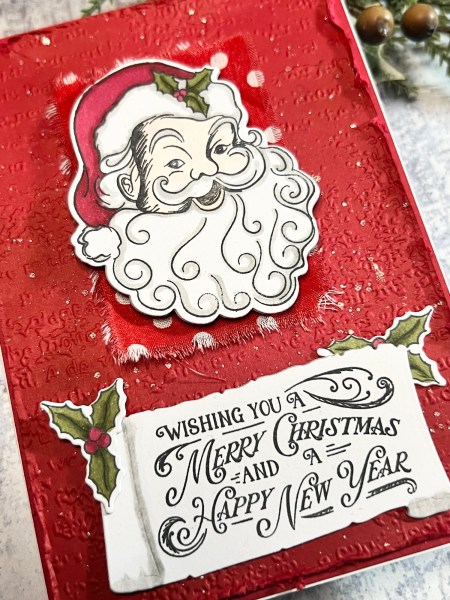
For this design team contribution I actually put the camera on and recorded the process … I wanted to use some stamps and dies that I bought months ago but never got around to using it till now! It’s a very different style from normal for me!
I don’t have many vintage style Christmas products and this stamp set needed to be bought when I saw it on Hobbymaker and Martin was demonstrating it!
I teamed the stamps with the embossed and distressed background, a scrap of fabric and then some champagne splatter.
Not 100% sure that I love the way I placed the holly right at the end but otherwise I love this card!
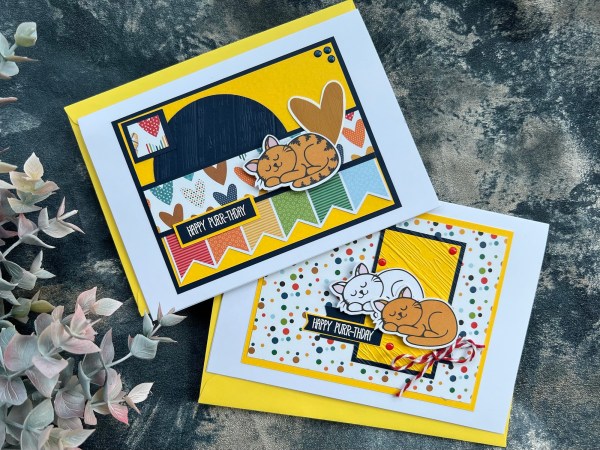
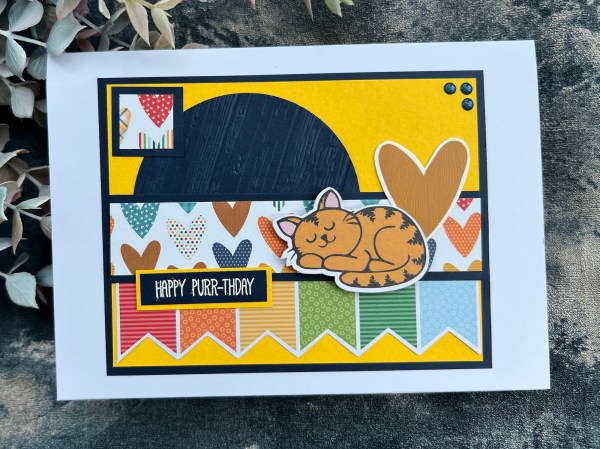
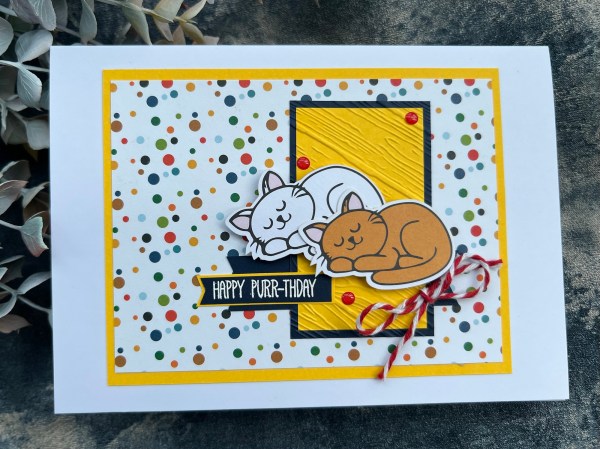
I decided to join in with Kendra’s Card Challenge back in April as I was starting to feel better – I figured it was an easy thing to do in stages as I felt I had enough energy and could just pick it up as and when. I decided I wanted to use up as much of the Kingston Crafts pet collection bits and pieces as I could so chose six papers and cut them into the different panels and popped each of the pieces into envelopes with the sketch so I could do a card at a time with most bits there ready.
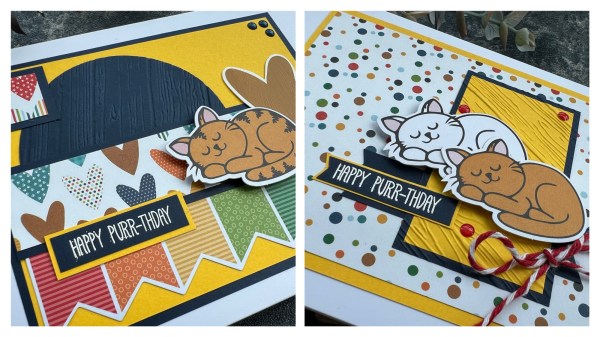
These two are the first two I finished – they were more generic in designs of the papers so I turned them into cat themed birthday cards.
For the first one I added in the little banner element to the bottom and rather than the top little element be a banner it became a square I added a mat to.
The card sketches are designed around American card sizes so I did them as toppers for 5×7 cards instead of the usual card size but think they work nicely with the frame of the white card blank.
I hadn’t really got sentiments in the kit left that worked as birthday type cards and I think they are the more useful types of cards to make when you don’t have a specific purpose to making them so I grabbed the My Favourite Thing stamp set that is based around cats and embossed the Happy Purr-thday sentiment into the navy cardstock.
I added the little gems from the kit to each of the cards and to this one I also added the bow using the coordinating twine.
I added texture to both cards with a wood grain embossing folder.
I have plenty more cards to make from this use of Kendra’s Card Challenge (some of which I have not yet finished!) – so they will be blogged in stages over the next few weeks!
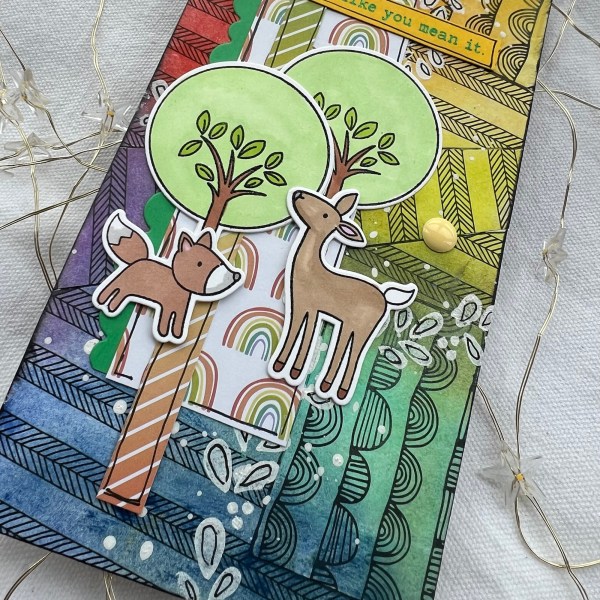
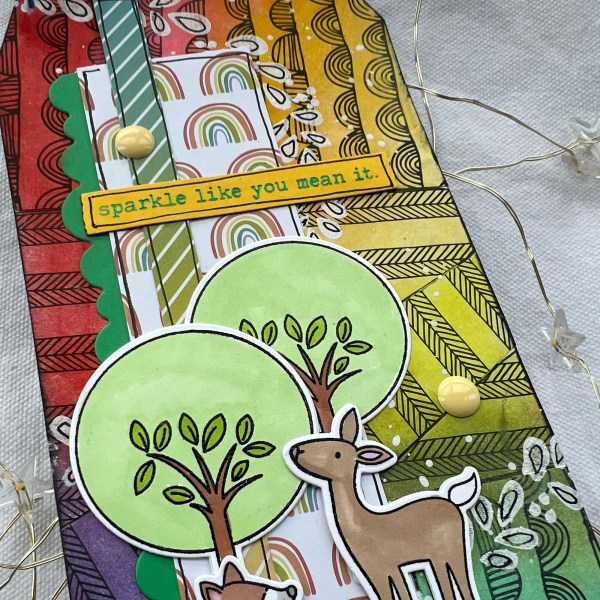
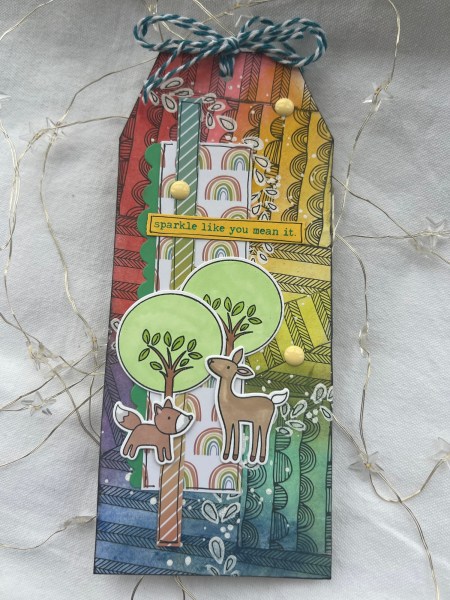
I didn’t do a great job of joining in the swaps last month with being out of action for so much of the month – so I’m starting off quickly this month with my tag for that swap and hopefully will get to do a few other of the swaps soon.
I went with some of the leftover patterned paper from the project at the beginning of the month and covered a large tag I had cut from grey board from old packaging.
I did some outlining of the sections with pen and inked the edge with archival. Then I went for a full rainbow with distress crayons.
I then added the stencilling using white gesso and an Alpaca Pals stencil – plus some splatters of course!. Once dry I added some doodles to the stencilled shapes.
I next added some strips of the spring slimline papers from Kingston Crafts and a scrap of green I die cut using my favourite Hey Little Magpie die.
Next I stamped and embossed the cute MFT images and coloured them with my promarkers. I die cut them out and then die cut them again from scraps to stack them so they are a little more dimensional.
I added them to the tag and then used the Dina Wakely press plates to foil the sentiment and die cut it out with the coordinated die. I just love the foiling – it’s a joy everytime to peel back the foil and see the effect!
To finish off I added the pale yellow gems and the blue and white bakers twine in a double bow.
Such a fun tag and love the rainbow background with the fun patterned paper I transformed with the distress crayons.