Christmas in July & DT: Addicted to stamps and more #496 – make your mark

Day two in my Christmas in July 2025 challenge and this is also my design team contribution for the Make your Mark challenge at Addicted to Stamps and More.

I decided for today to do a sketch …

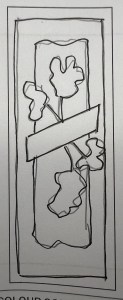
Please feel free to use the sketch and let me know if you share your make so I can come and see it 😀

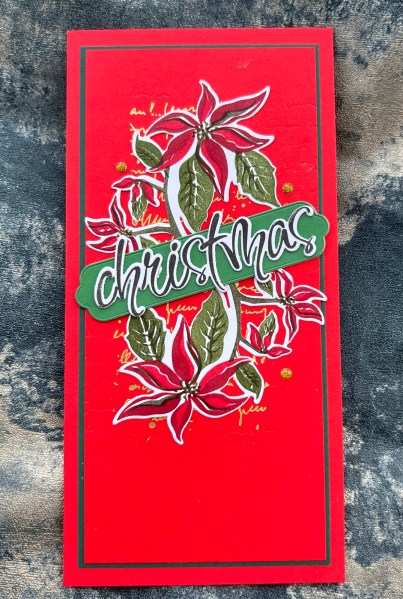
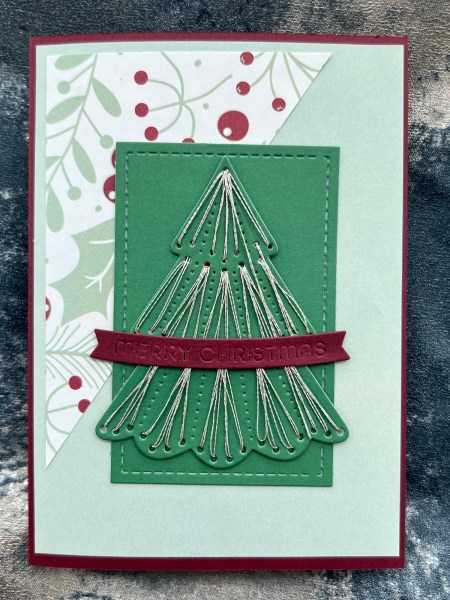
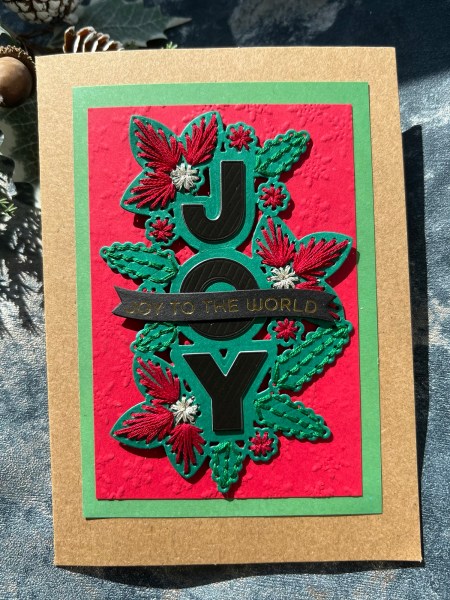
I went very bold and bright card inspired by my sketch and as I had the poinsettia stamps from waffle flower in mind when I started with the sketch it came together quite easily.

Originally I thought that the panel under the floral element I would be done with ink blending but instead I decided to add some foiling using the Dina Wakely press plate. I love this!

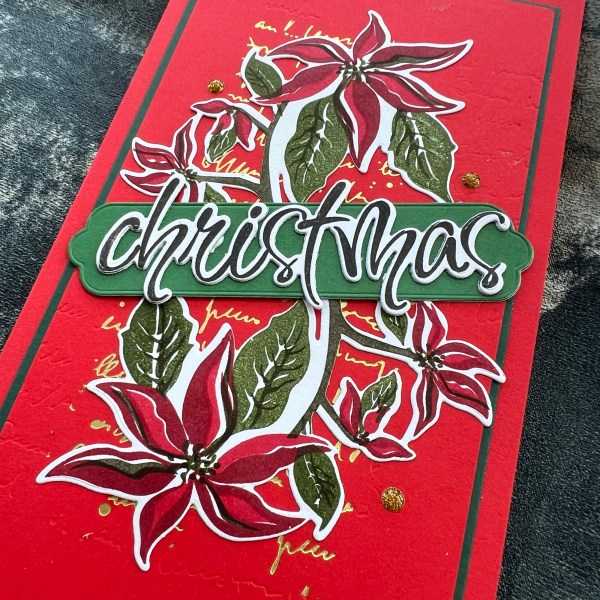
I kept the sentiment easy by using one that was already stamped and die cut and stacked. I added a label underneath. The green didn’t quite go with the green of the stamping – and so I then decided to mount the red panel with the darker green cardstock – when I did this it helped that there were three different greens.

I then added the glittery gems to finish off!

Love this card – so rich and modern with the traditional colours and that pop of gold.

Happy crafting!

Catherine

Christmas in July – Oh Christmas Tree – Patterned Paper

Here we go – strap in everyone – we have got a busy month ahead of us as I attempt 31 days of Christmas projects and a video each day over on my YouTube channel!

As it’s the first of the month it’s patterned paper time and I grabbed a couple of pages from the magazine kit in my stash and made four card fronts.

I also have chosen a theme for today – Oh Christmas Tree – so I went a bit mad with my first day for Christmas in July and chose two different tree dies for the topper.

I love the frames using the waffle flower dies with the texture in it.

Also how cute that paper is!

I teamed the green trees with the wine red dies and then also created the card blanks from the same wine red cardstock.

For the stitching dies I only did the sewing on one of them … I ran out of time and energy.

For the one I didn’t sew I added some dots of white in the holes using a gel pen to add some decoration.

So four cards to kick off the month! Hope you like them.

I can’t believe I made them so difficult with all the different configurations for the first one! Let’s hope I can simplify for some of them or I have definitely bitten off more than I can chew!

Happy crafting!

Catherine

DT: Kingston Crafts – Flip Its

Earlier tonight I showed a shaker card I made with the flip its – well I didn’t stop at one and made a second one! This time slightly easier as I didn’t have to worry about the mechanism being seen as I didn’t make it into a ‘see through’ card.

So this really is such a simple thing to do (5 steps!) and no messing around with trying to get foam adhesive to go round corners or anything. And because it is quite flat it doesn’t mean you have a really bulky card that doesn’t fit in the envelope.

Step one – die cut a shape from your top layer – in my case the fabric rainbow patterned paper!

Step two – Add sequins or shaker bits into the flip it.

Step three – Use the adhesive to adhere the flip it to the back of the die cut layer so the shaker elements can be seen through the aperture.

Step four – Grab some redline tape or double side tape and seal the flap on the flip it so the sequins are sealed.

Step five – Adhere the panel to your card blank and then you can decorate.

I learnt my lesson from last time and reduced the amount of sequins in the shaker so it is a little slimmer – but still packs a lot of fun with the movement and the shine.

Like last time I used the die cut and stickers from the Rainbow kit to finish off the front of the card – such a fun kit.

But when shakers are this easy I might have a new obsession for making shaker cards about to start – I’ve got so many sequins and little beads and things I never think to use – I suspect they might get grabbed quite often now to make some more fun shaker cards.

Happy crafting!

Catherine

DT: Kingston Crafts – Flip Its

I will be sharing on some of my city break Everyday Stories posts Flip Its in their normal use – to add to memory keeping projects to add in the extra photos – but I did make something very different with the flip its too – a shaker card!

It was so easy to make a flatter shaker card than using adhesive foam and yet I may have gone a little overboard with the sequins to make it extra special!

All I did was die cut the aperture in the front of the card blank and a coordinating one for the inside of the card – not necessary if you done mind seeing the adhesive element or the pattern on the card blank isn’t directional (mine had upside down rainbows and looked weird so I did add the cloud inserts!).

Then I filled the flip I with the sequins and used the adhesive to stick it in place over the aperture on the inside.

I then used red line tape to glue the pocket shut – I think red line tape is probably your best bet for this as it’s so secure.

Next I added the insert to cover the inside mechanism – and then it is done – just needed the decoration on the front.

For this one I did use the Kingston Crafts rainbow kit for both the cardstock making the card and the embellishments I added – like the sentiment and the paper windmills and the bunting across the aperture.

I added two further sequins to the outside to tie in with the shaker sequins.

Super cute! And a fun and easy way to use any extra flip its you have – or to make less chunky than the norm shaker cards.

And this is one of those projects I can say ‘as seen on tv’ because yes Martin showed it on the show last Friday – and he also demoed a different way of creating a shaker card which I can’t wait to try!

Happy crafting!

Catherine

DT: Kingston Crafts – Everyday Stories – Hello Life kit & FlipIts

As I shared yesterday I created an album for keeping pics from our UK city breaks in – specifically the photos of the buildings as I always take a ton of photos of the architecture when we visit somewhere.

Here are the Oxford pages I made – I mainly used the Everyday Stories Hello Life kit – and sometimes added in the Flip Its which are a fun addition to the albums to give you some more design options.

I actually started with a Flip It for each city – like a section divider – this is one of the 4×8 ones and I worked out that the Spring Slimline papers worked well – just a little trim off one end – and they coordinate well with the kit. I added a little tab I die cut from another card to each of the section dividers to make it easy to move to each section.

The Flip Its are designed to be added onto the pages with some adhesive but I actually removed the adhesive strip and then punched holes where I wanted it to go into the album instead.

The next pages I added my photos, selections of the cards in the kit and embellished them with the stickers, rub ons and the puffy stickers from the kit.

Sometimes I embellished the cards directly – sometimes I added to the outside of the pocket – both work well!

I printed off my journalling rather than handwriting this time and added that in some of the panels. I didn’t use many of the cards designed as journalling spots – but did use a few. I just had more photos I wanted to include this time!

Turns out I took a lot of photos in Oxford (I think it was several hundred in total) so these are just some of the pages I could have made! I liked splitting the photo occasionally, making the photo smaller and also love the ones I had printed as retro Polaroids (FreePrints offer this and handily pick up the location and date details to make it easy – albeit these cost a little more money to print!).

I did add a couple of other Flip its in a more traditional way too – this helped add an extra journalling spot or an extra photo! ❤️

I wasn’t expecting/ expected to make so many pages for my DT commitment – but once I got started I couldn’t stop.

I will however save the other cities I also did for other blog posts as this is already really long!

Happy crafting!

Catherine

#dyicad2025 week four

Started week four of #indexcardaday with lots of doodles and some fun green leaves!

It was definitely a labour of love to do all those skinny lines – and hindsight is a great thing – wish I had added shadow under the leaves! Ah well – still a cute one – and the sentiment was for the weather change we had at the weekend!

Day 23 I remembered just as I was about to head to bed so was a little less focussed for my doodling as I was tired! But love those flowers! Not used them in a while so might just keep them on the desk for a future project!

Day 24 I did early in the day pre dentist visit … as the stamp set above was still out I chose a different stamp from the set and used that. I added some extra leaves and twirly doodles to connect across the full width of the card.

Day 25 I was back to work so did this at lunch time … maybe I was thinking of cocktails? Love this Lawn Fawn pineapple – so cute! Then a simple grid for the background.

After a few days of green I went for something a little different for day 26 … and created a little scene and chose the sentiment sticker that made me giggle!

I mean really! 🤣

Ok day 27 I stamped a solid feather image with orange ink and then went to town on doodles to make than all different! the sentiment sticker was from a very old random sheet in the stash.

And so we then have the card I did yesterday. I had a lovely crafty day yesterday (lots of samples made for DT work) so knew that the sticker sentiment would be the perfect one (just ignore the spelling issue!) ! Gorjuss girl chosen as the focal feature and promarkers for colour and glitter glue for the sparkle! Kept the background simple with the wavy lines for doodles.

And there is week four done!

Nearly run out of the art by Marlene stickers so suspect there will have to be a change of design for the rest of the challenge – although there are some other stickers I can try and use – but they are definitely going to give a different feel!

Happy crafting!

Catherine

Scrappin Saturday – precious moments

Today I have a page I made using the leftovers from a page I made a few weeks ago.

I chose to scrap three photos taken on my daughter’s birthday of my parents.

I did video putting this together and so please do check that out.

I added stencilling to the background and also added in the gold laser cut leaf elements I had on my desk to carry on with the leaf design.

The colours of the papers I think work ok with my parents outfits and I love those Birdsong chipboard elements from 49&Market. It coordinates well with the papers.

With hindsight I think a base to the patterned paper before added to the stencilled background would have been good to separate them out – but I like how this looks too!

Video is up showing the process.

Happy crafting!

Catherine

DT: Kingston Crafts – Everyday Stories – Hello Life kit

Martin was on the tv again yesterday showing the fab product from Kingston Crafts and as there were new goodies – I now get to share with you what I’ve been making with them!

Let’s start with the new Everyday Stories album – the kit is called Hello Life and full of lovely coloured cards, stickers and rub ons alongside the actual album.

Well I started with decorating the cover for the album with the theme of the pages I was making and the photos I wanted to add in … city breaks!

I used four of the cards in the pack for creating the base cluster and then two other cards for adding a mat layer to the two photos I included.

Then I grabbed stickers from the kit- including the cute letter stickers and those puffy stickers.

I cut apart another of the cards as I wanted that camera icon that’s on the left.

I used a mix of red line tape and wet glue for sticking everything down so it is secure. I saw Beth demo that you could make a protector sleeve with a fuse and a normal 12×12 protector cut down to slide over – I got rid of my fuse so can’t do that but think it will be ok as long as I am careful sliding the album on and off the shelf!

So this was my starting point! I have quite a few pages I made for inside the album which I will share with you over the next couple of weeks I am sure! All of them went with the theme of city breaks and document a few different cities and show some other cool things that Kingston have started selling too!

Happy crafting!

Catherine

Festive Friday 2025 #26

Half way through my challenge to make every Friday a Christmas themed project and ahead of my Christmas in July series I went for simple!

Obviously they aren’t actually that simple because of all the sewing – but because these were already die cut, sewn and assembled it was just a case of choosing how to add them to a card with layers etc and a second sentiment added (again these are premade sentiments so simple!).

Probably took my about 15 mins to make these two for this final stage – but let’s ignore all the time I spent sewing them probably at some point last year! 🤣

I kept this one so simple with just two panels (one of which has been lightly embossed – I didn’t get the right sandwich for my die cut machine for this yet!) and then a kraft card blank.

The sentiment is a foiled one from the stash I made a couple of weeks ago (I do bulk making of sentiments or foiling whenever I can to save time!)

This one is one of the remaining pieces of the paper I used a few weeks ago and is a small slimline – perfect for this tall slim focal point!

I added the foiled cardstock behind the plain green to add interest and again one of those foiled sentiments.

Love how these came out as finished cards and how easy it was for me to make – essential as I am in the thick of planning for Christmas in July and have 31 festive projects I am trying to get planned, and then some are already filmed ready to go! I’m in the nervous state now wondering why I challenge myself to do these things!

Ah well – another festive Friday done and dusted!

Happy crafting!

Catherine

Make it masculine – tree

So I am back with my monthly challenge of making at least one card a month suitable for males! This month the idea came from one of my YouTube subscribers who said she usually uses tree images for her masculine cards so I took that as my theme!

I actually used this same stamp when I made my Father’s Day card but this time went with a different feel with all the greens!

I made the background using the sprays from Kingston Crafts so they have a lovely shimmer and then used the gold laser cut panels from an old Stampin Up kit.

For the actual trees after doing the stamping I added some extra details using my stampin write and stampin blend markers – love how this gave them more dimension and texture.

And those gold panels add a touch of luxury too!

I filmed this of course so check out not just this one but all the make it masculine videos I have done so far! Half way through the year now – 6 more months to do!

Happy crafting!

Catherine