DT: Craftyhazelnuts patterned paper challenge

Another month and another design team contribution to share for Craftyhazelnutspatterned paper challenge.

I went to town on this card and love everything on this… the digital image coloured with promarkers and paper pieced and then lots of layers of card and paper and doilies… and of course super cute die cuts.

And don’t forget the ribbon and glitter glue dots!

So this is what I did with my paper stash… wonder what the rest of the team did with theirs? Well it’s time to go over to the blog and find out!

Happy crafting!

Catherine

Making Cards magazine pop up

I made another pop up box card and I loved it so decided to make another using the papers and an image from Making Cards magazine.

Again I started with the same Tranquil Tide cardstock base making the rectangle pop up box.

This time I added die cut flowers and clouds from my stash. The sentiment I embossed on vellum and then fussy cut it out before adhering it onto the box front.

Love how cute this is.

The theme over at the Paperartsy blog challenge is boxes so entering this into the challenge.

Happy crafting!

Catherine

Unicorn pop up box

During yesterday’s mammoth crafting session I wanted to make a fun pop up box card using both Magical Day and Sunshine and Rainbows stamp and die sets.

I started with a base of the Tranquil Tide cardstock and made the base using instructions I found online.

I stamped the unicorn a couple of times using grey archival ink. Then I added colour using SU inks and a water brush. Then coated them in wink of Stella and die cut them.

Rather than die cut lots of coloured cardstock for the rainbow I die cut them from white and used the same colours for the unicorn and watercoloured them.

I die cut the clouds from the white and the sun which I had stamped in Daffodil Delight. I also stamped the sentiment and diecut that separating the first and second part of the sentiment.

For the paper I added some from the latest Making Cards magazine as the rainbows matched so well. For the background I created a sky scene using the cloud border die from the Sunshine and Rainbows set as a stencil. I kept it soft using a stencil brush.

Then adhered it all together and added some sequins from the stash.

Love how cute these unicorns are! So sweet!

Happy crafting!

Catherine

52 mixed media cards… catch up for four weeks

Hi there. Sorry I have been AWOL for the past few days. After our trip away and the wedding weekend I’ve not really stopped and made room for crafting… but today that changed and I’ve spent most of the day being creative. It’s been fab!

I started by catching up on some of the #52playingcardchallenge I’ve been doing this year… I had 4 weeks to catch up on. So over the course of a few hours I managed to get 4 cards made.

1. Round and round

2. Lady in Red

3. Fragile

4. Monotone

I videoed the process so here is the link.

I love how different they all are and am especially in love with the cow one! Love the Teesha Moore style of this.

Happy crafting!

Catherine

Congratulations Tracy & Mark

Yesterday we celebrated the wedding of Tracy and Mark in the beautiful lake district. Today I can share the card I made for them.

I die cut the flowers from some ombre cardstock and layered them onto vellum and a layer of kraft card and sewed it to adhere it.

Then the butterfly was using the fab watercolour wings and I did one layer of the butterfly into vellum and then another onto whisper white. The vellum one I then heat embossed with clear to give it some texture.

Underneath the butterfly I added some die cut flourishes and sprigs which I added ink to some to give some definition and the sentiment from a Woodware set on a die cut label. The finishing touch was lots of pearl gems scattered around the cluster.

Inside the card I created a panel and edged it lightly with the Wisteria Wonder ink and then stamped the butterfly using the same colours (2nd generation ink) as on the front and added the stamped message.

Really happy with how this intricate card looked and wishing the happy couple love and happiness for their future.

And as an aside the gift bag I got matches the card with the days schedule left in our hotel perfectly so I think I judged them just right.

Because I chose kraft as the base for my card I can also share it on the Paperartsy challenge blog... Love all the inspiration Darcy provides.

And of course I’m going to share a pic or two from yesterday…

Happy crafting!

Catherine

Butterfly postcard art swap

This month I joined in another swap over at postcard art Facebook group and the theme was butterflies… so of course Swallowtail had to come out to play!

I started by heat embossing it with a dark red/brown embossing powder onto the mountboard panel. Then added colour to the butterfly using a mix of Aged Mahogany, worn lipstick and Fossilized Amber distress oxide. After a few layers of the oxide applies with a water brush I then also added the fossilized amber to the rest of the background and flicks of the aged mahogany. I heat embossed the sentiment from Crafters Companion and also edged the card too with archival inks. I then added a generous amount of wink of Stella to the butterfly.

Then to seal I heat embossed the whole panel with clear embossing. I did this several times especially over the butterfly. This gave it a smoother feel in the centre.

Hopefully from the close up you can see the smooth texture and some of the shimmer to the butterfly.

Love how this came out and very tempted to make another to keep. Hope the recipient likes it too.

Happy crafting!

Catherine

One sheet wonder

It has been a while since I did a one sheet wonder but I felt like having fun with paper and set to on this one sheet wonder project.

I tried to use up bits off the desk as I was building them after the initial cardstock mats etc. I built them up bit by bit too rather than just rushing in to get things stuck down.

So here was the starting point…

A piece of retired Stampin Up Tea for two dsp that I happen to love both sides of.

I teamed it with Early Espresso and old olive cardstock. The early espresso is also the coredinations cardstock so wonderful for distressing.

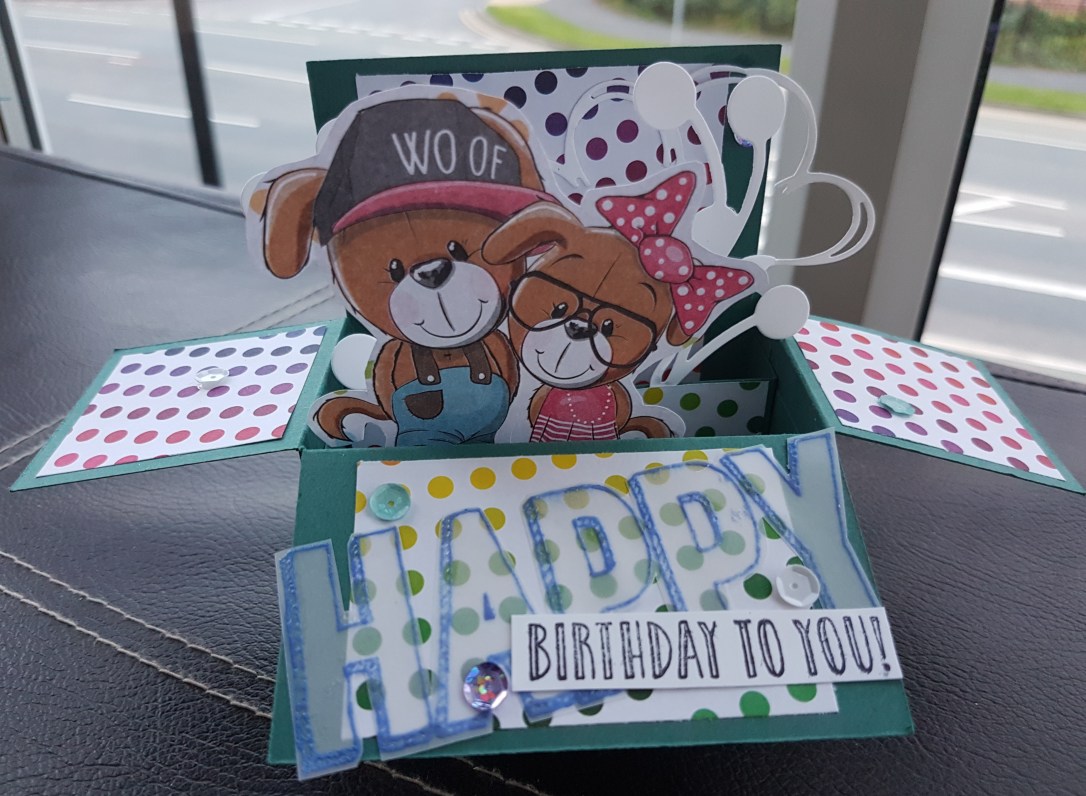
Next to start adding focal images…

A real hotchpotch of stuff going on… scraps of vellum, die cuts, images from magazine kits and embossing. I had so much fun popping images and scraps from the desk in with these.

So then I started assembling and decided I wanted sewing to feature on most with the quilted type paper as the inspiration. So I added machine stitching to most but not all and the started with the assembling and finishing off.

So I started with some images leftover from making cards magazine…

These first two don’t have any sewing but instead added some twine and ribbon. The next two however have sewing and the lovely cute images.

Now I move onto my fave stamp set… petal palette…

More die cutting and vellum and embossing and some pretty cards were created.

And finally three different cards … the gorgeous watercolour wings…

This one I created some inchies using the butterfly basics stamp set and heat embossed in clear the post script background stamp on the early espresso cardstock.

The last one uses a die of the white rabbit as a focal point. I adore this die and it was gifted to me by a kind friend… thanks M xxx

So there we have it… all of the cards from my one sheet wonder! Hope you enjoyed them as much as I did making them.

Such fun playing with this paper!

Happy crafting!

Catherine

Finishing off Rebecca’s journal

Last piece for Rebecca’s journal…

This time bright and warm fresco paints over a patterned paper piece…

Lots of text stamping and some stencilling. Splatters and grungy edging to provide a graffiti style page.

Love how all of the art work works together but also are completely separate pieces.

Hopefully Rebecca likes them as much as I enjoyed working on them.

Happy crafting!

Catherine

Rebecca’s envelope journal continued

So continuing from yesterday’s art journal page I have one of the other pieces I made which is for the back of the piece…

The rule that Rebecca had was that I should choose colours in opposition to the page before it … well I had navy and black on the page before and so I went orange and brown for my page to face.

I actually painted this onto a separate piece of patterned paper and stuck it to the page afterwards (which I had edged in black gesso).

The page itself has lots of layers of fresco finish paints … buff, mahogany, cheesecake, autumn fire and mermaid to name but a few! It then has stamping in archival and distress oxides and some embossing with clear emboss. The main image is the Darcy seed flower which I stamped in versamark and then used the Seth Apter baked texture embossing powder. I also added shading to it with a big brush pen and some white highlights using a white paint sharpie.

The bottom of the page I added two layers of the baked texture embossing powder and one of the clear emboss to create some ground.

I then added the Tim Holtz stickers that spoke to me.

Happy birthday KJ

So one of the princess’ best friends had a birthday party yesterday for her birthday that is actually tomorrow… and here is the card I made inspired by her lovely dog Lottie…

I had to use the Dogs Woof stamp and stamped it a few times before trimming it down and colouring with ink and a water brush.

I then stamped one of the single images and diecut and mounted this … and then inside the same image.

Hope KJ likes her Lottie inspired card. And here is a pic of the lovely Lottie dog!

Happy crafting!

Catherine