DT: Happy Little Stampers Anything Goes with Dies challenge

Hello! Welcome (back) to my blog!

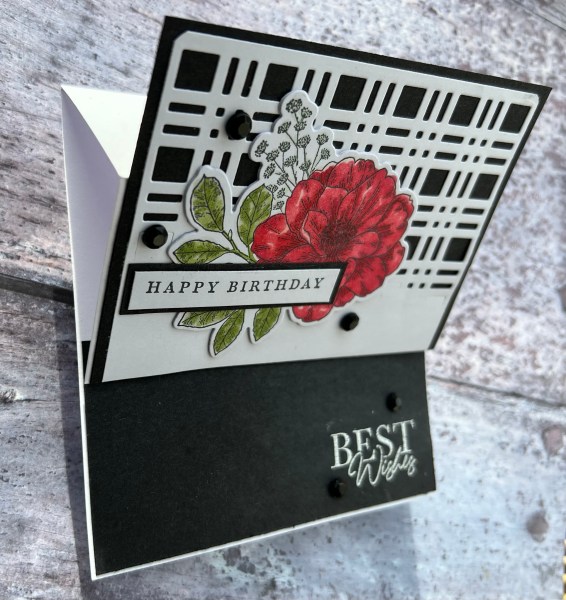
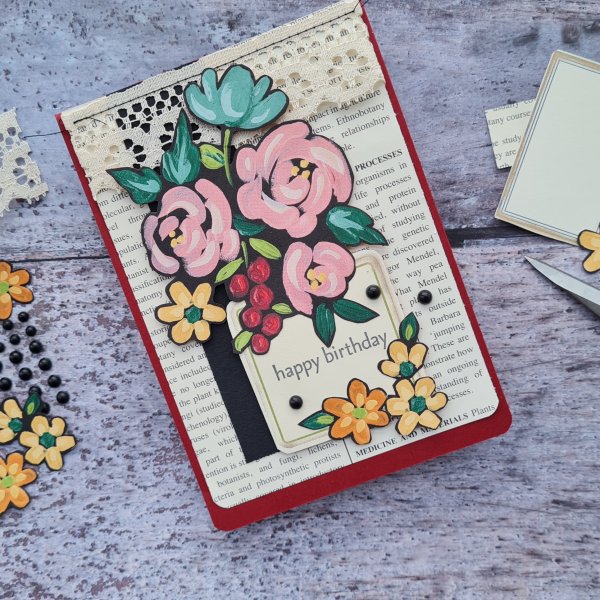
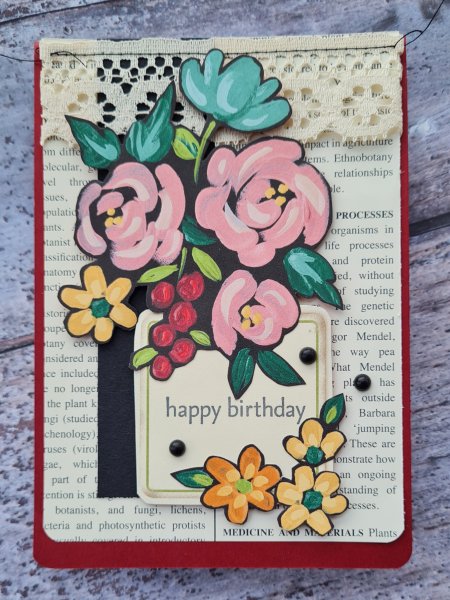
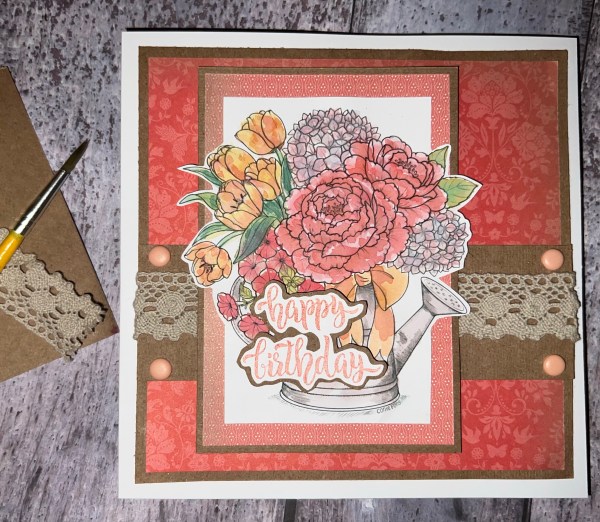
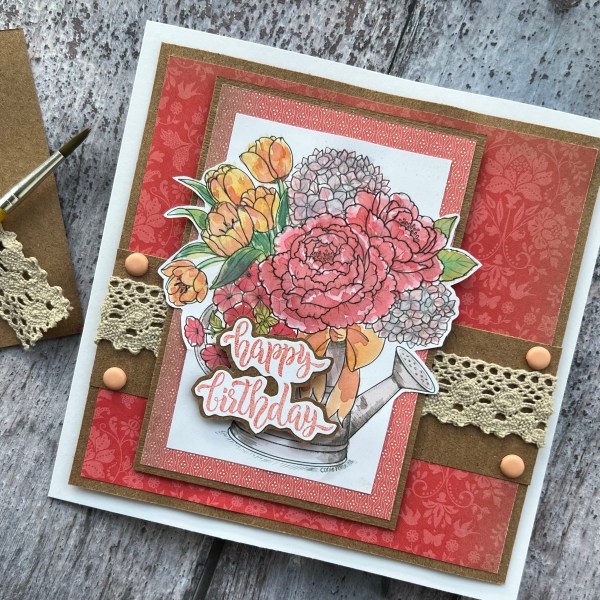
Today I have a card I made for the Happy Little Stampers Anything Goes with Dies challenge design team using lots of the little flowers from Wreath Builder Dies and the leaves from Pierced Blooms dies with a cute digital image that has been printed and coloured in my stash for ages!

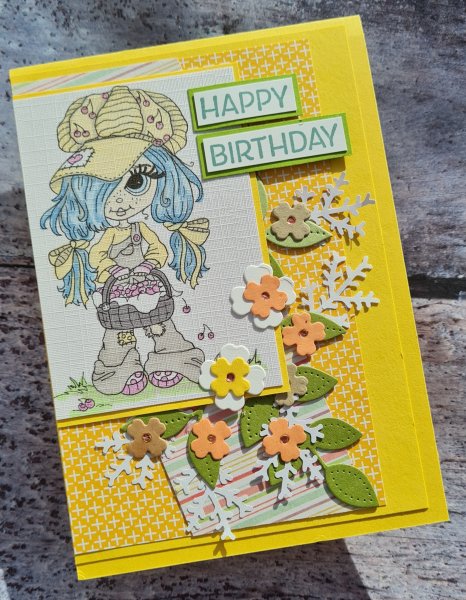
I chose some papers from the stash that worked with the colours in the image and then used Daffodil Delight as the base for the card and the mat layers.

As long time readers of my blog will know I occasionally have a big die cutting session using all my scraps of cardstock and as a result I end up with pouches of the die cuts sitting there ready to use and this was the case with the flowers and the leaves.

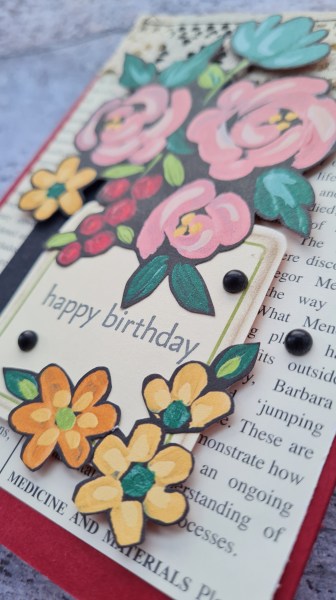
I just picked out the ones that went with the colour scheme and it was easy to create these little flower clusters. I added in the white die cuts that I think are Memory Box dies but I’ve had them so long I have no idea and certainly don’t own the die to check. This helped soften the slightly more graphic shapes of the leaves.

I decided to fill the centre of the flowers with rose gold shimmer paint to finish them off.

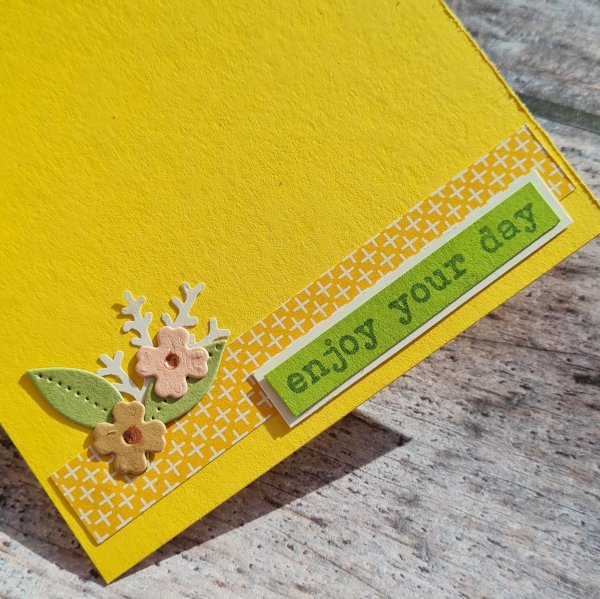
I remembered to also finish the inside with some of the paper, another leaf and flower cluster and a sentiment.

Cute!

Love this bright and cheery card.

Happy crafting!

Catherine

Uk stampers forum tag swap

Hi all … hope you are having a great day! I’ve got a tag to share with you that I made for this months UK stampers forum swap.

I went for an inky tag this time and also had a little play with texture by partially diecutting a layer with a background die.

I used all pink coloured distress oxides and there was plenty of smooshing, blending and splattering. I also added some splatters of shimmer ink too.

I added some stamping to the tag itself with the sentiment stamp and also around the edges.

Next I stamped the chess pieces and cut them out and added them.

I decided to add the following washi tape as a backing to the sentiment and then the glittery gems and the pink ribbon as contrast. I also added some staples for more texture and to keep the washi in place.

Happy crafting!

Catherine

DT: ATSAM – #443 Birthdays

Hello! Thanks for popping over to my blog. I really like to see people coming to my little slice of the internet to see what I’m up to! Today I have a design team contribution for Addicted to Stamps and More where our theme is Birthdays! Now regular visitors will know I make a lot of birthday cards so this wasn’t difficult to do … but I decided to mix it up a little and make an easel card just because I fancied something a bit different.

I also wanted to use a new die (yes I sort of failed in my no spend quest but decided that the challenge would be that I can only buy things using the proceeds from selling craft supplies and I’m definitely within that budget still!) … so I started by partially diecutting the panel with my die and then adding that to a black background.

Next I went for the beautiful Cottage Rose stamp set and stamped the main image and coloured it with stampin blend markers. I die cut it out, then die cut another two to stick them together to give them dimension.

Next I constructed the card using black for the bottom panel and embossing the white sentiment and adding gems. I also added the sentiment on the front with the gems to make the card complete.

I love the contrast of the red rose against the black and white and also the partial die cut background.

Fun to create a different shaped card … hope you like it too.

Happy crafting!

Catherine

DT: Happy Little Stampers Anything Goes Birthday challenge

Hello!

Another design team contribution for you for Happy Little Stampers and I decided like last month to delve into the printed digital stamps pouch and see what took my fancy… and this is what I made.

A super cute mini (4×4) card featuring all the bright colours and this gorgeous dog from All Dressed Up.

I do love a dramatic black card and with the bright colours this is such fun. I added a couple of matt black dots for the embellishments but otherwise kept this pretty simple and let the image and the papers do the work!

As it is a black card I did add a panel inside with a strip of the paper to decorate.

Happy crafting!

Catherine

Patterned paper play

White rabbit white rabbit white rabbit… is that still a thing for first of the month? Also April Fools… nah not for me!

Anyway first of the month means to me play with patterned paper. So like the last few months I got prepped ages ago, picked out some 12×12 dsp and did some fussy cutting. This time I think the dsp was saleabration and perfectly penned or something similar … but its a black and white floral on one side and loose watercolour stripes on the other.

Perfect for fussy cutting the floral images and mounting them onto foam and adding into a background below the focal image. I chose to stamp the Happy three times and mount that on black then fussy cut the birthday.

I added the gingham ribbon and some sparkly gems to finish … jobs a good’un!

I have loads of these floral images left to play with and look forward to doing more cards with it… maybe with a bit of colour?

Happy crafting!

Catherine

Mashing up the dsp

Todays card is one I made with the bits and pieces that were left over from other projects. Firstly some fussy cut dsp from projects I made in January (the flowers) and then the dsp I made this months patterned paper playtime project with and the UK stampers forum tag swap with.

From these bits and pieces a cute card came together with the gorgeous lace trim, some sewing and some scraps of black. All mounted on a Cherry Cobbler base card blank.

I love how easily this came together just using bits and pieces left over from other projects.

Finished off the card with the black gems and a sentiment stamped on one of those labels leftover.

Happy crafting!

Catherine

Gelli printing session

I haven’t been feeling very well recently and focusing on things isn’t always easy so decided to just sit and play with ink and my gelli plate.

I made these three backgrounds and one where I was wiping off the brayer.

By the time I had made these I decided to make something with half of the yellow one.

I decided to emboss the background with some extra yellow ink. Then added some scraps of cardstock and then chose to stamp and colour the Art by Marlene beach house as the focal feature.

I also stamped the Corcord and 9th sentiment and cut that out.

Added the sequins as a finishing touch!

Happy crafting!

Catherine

DT: ATSAM – #442 Christmas

Hello!

Another Design team contribution this time for Addicted to Stamps and More which I’ve joined this year (to add to my collection of design teams) … the challenge has had a little holiday but is back now and the theme is Christmas.

I will confess I made this back in February and videoed the whole process with a lot of fast forwarding as I did a lot of stamping of these baubles before I got to the final idea of making the three panels. But then I corrupted the video so that went in the bin!

Now this is a super shiny card with all the gorgeous embossing and so I kept it quite simple with all the white… quite unusual for me!

I really love how it finished up and the pearlescent embossing shows up best in real life … I couldn’t get the camera to pick up how pretty it is here.

I went for a different sentiment originally but this more simple type font one works best keeping the card quite simple.

Hope you like this clean and reasonably simple card … I wouldn’t say completely simple because it takes time to stamp in all the colours but the combination of the stamp platform and the stampin write markers makes the job simple.

Happy crafting!

Catherine

ATCoin swap

It’s been a long time since I made any coins but just like with the inchies I found some I had got cut out of packaging in the drawer and decided why not make use of them and just have a little play with the bits and pieces on my desk. I also made inchies as toppers on the coins because why not when they were to hand.

So like the inchies I made the other day I used inks to add colour to some white cardstock and then stuck them to the packaging coins. I did the same with the inchies but in darker colours so there was some contrast.

I used my little rainbow themed stamp set to stamp the sentiment and then the three rainbows for the focal point. I did this on scrap cardstock and fussy cut them out before sticking them on.

I added wink of Stella to the rainbow to add some sparkle and then a sequin for fun embellishment!

Simple but cute coins and it was nice to both make use of them and to do something a bit different from my usual card making.

Happy crafting!

Catherine

DT: Creative Knockouts – add a sentiment

Hello! Time for another design team contribution and this time for Creative Knockouts where the theme for this fortnight is to add a sentiment.

I chose to use this flowery watering can image which I was gifted by Connie Fong who are sponsoring the challenge. The image is called Garden Bouquet.

I printed it off in a couple of sizes but for this one I went large and ended up making a 7×7 card. I love the colour schemes and the pretty vintage style I ended up with.

I coloured the image using distress inks and water and a paintbrush and kept the painting quite loose so it has some depth but no precision. I also did some fussy cutting around a rectangle shape so some of the image fell off the edge of the rectangle.

I added the lacy trim and some brads and then the sentiment is hand stamped from a magazine freebie set. I then fussy cut, mounted it, and fussy cut the mount. I added foam to both the sentiment, the top rectangle and then the full background so there is plenty of dimension.

Love how it turned out. Think this image would be great for decoupage too so may give that a go at some point.

Also I did make a video of me making this if you fancy watching me in action!

Happy crafting!

Catherine