Gelli Plate, Masks/Stencils, Stampin Blends alcohol pens, True Love, Waffle flower, Waffleflower

Final True Love dsp card

Yes it’s come to the point where (unless I find a piece in my stash that has been hiding) I have used up the True Love designer series paper. I have absolutely loved using this … especially to quickly get a floral focal piece onto a card without stamping!

So this one I made with a background of a gelli print!
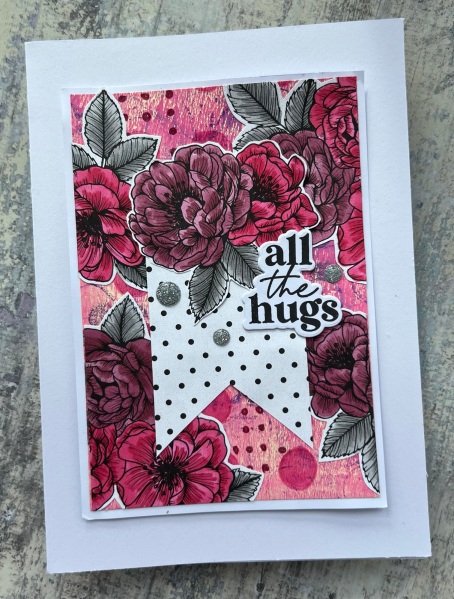
I grabbed this from the stack I had made and then started adding to it using a stencil I bought at the crop. I didn’t use the stencil in the normal way … I used my stampin blend markers to add circles through the stencil instead of blending over it to show the full pattern. This gave me some dots and circles in pinks and purples.

I decided this would then be the background for true love leftovers. I chose all the edge pieces first to colour and add to the sides of the panel.
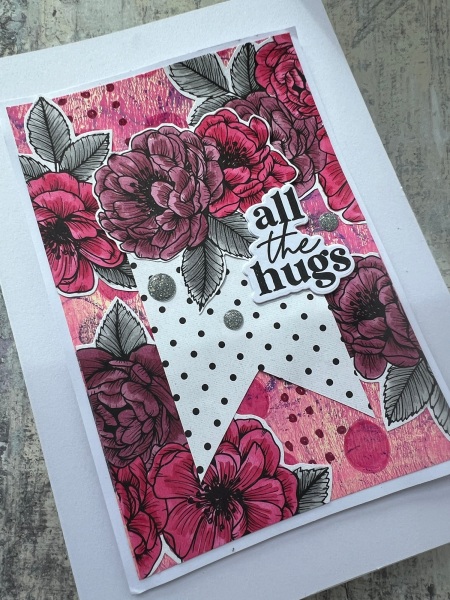
I decided to go with grey leaves though as I didn’t want the green to draw focus as a contrast colour … so it’s a bit odd but I think it works!

I then coloured the remaining whole flower cluster and grabbed the last piece of dsp to cut the banner from.

I did add a little dimension beneath the banner to slightly raise it above the background and then added the sentiment.

I added more dimension when adding it to the card blank to raise it a little more and then added the gems to finish off!

So that’s the last of True Love dsp. Hope you’ve enjoyed seeing it over the past few years as much as I have done!

Happy crafting!

Catherine

Altenew, Design Team, Distress oxide ink, Embossing Folders, Honey Doo Crafts, Ribbons, Waffle flower, Waffleflower

DT: Addicted to stamps and more – die cuts/stencils #470

I’m back with another design team contribution for Addicted to stamps and more where the challenge is die cuts/ stencils. And on this card i used a few die cuts.

Let’s start from the back up … I die cut the large leafy background panel die from Honey Doo. It’s slightly larger than the card blank I added it to but I just trimmed it down after adhering in place. This gave some interest to the background.

Then I chose a piece of inky background I had made. It’s lots of yellows and greens and all smooshed together. I added a green edge to the panel but otherwise left it as it was.

I found in the stash the gold laser cut panel and adhered that down to create another layer of leaves.

Then I grabbed the Altenew Eclectic bouquet stamp and white embossed the image. Then I watercoloured it loosely using pinks and greens I thought would work with that background.

Then I embossed it, and wow what texture! The 3d embossing folders are just amazing!

I added that onto the main topper and then decided to place that top right on the card so that the leaves could trail off the topper.

Finishing it was easy … a stamped and die cut sentiment from Waffleflower, an embroidery floss bow and then some gold gems!

Perfect!

Inside I stamped the image again this time using pink and added one of the sentiments from the same set.

A really pretty card!

Pleased with this and all the layers … and that embossing folder is just glorious! ❤️

Happy crafting!

Catherine

Altenew, Altenew, Embossing Folders, fresco finish paints, Paperartsy, Masks/Stencils, Pinewood planks, Waffle flower, Waffleflower

End of an era

This week we marked the end of an era in our household as the princess finished her ALevel exams and so the end of school/college!

I made a card to mark the occasion of course with a little gift for her to receive when she got back from her exam.

It’s an arty one (well she is arty!) with a painty background on the text paper. Then the main feature is of course the gorgeous Altenew floral (Eclectic bouquet) which is stencilled, die cut and embossed!

Loved using the translucent fresco finish paint on the background so the text is still visible.

I added the sentiment that was already die cut and stacked (easy) with some copper thread underneath to add texture.

Mounted the panel on the aqua card and then a layer of embossed white to again add texture.

So congratulations to our girl on finishing this stage of her life – now onto the next. Pending results we are hoping for her next step to be Fashion Marketing at Manchester Fashion Institute. 🤞🏼

Happy crafting!

Catherine

Stampin Blends alcohol pens, True Love, Waffle flower, Waffleflower

More patterned paper play with True Love

Yesterday I promised you other projects using the True Love papers that I made at the crop back in early April.

Well here is one of them … rainbow of flowers with some pieces of the reverse of the dsp and a sentiment! Done and dusted! And perfect for Pride month don’t you think?

With having chosen the mix of colours I kept the background neutral with just the black and white and then the large expanse of white. I did bring in a colour for the card base but with such a small amount visible it didn’t dominate the card and allows the flowers to be the focal point.

Used a Waffleflower sentiment and a single black gem for embellishment!

Two more True Love dsp flower cards to come – watch out over the next couple of weeks!

Happy crafting!

Catherine

Altenew, Expressions in Ink, Stampin Blends alcohol pens, True Love, Waffle flower, Waffleflower

Patterned paper play

It’s the first of the month so time to play with patterned paper and this time I cheated and actually made these months ago at a crop where I took along the pouch that had a few remaining pieces of the True Love dsp along with a few other bits of paper from the Expressions in ink papers.

I had fun colouring in the flowers with the Stampin Blends and then made up several card fronts using the stash I had to hand. Will share others later this month as they had a different thing going on!

Because I had the flowers already cut out and the panels I kept quite simple these were easy cards to make. I’d also die cut and stamped all the sentiments already too so that made those really simple to pick out and adhere!

I liked keeping it simple at the time because of the fact that I had very few supplies to hand (although I had packed a lot of stuff to take with me!).

When I got home I finished them off with gems and adding them to card bases.

I’ve loved this paper and although it is sad to see the final pieces of it being used it is also good news —- means I might eventually get around to buying new papers because I am making a small inroad into using up what I have!

Happy crafting!

Catherine

Craft Stamper magazine stamps, Masks/Stencils, Waffle flower, Waffleflower

Inky new home card

Had a play with distress inks and new stencils to create this card for my friend who has recently moved home.

Yes I bought two circle themed stencils at the same time … Tim Holtz and Aall and Create.

Made a blue and green panel and then a red, orange and blue panel and played with the stencils on both and then stamped the little house out of the red panel before using my stampin blends to add some definition to the image.

The stamp itself is a Craft Stamper magazine one and it’s so cute and quirky!

I also added some stamping to the blue panel with black for the cup stain to add something a little different in the background.

I edged panels and doodled round edges and then added the sentiment and gem after adding it to a green card blank.

Pretty sure my arty friend enjoyed this bright and fun card I made.

Happy crafting!

Catherine

Altenew, Crafters Companion, Waffle flower, Waffleflower

Wallpaper sample notecards

Happy bank holiday weekend everyone. I’ve got a busy day ahead with a non-BBQ with the parents (typical bank holiday weather means I’m not cooking outside!) so no crafting planned. Instead I’ve got a post from a project I did a while ago.

I had a scrap of wallpaper sample that I had been hoarding … so you know the score … must use or ditch it! So notecards made!

Kept them really simple with the embellishment of roses cut from another piece of dsp and then some stamped, embossed and die cut sentiments.

Oh and also some white sequins to embellish!

Love the texture of the wallpaper and the torn edges with those beautiful watercolour floral images.

Simple project … feel satisfied I put the wallpaper sample to use … and no longer hoarding it! I mean how ridiculous was it to hoard it in the first place? But if you are a crafter I am sure you are just like me in having lots of random stuff around that just needs using or binning!

Happy crafting!

Catherine

Altenew, Paper Blooms, Waffle flower, Waffleflower

Paper blooms dsp

I made these two cards using leftover paper blooms dsp which I had in a pouch from over a year ago. It was good to empty the pouch and get it used. I teamed the flowers with some patterned paper from the stash.

They are fairly simple cards but a sweet way of using up these fab flowers.

On this one I added in the little die cut label to break up the background and the sentiment. Sentiment was an Altenew one I had stamped and die cut in a ‘use up scraps’ session so was ready to use.

The second one I used more of the flowers on…

I created the stripe across the paper and added the flowers across that and then added another band of the patterned paper to ground the sentiment with a few of the smaller flowers on that layer.

This time the sentiment was a Waffleflower one – created at the same time as the other in a ‘use up the scraps’ session!

I added some gems to finish off once I added the panels to the card blanks.

Happy crafting!

Catherine

Paper Blooms, Waffle flower, Waffleflower

Patterned paper play

Last year I took pieces of dsp and cut them apart and popped them into pouches so they were ready to make up some cards for my monthly patterned paper challenge at the beginning of the month… well I found one of the pouches when having a tidy up and decided to pause the tidying and make a card!

Entering this into the anything goes challenge at Crafty gals

I chose all the blue flowers and then grabbed some pieces of Starry Sky dsp from the stash and made up a background panel… then made a focal piece using another piece of the dsp and the big pink flower.

I then stamped and die cut and stacked up the sentiment from the Waffleflower set and sandwiched some thread behind it before glueing it into place on the card.

I then added the card Candi for embellishment.

Happy crafting!

Catherine

Hot Picks, Old Paper, Waffle flower, Waffleflower

Rainbow distress resist #2

Yesterday I shared the first card I made using two focal points I had created inspired by these cards I watched Amy create on YouTube.

Now it’s the turn of the second card. This time I went to town with colourful stamping on some cardstock to create my own background paper. I used the same colour distress inks but sometimes stamped them off so lots of different shades. I also added in the Hickory Smoke too for a subtle grey.

I mat this panel on to block cardstock. I then used some of the same black and created a panel I ran through the big shot with the Old paper embossing folder. I then used the shimmer paint and brayered it over the texture so just pick up a bit of the shimmer on the raised elements. I placed this onto the panel to be a contrast for the focal element to sit on.

I then created the sentiment using the Waffleflower stamps and dies and die cut it a few times to stack up. I love the white sentiment on black.

I finished off with the blue gems in different colours and sizes to add that bit of bling!

Pleased with how both cards ended up – and it was fun to try a different technique for creating a rainbow with a difference … still want to have a go at a floral image like Amy did but for now this was fun to do and good to make me move away from Altenew florals if only for a short while!

Happy crafting!

Catherine