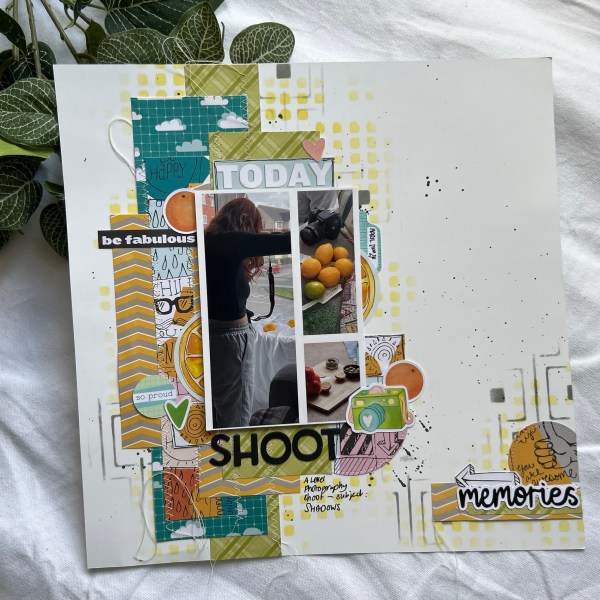
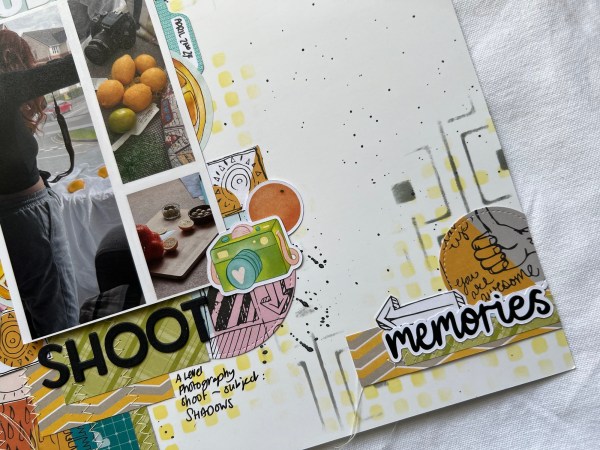
Clearly I am on a roll with my pages and this time I am using the leftovers from the page I shared yesterday (with an extra paper pulled in too!)
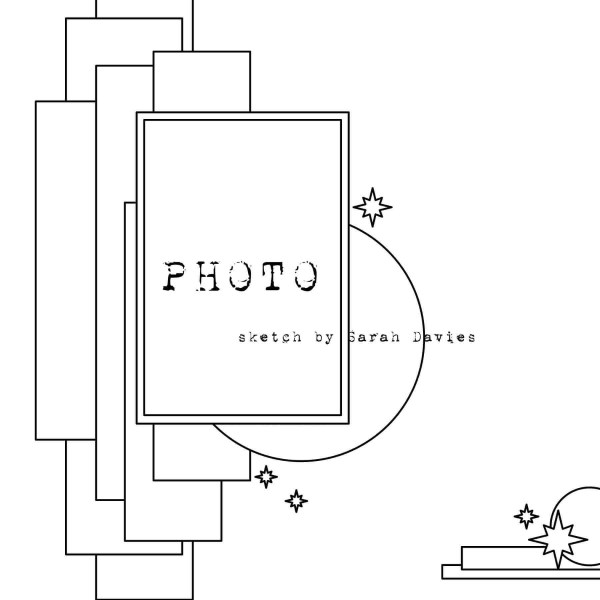
The sketch I used was the day 10 from 30 days of sketches with Christy’s Beautiful Life and was designed by Sarah Davies.
Whilst I might have slightly lost some elements of the sketch with over embellishing with bits and bobs I think you can still see most of the intent!
Loved adding in the stencilling on the background and the lollipop box club kit bits and pieces too.
Also like the sewn elements and the hanging threads from that.
Kept the journalling small as just really documenting the a level photo shoots that my daughter was doing in the spare room – this fruit themed one was in response to the theme of shadows.
Thanks for the inspiration sketch Sarah.
Also I videoed this process (again) and so check out the video to see this come together.
Carrying on from last week I used another background I had created in that mammoth session and rub ons to create this Christmas card.
This one was a mix of smooshing the colour and drips and splatters and is a really pretty mix… I also think there were both distress oxides and distress inks in there.
I once again added lots of rub ons on the background although this time they are more subtle against the lighter colours.
I also added spots of the purple shimmer paint around the panel… with hindsight I preferred it without … but hey ho … sometimes it just goes like that!
I then added a die cut sentiment and added the panel to a purple coloured card blank.
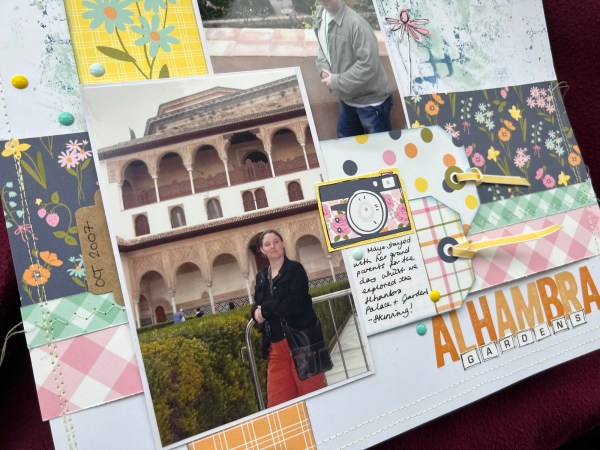
I made a third scrapbook page using up the scraps left from the last two pages I made (page one & page two)… it’s amazing how far a few bits and pieces can go!
This time I used a white background and added stencilling and stamping (I realised I hadn’t used any stamping in the previous few pages which is odd for me!).
I added some die cut hearts from the pouch I already had die cut from scraps and just were waiting for use!
I didn’t add much in the way of ephemera this time but those cut apart panels got some use.
I also didn’t add gems to this layout – I think the hearts did the job instead!
And finally the leftovers from the four pieces of patterned paper …
Really not much left I can get use out of without another piece of patterned paper but I’m going to put the cut apart panels to one side as they may come in useful on other layouts and seem too good to chuck away … but the scraps of the paper are going in the bin now. They served me well but I really can’t justify keeping them when I have so many other papers to use!
Oh and I forgot to mention till now I did video the process so you can watch that on YouTube.
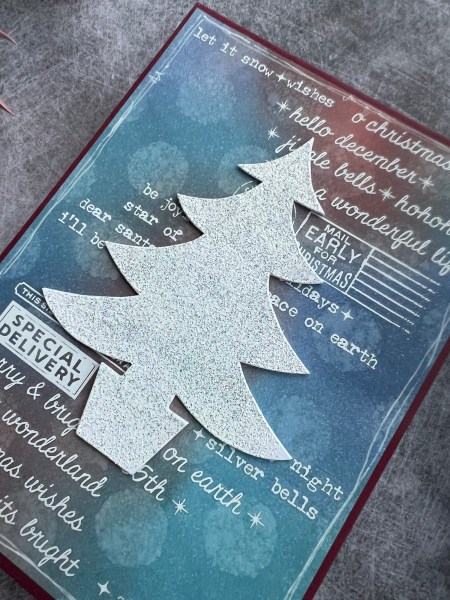
A few weekends ago I spent a thoroughly enjoyable few hours watching Tim Holtz YouTube videos and making lots of backgrounds…
Yes lots of backgrounds! Well this card came as a result of picking out one of the backgrounds and then rummaging through the Christmas stash to find the rub ons … and well it was such fun to put together!
I love the colour combo on this background … aged mahogany, broken china and faded jeans. After inking up the background heavily I sprayed water through a stencil which lifted the ink to create the circle pattern in the background.
I decided to go overboard and use a lot of the rub ons to create the background. I know this might seem excessive but I never think to grab them normally so it was good to get a fair few used up at once – plus I liked the look of the mixed fonts and little decorative elements.
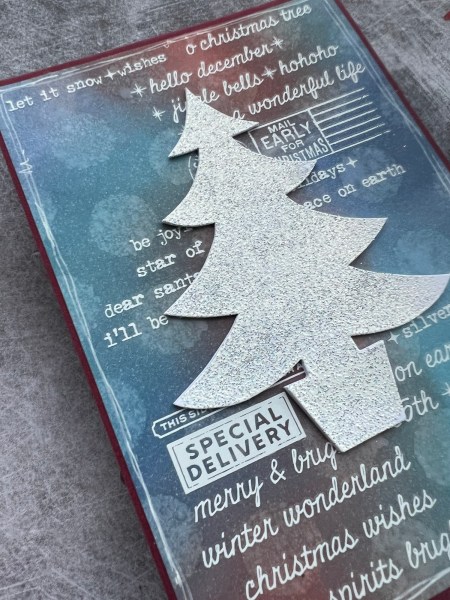
The focal feature of the tree is actually three die cuts which again have been in the stash a long time. I stacked them up for dimension and added a coat of sparkly embossing powder to give it texture and shine/sparkle!
I added a doodled border and then mounted it onto a Merry Merlot cardstock. Whilst not a perfect colour match I thought it went well with the colour of the background.
Decided against any other kind of embellishment or sentiment as the card felt done at this point!
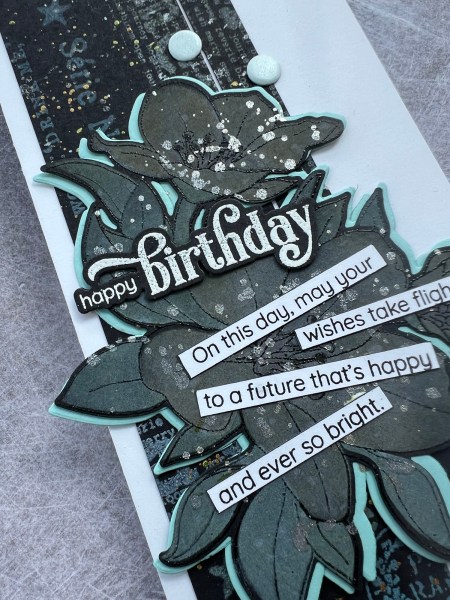
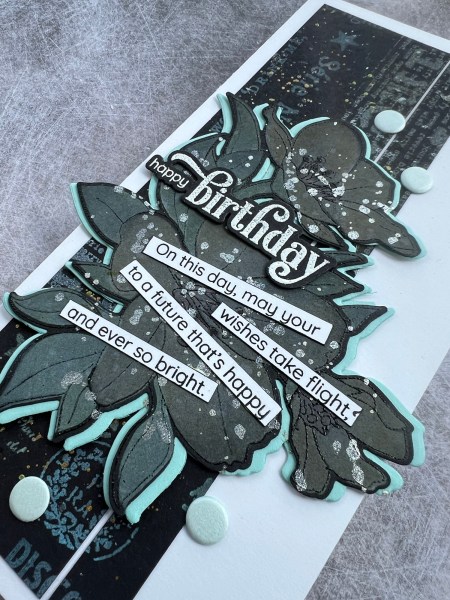
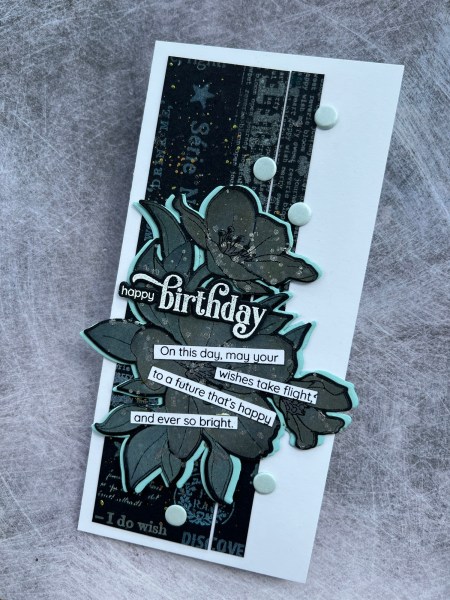
A week or so ago I made a tag from a black background I had been experimenting with and I had a little bit of the background left so I made a card using it. I also used the same Altenew Splendid bouquet stamp for the focal point but this time I did colour it differently. I wanted to see what black embossed lines would look like as opposed to the white ones. Well it certainly gave it a different look.
I also used the distress oxides direct into the black without a layer of white pigment ink… that made it significantly duller and more subtle in colour… but still a fun effect. I decided to also splatter it quite a lot with a gold shimmer.
I also added two layers underneath which I offset slightly to frame the image not just stack it for dimension.
This brought out the blue tones in the background I think and gave it a different look.
To add to that I added blue card Candi for the embellishment.
For the sentiment I thought that I would add both the bigger sentiment and the extra sentiment cut into strips. This gave the card another focal point rather than the flower and I like how this brightened what was quite a dark card.
I say dark but with all the sparkly splatter it is quite shiny when the light catches it … but all in all a fun different way to use this amazing floral piece I am obsessed with and can’t stop grabbing… and pleased I found a use for the leftover strips of the background I had made!
My lovely and talented friend Helen is celebrating surpassing her 500 subscriber milestone over at YouTube so I joined her with making a page with a few instructions.
Use tags
White background
Stitching
2 or more pictures
Mixed media / doodling
So here is what I made …
I videoed the process and have that up on my YouTube channel.
I used the kit I got from Hey Little Magpie at the crop last weekend and had lots of fun playing putting this together!
Some distress oxide playing on the background and lots of sewing around the edges.
Love the little tags and those cute flower die cuts too!
Hope you like what I did and also go support Helen with her celebration!
So I had a very lovely few hours making lots of backgrounds whilst watching Tim Holtz on YouTube – I just played with distress inks and distress oxides and made lots of backgrounds as works in progress for me to grab as and when I fancy to make cards from.
Well I grabbed this one and started transforming it just by playing and grabbing stuff … no plan to start with and certainly wouldn’t have guessed where it ended up!
So I can see blues and greens and stencilling in there and I’m guessing a mix of oxide and ink but who knows? I think I used most of the colours in my collections during the play just grabbing them randomly!
So I started by grabbing a stampin write marker and adding definition to the leaf stencilling.
But then I was less keen on it … so needed a way to cover it up! out came the zero waste leaf die from Altenew and white cardstock.
Hmmm … still not happy .., but then I spotted a pouch of cut apart dsp that I refound whilst tidying the other day and put it on the desk to get it used… and hey presto a card came together!
Most of the background is covered but it is still visible in some spots and the colours went well with the greens of the leaves and the contrast of the red.
And I used up lots of the dsp left including all the cut apart pieces so I was very happy to put it to good use in a way that surprised me!
Added two gems from the stash and also a sentiment I had die cut and stacked (Waffleflower).
On Tuesday I discovered some paints had dried up so in a bid to make sure my paints were ok and get rid of those that weren’t I had some fun gelli printing! After all part of the fun of decluttering and tidying is playing with what you find along the way!
Well I may have got rather distracted with the playing…
Well once I had cleared away the paints and trimmed the papers I had made I grabbed the top one … the one with the leaves at the sides and decided to get something made with it!
I first added some more green to the edge using Mowed lawn distress oxide and then splattered with the same.
Then I grabbed old dsp that that I had cut up and layered all the flowers around the panel and adhered them down.
This totally changed up the panel and made it more vintage rather than grungy I think.
I wrapped some green ribbon round the panel with a little bow to one side and then picked out some scraps of text paper and a little bit of leftover dsp (this is reverse of the floral side) and inked up the edge and layered them up over the ribbon.
Then I added the sentiment that was embossed and die cut.
I mounted the panel on cream and then Merry Merlot. I also added some gems that coordinated.
Love how this came together and really pleased with all the gelli prints I’ve got to play with! Plus one whole box cleared out with paints that had gone off which is frustrating and satisfying in equal measure!
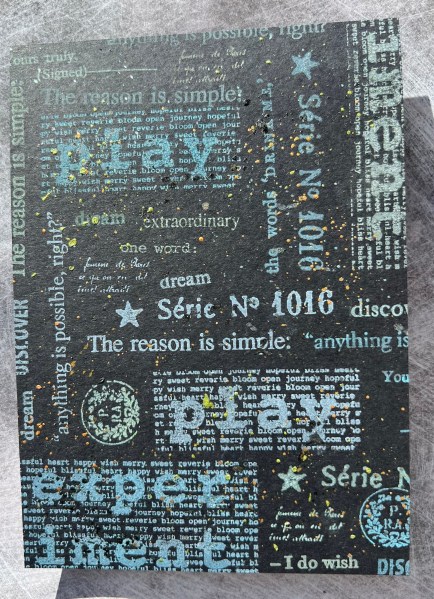
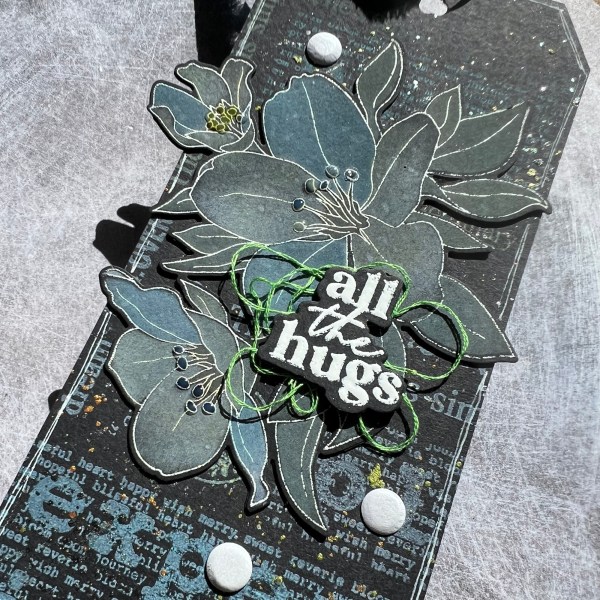
I decided to join in with the UK stampers forum swap again this month as I made a background as an experiment and wasn’t entirely sure what to do with it … so a tag was made.
I am still going through my stash and trying to get rid of things I don’t use and this Paperartsy stamp set is one I like a lot but never really use now I don’t really do art journalling stuff … so I decided to have a play with the stamps and see if I could make something with them before I listed them for sale.
I took some black cardstock and stamped the stamps using white pigment ink and then went over them with the distress oxides in different colours. This gave a colourful but subtle colour to the whole piece.
Then I sorted through my Art Alchemy paints and did lots of splattering. Unfortunately these paints were quite dry so I had to water them down to reactivate a little and then have had to accept defeat on these and get rid! Such a shame but it’s my fault for not using them more often.
Once the paint was dry I trimmed down the panel into a tag shape and had to decide how to finish off … well of course my stamp set of the moment (Altenew Splendid Bouquet) begged to be used … this time with white embossing the stamp image and then blending using the mix of white pigment and distress oxides.
I die cut it out twice to stack it and give it some strength as I knew it would hang over the edge. I also spritzed it with water to activate the oxides a little.
I added the sentiment from Waffleflower again stacked up for dimension with the thread sandwiched between the sentiment and the image and then added some white card Candi for embellishment.
I added some glossy accents to the stamen on the flowers too.
I chose three bits of blue and green ribbon from the stash to add to the top of the tag and then decided it needed something to finish off … white posca doodled outline did the job perfectly!
I do still really like these stamps but they have gone for sale as unlikely to use them often. I do still have a strip of the background left so will have to do something with that soon and share it … but for now it’s still sat on the desk awaiting inspiration to strike!
I made these two cards for my aunties as their Easter cards, but then our plans took a turn as the whole house has been poorly with a bad cold so they didn’t get posted in time to teach them for Easter but they should receive them next week instead! Better late than never I suppose!
For both I chose the patterned paper that I think was called Sycamore Street or something like that. It’s been on my desk for a while waiting to be used up after I used some for a scrapbook page I made … and the colours of those ‘&’ made me think vintage Easter so I went with it!
I started by embossing the wreath from Arrange a Wreath with a gold colour over the top of Distress oxide walnut stain – this gave it more of the vintage look than a bright gold.
Then I added speckled egg and the walnut stain onto the background more randomly so it is very vintage looking.
I did both backgrounds at the same time but one piece of paper was slightly larger than the other and so the positioning was slightly different for both cards.
I mounted the background onto the green cardstock for both which adds a little pop of extra colour.
Then I took the egg stamps from the set and stamped them six times on the leftover patterned paper – fossilized amber, worn lipstick and cracked pistachio. I then die cut them all out.
I then stamped the box image in speckled egg but decided it wasn’t quite bright enough so went over it with the cracked pistachio. I fussy cut out the box and edged it with the walnut stain.
I arranged the eggs in the box with one at the front of the box and stuck them together and added a piece of foam behind to add dimension.
Next I stamped and fussy cut the sentiment. I added some gold thread behind the sentiment and stuck it down onto the box.
So quite a fun pair of easter cards and a bit different for me in terms of going vintage … maybe watching Tim Holtz has worn off on me!