Distress oxide ink, Emma Godfrey, Frosted Frames, Sheena Douglass Embossing Folders, Stitched framelits

Festive Friday

This is a slight cheat for this weeks festive Friday as I actually made it on Christmas Day whilst watching Amy (Prarie Paper and Inks) and her ‘unpaid intern’ craft together (it’s fun and worth a watch – as are all her videos!) and so it inspired me to grab similar supplies and have fun!

I used some mixed media cardstock and embossed it with the snowflake embossing folder. I then did ink blending with distress oxides in pinks and purples. I then did lots and lots of splatter using my shimmer watercolours in silver, purple and pink.

I did a slightly larger panel than ended up on the front but cut a piece off at this point to make it work with the shape of this card and I stuck that on the inside of the card.

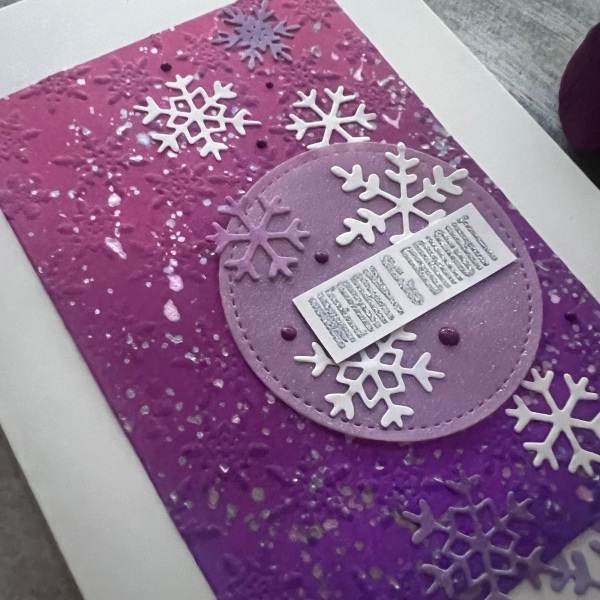
I then chose a shimmer vellum and die cut the circle for grounding the sentiment. I already had this sentiment embossed on my desk so I trimmed it down and added some strips of card stock behind to slightly raise it and added the two snowflakes to the back before adhering it to the circle. This helped me choose where to add glue to the back of the circle as I didn’t want it to show through the vellum so only added glue where the snowflakes and sentiment were on the other side.

I had die cut lots of little snowflakes out of white and a few out of thinner cardstock I had inked in the same colours so that I had both white and inked snowflakes and made a ‘drift’ of snowflakes both down the card blank and the inked and embossed panel.

I glued the panel down and then added snowflakes inside too.

(Sorry the inside lights made this very yellow!)

On the front I also added some purple enamel accents … I originally looked for the stickles in purple but seems I must have run out so enamel accents used instead.

All in all a fun card to make and even more fun watching Amy and Chris crafting whilst I made it. Thanks for the inspiration Amy.

Happy crafting!

Catherine

Design Team, Digital stamps, Emma Godfrey, Promarkers, Letraset

DT: Happy Little Stampers Anything Goes Birthday challenge

Hello! Another day, another DT contribution.

Todays is for Happy Little Stampers Anything Goes Birthday challenge and I had a fun card I made with a LARGE printed digital stamp.

I had printed this onto quite a thin paper and coloured it with promarkers including a nice shadow outline.

I decided to cut round the image to give it a white halo and then stick directly onto a mix of patterned papers. I particularly love the dotty one with all those cool colours. So as I had coloured the girl in a mix of bright colours this worked fab. I grabbed some Sweet Sorbet cardstock and made my cardblank and then thought it would be good to do the peep of the paper at the edges by curling it back and this created both some dimension and interest.

I added a sentiment in bright pink and then some enamel dots to add to the “dottyness”.

Inside I just added a strip of the paper… but look at the dimension to the front of the card … you can really see it on this photo.

What doesn’t quite show on the photo is that I added wink of Stella to the flowers in her hair and the bow on her top… so in real life they are quite shimmery.

Super cute image and pleased that even though it took up most of the card front I was able to make a card this size using the image.

I am doing well in my using up stash I’ve got challenge I set myself for 2023 … and really enjoying playing with stash I had forgotten about and lay around unused for years.

Happy crafting!

Catherine

Artistic, Beautiful Brocade, Distress oxide ink, Dylusions paints, Emma Godfrey, Gelli Plate, piercing templates, Playful Alphabet, Ribbons

Bright and cheery anniversary card

Hello all! Thanks for popping by my blog. I have a large card I made which has lots of bright cheeriness along with the beautiful Artistic floral cluster die.

Now there is quite a lot going on with this card. Firstly a pre-made gelli plate background for the patterned paper on the left and then a sprayed piece of cardstock I embossed in the debossing on the right.

There is a lot of Kraft cardstock layers and then the lovely Artistic die cut flower section that I stacked up a couple of times to give strength and then cut round to give it a white frame (this is my main grumble for this diecut – it didn’t come with a frame die cut!)

I added some pierced holes as a border on the Kraft middle panel and then that gorgeous yellow ribbon and the sequins to add more texture.

The sentiment is a mix of die cut letters (again stacked for dimension) and the Paperartsy sentiment which I embossed to pick up the gold from the embossed debossing panel.

All in all, lots going on and I really like the final card.

Happy crafting!

Catherine

Christmas 2023 challenge, Darcy, Dylusions spray inks, Emma Godfrey, Indigo Blu, Masks/Stencils, Paperartsy - stamps, Waffle flower

Masterboard playing part 1

A few months ago I made two masterboard backgrounds as I was inspired by a Jennifer McGuire video to just play with the stash I have got and I then made some cards … a total of six so far but will share them over a few blogs to spread them out.

Let’s start with the how… I tried to remember to take in progress pictures.

I started by creating the first inky layer with the brayer just like Jennifer. She then did a spray of the distress mica sprays but I don’t have any so I made my own using Dylusions and some perfect pearls. I used yellow for the red coloured one and then added some blue to turn it green for the blue one.

You wouldn’t believe how sparkly this makes them … they look gorgeous but it never comes out in photographs so you will have to take my word for it … super ✨ soarkly!

I did the same as Jennifer did and cut the panels up first and then taped them together. Next I added stamping, stencilling and had lots and lots of fun!

I started by die cutting the panels with the pierced background die from waffle flower and then cut them into angled panels.

I decided to keep it simple for the first two…

I stamped and embossed the deer image and stacked up the cardstock so it was nice and thick and fussy cut it out.

I stamped and embossed the sentiment and then added some gems.

The pierced die cut adds some extra subtle elements.

For this one I blended ink onto some scrap and then embossed the Darcy holly leaves in silver to coordinate with the embossing in the background.

I then added sequins to embellish and the embossed sentiment layered up on the green leftover panel.

Will share the next cards in a couple of days.

Happy crafting!

Catherine

Design Team, Emma Godfrey, Prismacolour pencils, Ribbons, Splendid Stems

DT: Happy Little Stampers Anything Goes with Dies challenge

Hello hello hello!

Todays design team contribution for Happy Little Stampers is the card I made for my cousins daughter last month but I saved blogging it till now so that I could share it on this DT post.

I love this image that I’ve had for quite a while and decided to team it with some quite elegant papers from the stash and made a pretty pink and purple themed card.

Of course as this is a anything goes with dies theme I used some of the Splendid Stems dies to create the embellishments and a spray of flowers down one side.

I added lots of dimension on this bigger card (7×7) and some pearls and a ribbon to finish.

I’m sure Eleanor would have loved this more grown up looking card for her birthday.

Happy crafting!

Catherine

Design Team, Emma Godfrey, Gelli Plate, Ribbons, Sizzix

DT: Happy Little Stampers anything goes with dies

Hello!

Here is todays Happy Little Stampers design team contribution for the anything goes with dies challenge.

I made this cute card a few weeks ago using some sizzix dies and a couple of pieces of paper I had previously had fun gelli printing on.

I created lots of little flowers and leaves to create a cluster with.

Then I took some white cardstock and added ink through a stencil to provide the base for the flowers and then also splattered some ink too.

Then I had fun adding the flowers and leaves making sure to raise some with pinflair glue gel to give dimension.

Next I die cut the banner from the same sizzix die set three times and stacked them up. I added the sentiment using a Paperartsy stamp but kept it simple using the same ink as the stencilling in the background. I also took some paper twine from the stash and added a box which I placed the banner over using some foam tabs to again give it some dimension.

Then I added in sequins to add some sparkle.

I mounted the panel onto some grey cardstock I had used for the card blank and called it finished!

Happy crafting!

Catherine

Christmas in July, Designer Series Paper, Emma Godfrey, Masks/Stencils, Promarkers, Letraset

Christmas in July

Todays card for Christmas in July is a quick little notecard using up scraps and a cute little image I stamped a while ago from a magazine.

I mean that little penguin is so cute, right?

I gave him a little weaving of cardstock scraps to sit on, a bit of dsp and then some paper I had done a soft snowflake stencil design on.

I added the sequins and the sentiment and then added it to a 4×4 card blank … perfect and oh so simple!

Happy crafting!

Catherine

Design Team, Emma Godfrey, Happy Celebrations, Tidings and Trimmings

DT: Addicted to stamps and more – birthday challenge #448

Hello! Welcome to my blog (welcome back for those who have stopped by before)!

Today I have a design team contribution which is actually a card I made quite a while ago for a friends 40th birthday but I saved it as a design team project as I was so happy with it!

This is for the birthday challenge at Addicted to Stamps and More

I chose to use Kraft and white with lots of embossing and and a tiny pop of black with both the mat and the embellishments.

I made a background using a mixture of the Happy Celebrations stamps and some little Paperartsy ones and lots of white and pearl embossing powder and then I coloured in the open space with white Kraft ink and water. Then did lots of splatters of the Kraft ink to finish off!

I created the last part of the sentiment with embossing and layers of the card but then decided i wanted to add a die cut star as the focal point.

I cut the star using the Tidings and Trimmings dies and stacked it three high to give it some dimension. Then stacked under the sentiment to make that sturdy too.

Then I grabbed the black star embellishments from the stash to add some more fun. I layered this background with a few layers and then added it to the 7×7 card blank and then grabbed my foam letters/numbers and added that to the front of the card … after all it was a special birthday!

Inside the card some simple stamping and more of the black stars to finish off!

Really pleased with how this ended up and think it is a nice card style that can be adapted for different recipients with a change of colour or embellishment!

Happy crafting!

Catherine

Design Team, Designer Series Paper, Emma Godfrey

DT: Creative Knockouts – outside fun

Hello everyone!

Today it is time for another design team challenge. This time the challenge at Creative Knockouts is Outside Fun and we’ve been sponsored by Dr Digis and I was gifted the golf clubs image to play with.

I chose to print it on both the card and the patterned paper to do some paper piecing.

So the base image on the white I coloured with my Stampin Blends and then I also added some shading to the golf bag to help the image stand out and look more dimensional. Then I edged the white with the same grey pen and then added some doodle lines around.

I used the same patterned paper for the background along with a strip of the reverse.

I decided to use some letter stickers for some of the sentiment and raised the main focal image on some foam for dimension. And that was pretty much it. Simple!

Happy crafting!

Catherine

Découpage, Design Team, Emma Godfrey, Fern, Playful Alphabet, Ribbons, Stampin Blends alcohol pens

DT: Creative Knockouts – spring is in the air

Hi! Welcome to my corner of the internet.

This blog is all about my design team contribution for Creative Knockouts using a gifted image from streamside studios shop.

I ended up making a long thin card (DL size).

Streamside studio shop

I decided to play with decoupage after printing and colouring the image three times and then cutting different parts out to layer up.

I then added some layered cardstock and the ribbon and the embossed card base. I then decided to diecut the letters for the sentiment and stamp the final part.

I decided to add wink of Stella to each of the flowers and this made it really shiny!

Happy crafting!

Catherine