Today’s challenge at Creative Knockouts is a ‘for the kids’ one but when I saw the image from Polkadoodles I am to work with it totally spoke to me as a total Harry Potter nerd!
What was great is that polka doodles provided the papers I used too … I love that starry background and the fact I could resize it for printing so I printed off the tiny tag I made using it too with the tiny stars.
I went for quite a large size of image. I coloured him with promarkers and kept to a Gryffindor scheme (even though I am Ravenclaw).
I added a few bits of white gel pen too for highlights and then fussy cut him.
I chose my layout and added it to the 5×7 card blank and then decided it needed a properly birthday sentiment so used this one from Avery Elle.
I also added the card Candi in the three colours to finish off.
Really happy with how this came out! Perfect wizarding card for me – oh and kids too I suppose!
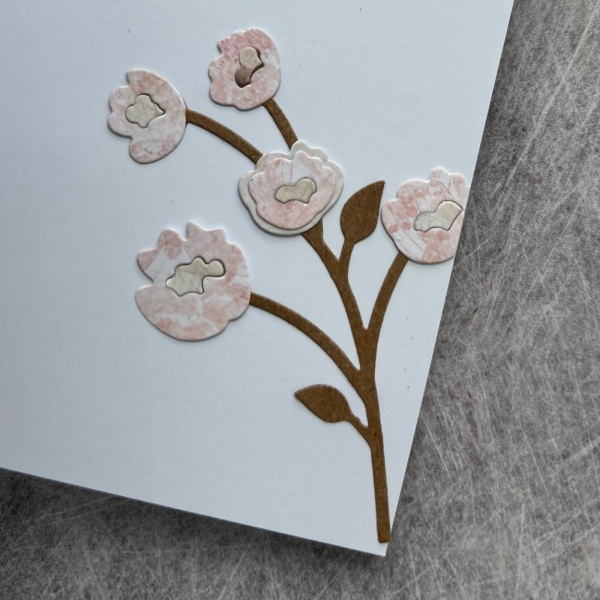
I made this card a little while ago when I was sorting through printed digital stamps and came across the Alex Syberia digital image and decided to get it used!
I went with a technique I had seen Amy use from Prairie Paper and inks where you blend the three colours and then go back in to paint the flowers where the blending ended up so you get a more haphazard rainbow.
Well it didn’t exactly go to plan as the printer ink smeared a little when I was blending and also the cardstock isn’t great at taking water but it worked enough for me to continue with the card.
After colouring the image I then dried it and fussy cut it out. I then glued it to white and fussy cut round that. This may seem odd but it needed a frame to stand out against the colourful background I wanted to make.
I was watching Tim Holtz distress ink videos on YouTube and so I made a lovely rainbow distress ink background … it was so lovely to play with the inks … and in fact it was when I made this I then went on to make many many backgrounds without the pressure of thinking of final projects … so freeing!
Anyways I digress… after finishing the background panel I layered it onto black to frame and then added some foam under the flower image so it would have some dimension.
I then added the sentiment from Altenew which I had die cut and stacked up. I sandwiched thread between the sentiment and the flower for a bit of additional texture.
A lot of my festive Friday projects have revolved around using up scraps and stuff off the desk and today’s is no different!
Came across the two Rudolph digital images I had already coloured and then leftover bits and pieces from other projects using the fabulous Painted Christmas paper and some other bits of dsp. I ended up with these two cards!
I used the Tin Holt sentiment stickers for sentiments…
And card Candi to embellish…
This one I felt needed more of a background than I had left in scraps so did grab some white and cut a panel and then embossed it too.
Otherwise … quick and easy cards to put together using the scraps! Wonder if next week my Festive Friday might be a little less cobbled together and more of a new project?!?
I say this is the final set because this is where I got to … but doesn’t mean I won’t make more as making these quick and easy little projects using up stash and scraps is so much fun!
These ones I grabbed pre coloured digital images and fussy cut them out as the focal images. I also added these black chalkboard type stickers I found in the stash!
What has made these projects so easy too is the sentiments … I just stamped lots of the sentiments in one session and embossed them and die cut them and stacked them … all from my scraps and have them sitting there ready to use. In this case silver embossed the Waffleflower ones!
And then one more with scraps of the scraps all made into a little collage …
Then the stamped image and the sentiment … in this case I also added some staples to add to the collage effect!
Normal cardmaking projects to resume tomorrow – but I did enjoy playing with scraps and much loved old dsp to make these little notecards!
Today’s blog is another Design team contribution for Creative Knockouts where the challenge is Birthday Wishes. Now as I make a lot of birthday cards this really doesn’t count as a challenge!
However we were gifted this image from The Paper Shelter and as it came as a pre coloured image, black and white image and a background panel coloured my challenge was how to use it!
The excellent news was as it is so cute you don’t need to do much – especially if you decide your colouring couldn’t possibly be better than the pre coloured version!
So I printed out the background and the image in colour. Cut out the image including the three free floating balloons and added them to the background with a bit of dimension using pinflair glue gel. I also added gold thread to the balloons and some wink of Stella to both the balloons and gifts to give them a touch of sparkle.
I decided to add to the balloon theme using the waffle flower balloon builder stencils on the background card panel. I used teal and green ink for this to keep in with the colours on the image and background.
I also added little white highlights to the balloons to keep them looking dimensional.
I finished off the card with the heat embossed sentiment which I fussy cut and the pink puffy sticker hearts I found in the stash which I thought went well with the cutesy image!
This was a simple card to put together as the digital image was already printed and to hand, and the paper was already cut to size with the little snowflake hexagons cut out! Mainly a case of colouring, cutting out and assembling!
I coloured the digital stamp image using my stampin blends and then fussy cut the tree. On a second print out of the image I added the greys for the background and then splattered some white ink for a subtle snow effect.
Then using foam tabs I raised up the cut out image so it gave it a decent amount of dimension above the background.
Then put together the two pieces of dsp, the main focal image and the little snowflake hexagons. I decided to add the little printed tags as the ‘sentiment’ and then a scrap of ribbon for final embellishment.
Simple – but effective! Job done for this weeks Festive Friday!
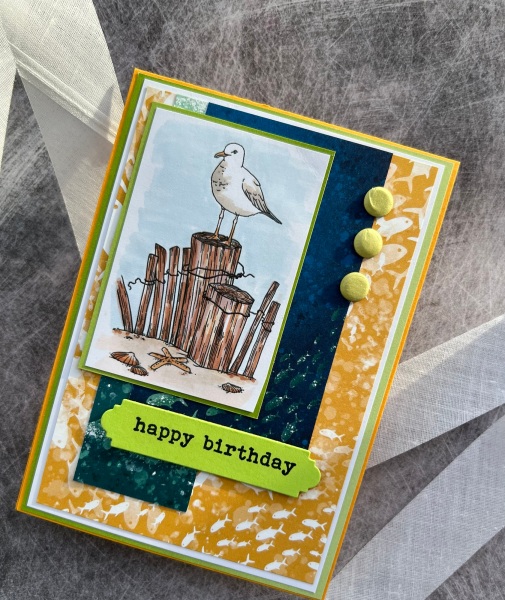
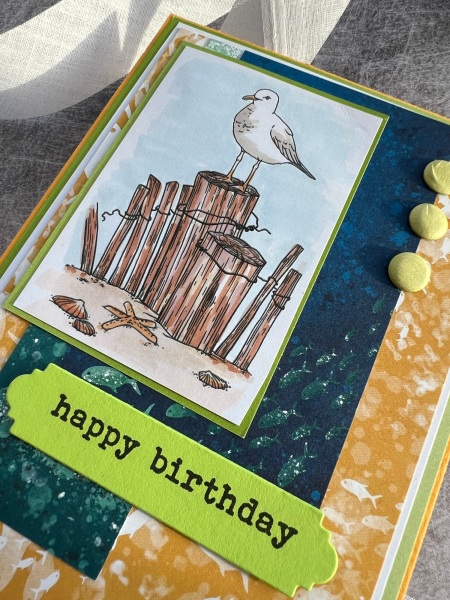
I decided to make up a very different type of card for this Addicted to stamps and more design team challenge from what I have been making recently.
I grabbed the digital image I’ve had printed for a while and coloured it using my promarkers.
I then rummaged round in the stash and found these nautical themed dsp and made the background up from them with little pops of the lime green as mats. Then I added the sentiment and some lime card Candi as embellishment.
The card itself is using Mango Melody … so more bright and zingy for the cherry card!
Todays post is my design team contribution for Creative Knockouts where the theme this fortnight is Anything Goes!
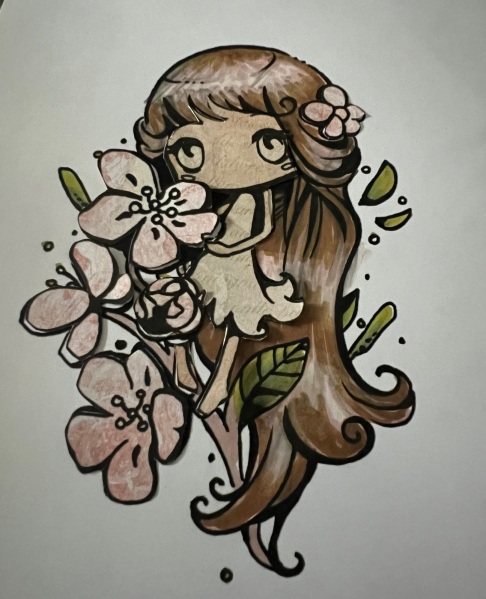
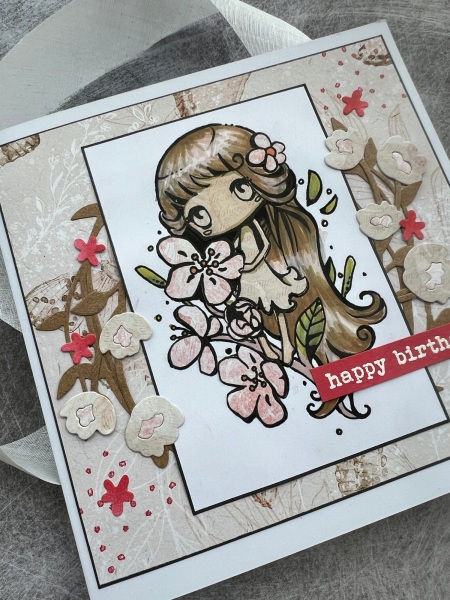
I used this cute digital image called Spring flower from Star Stampz
I decided to do some paper piecing along with using my promarkers to create the girl .. I printed the same image several times on both the white cardstock and the patterned paper.
Then I fussy cut out the pieces I wanted to layer and coloured the rest with my promarkers. I also added promarkers to the skin elements of the image.
This is how I had got it before I actually glued it together.
After glueing together I added some shading to the image and some dots of brighter colour to the flower stamen. Then started thinking about putting the card together. At this point the in progress photos disappear as I get busy creating!
I chose another piece of the crafters companion paper from the stash and had that as the base layer. I edged it with black pen though as I thought the line art on the image was so thick it needed the black line of the frame in contrast to the soft papers.
I did the same black pen for the edge of the image panel.
I added the spellbinders wreath from an old spellbinders set in the Kraft and then used a Sizzix die set to create the flowers.
Again I used the paper scraps from the paper piecing to create the flowers so they coordinated.
I popped this all together with the flowers coming from behind the panel but also overlapping the edge.
Then I decided to go bold and added the sentiment heat embossed on the sweet sorbet card and then needed to add a pop of the red on other parts of the card … so I inked up some white cardstock with the sweet sorbet ink and die cut the tiny flowers and also added the dots using a dot from Artistically inked stamp set to the background.
I think this added enough to tie it all in together.
Inside the card (it’s a 6×6 card blank) I added one more of the flower die cuts that I made, this time in full.
Love this cute card and saving it until September for my cousin’s daughter as I think it is perfect for her (so shhhhh keep it 🤫 secret!).
I took a very old digital stamp I had in the stash and coloured in with promarkers for that part of the challenge and then went mad with diecuts!
The background to the image was actually using the leftovers from another project I haven’t yet blogged about but using the Creative Expressions panel that has lots of rectangles in. I had cut it from two pieces of dsp and then used the leftovers from the previous project to put together this cute background. Admittedly most of it is covered on this card with the main image and the flower and leaf die cuts but you can still see some of the variations in the back.
I then went through the pile of die cuts I have from when I’ve die cut scraps using the pierced blooms and added ones in colours that went with the image and background.
I also added some strips of fabric to the back too to add in a different texture.
I added a layer of peachy pink cardstock to the image and raised it on another layer of card and then stamped and layered the sentiment too.
Finally I added the gold gems to the centre of the four biggest flowers to embellish.
Love this cute image. Nice to revisit old things like this and get them used.
I shared on Thursday the first card I made with my old patterned paper and now it’s time to share the second card I made that you saw a sneak peek of on that blog…
This time I used a larger panel of the DCWV paper where I had die cut out the circle that had a D in it.
I kept to the same colour scheme as last time but this time used a bigger digital stamp image from the stash as the focal point.
I added some embossing to the circle die cut to keep in theme with the circles.
I added a ribbon to embellish and then did lots of die cut letters for stacking them up for dimension for the sentiment!
I love the encapsulated glitter elements and the pop of peach and green against the black and white.
Inside I added a panel of the dsp layered on the peach.
Thinking that this card will be for my auntie whose birthday is next month so keep it quiet about this!
Still got a few panels left which have yet to be used so expect to see some more soon.