Clearly I am on a roll with my pages and this time I am using the leftovers from the page I shared yesterday (with an extra paper pulled in too!)
The sketch I used was the day 10 from 30 days of sketches with Christy’s Beautiful Life and was designed by Sarah Davies.
Whilst I might have slightly lost some elements of the sketch with over embellishing with bits and bobs I think you can still see most of the intent!
Loved adding in the stencilling on the background and the lollipop box club kit bits and pieces too.
Also like the sewn elements and the hanging threads from that.
Kept the journalling small as just really documenting the a level photo shoots that my daughter was doing in the spare room – this fruit themed one was in response to the theme of shadows.
Thanks for the inspiration sketch Sarah.
Also I videoed this process (again) and so check out the video to see this come together.
I had a play with the MFT fanciful roses background stamp and made two backgrounds and made one into a card… and videoed the process!
On this one I used the shimmer watercolour paints and the effect is so pretty!
I did add plenty of splatter but then in contrast to the pastel pretty background I added the pierced blooms leaf die cuts and a vellum circle with Kraft frame.
Then the label die onto which I added the Altenew sentiment.
Embellishment was the embroidery floss bow and then the little peach die cut hearts.
Love how this came together. Beautiful card.
Will share the other card I made from the second background using Inktense pencils in a few days when I’ve finished editing the video!
Yes I am well and truly in a scrapping mood and made another page last night – and I videoed the process so check out the YouTube video if you fancy watching me put it together.
Papers I chose are old papers that I just thought would work ok together – totally different companies and no real connection but the colours worked ok I thought.
The layout was scraplifted from Sarah Davies and this page she made and shared on instagram…
Thanks for the inspiration Sarah! If you want more Sarah inspiration also check out her YouTube channel.
I added the gesso through a laser cut cardstock piece I had in the stash and then just popped lots of bits and pieces from the stash onto the page around the photo panel and then the title.
I die cut the orange circle frames and added those for a pop of colour and then those white die cut hearts for little repeating embellishments.
I also added the orange gems to finish off.
Lots of doodled borders made the page complete!
Loved doing this so much I made a second page from the leftovers – but you will have to wait to see that as I still have the video to finish off!
Today I have the second of the cards I made from the masterboard piece I shared on the first of April.
Again I die cut a panel using the scalloped die from the December spellbinders die set. This time I teamed it with the wreath from the Natures Prints set and the sentiment stamp and label from the same set. I also added the die cut dragonfly to the centre of the circle.
I again added pearls as final embellishments.
Love this shabby chic background and the pretty way this came together.
I did stack up a couple of extra panels of the scalloped panel so that there is quite a lot of dimension on the card but otherwise kept the card blank clean so that the texture and fun on the main element took centre stage!
Weeks like this I am so glad I craft a little ahead of time and get lots of projects done over a couple of days because this week I’ve barely left my bed thanks to a horrible virus. So the cards I’ve got to share were actually made a week ago when I panicked because I hadn’t got anything made for Festive Friday! Thankful to have been ahead for this week as otherwise it would have been a week off the challenge. Fingers crossed I am over the worst of this virus and should be back to being vertical next week!
Today I have three cards for my stash of Christmas cards. I had so much fun playing with a new layered stencil and so ended up making three cards. I also used the same set of stamps from an old Creative Stamping magazine set for the focal images because I thought they worked perfectly with the knitwear themed backgrounds.
I spotted the cosy knit layered stencils from Altenew and thought they were so cute so decided to treat myself to a little crafty splurge. There are two layers in the set and they create a lovely pattern with the different colours. You can of course add more colours with masking but for now I stuck to two colours for my panels.
I did one 6×6 and then the other two were more suitable for standard 6×4 cards.
I grabbed a mixture of blue, purple and green coloured inks and very quickly created the three backgrounds … I think I would have kept going if I had had more time as it was so cute revealing the different ones!
I then stamped out the two penguins and two bears with their winter clothing/accessories. The bear also had a couple of jumper options but I didn’t end up stamping those and instead stuck to the hat!
I coloured them all with my promarkers and then fussy cut them out and added their clothes etc too.
Then I made up the three cards. First the larger one.
I created a cluster in the middle of the card of blue cardstock and some blue paper scrap that was on my desk. I had also reclaimed the star embellishment off the card I made for my hubby (we don’t keep them after Christmas as so I always recycle or reclaim elements I think I can use again) and I thought it would work well on the card.
The sentiment is a Claritystamps one which I heat embossed in silver and fussy cut.
I finished off by embellishing with some blue card Candi.
The purple themed card I used the penguin on and I decided to make it quite bold with the black panel and a panel of ombré purple (again a scrap off the desk). I then added the white stitched circle die cut under the penguin and added purple card Candi to embellish.
The sentiment I stamped twice and added it on the front and then inside the card I added the second penguin and the second sentiment.
The last card I changed it up and added the panel on the edge of the card at an angle and then just added the bear on the top. I added the sentiment onto a mat so it had a frame and again card Candi to finish off.
Inside this one I just added another piece at an angle to tie in with the front.
Love how these three cards came together and in love with that layering stencil. So much fun to use!
I shared on Thursday the first card I made with my old patterned paper and now it’s time to share the second card I made that you saw a sneak peek of on that blog…
This time I used a larger panel of the DCWV paper where I had die cut out the circle that had a D in it.
I kept to the same colour scheme as last time but this time used a bigger digital stamp image from the stash as the focal point.
I added some embossing to the circle die cut to keep in theme with the circles.
I added a ribbon to embellish and then did lots of die cut letters for stacking them up for dimension for the sentiment!
I love the encapsulated glitter elements and the pop of peach and green against the black and white.
Inside I added a panel of the dsp layered on the peach.
Thinking that this card will be for my auntie whose birthday is next month so keep it quiet about this!
Still got a few panels left which have yet to be used so expect to see some more soon.
The idea of having a regular feature on the blog is that I can get ahead a little and maybe make it at least a few days ahead … sounds like a great idea… but I find myself on the 1st of the month but no patterned paper projects made!
Fortunately today I had a day off work and had no plans so could give myself a good few hours in the craft room… and taking one piece of very special patterned paper I made two cards.
First up is this shaker card with the gorgeous large flower stamped image.
I started by die cutting lots of layers of scrap cardstock with the circle to create the backing and backed it with the Petal Pink and then did the same to the top layer of patterned paper. This paper is from a DCWV pack I have had for years and years. Each sheet has encapsulated glitter and a different letter – ideal for scrapbooking – but as I rarely do this now it’s just sat there waiting for use.
This piece had a circle with the letter D in it otherwise was dots and circles with a few striped bits.
I cut it into two panels (one for this card and one for the second) and on the front I die cut the circle in the same place as the backing bits.
Next I added the die cut circle frame for the edge and added the flower poking out before adding the acetate layer.
I added sequins to the background and then sandwiched them together. It is quite a shallow shaker but it’s enough for the sequins to move around a little and the whole panel is sturdy as it’s made of layers of card rather than foam tape bits.
I kept the rest simple with a stamped sentiment and a little strip of cardstock inside to finish off.
And that flower on the front I actually stamped and coloured and have had waiting to use for a number of years … perfect for the front of this black white and silver card with the pops of the peachy pink!
The second card I will blog in a few days time so you only get the sneak peek now… and the rest of the piece of patterned paper is still sitting on the desk awaiting use so will no doubt get used soon as I like to try and use what is on the desk rather than grab new products!
Entering this in the sparkle and shine challenge at Dara and Diane and the patterned paper challenge at Make my Monday
This is a slight cheat for this weeks festive Friday as I actually made it on Christmas Day whilst watching Amy (Prarie Paper and Inks) and her ‘unpaid intern’ craft together (it’s fun and worth a watch – as are all her videos!) and so it inspired me to grab similar supplies and have fun!
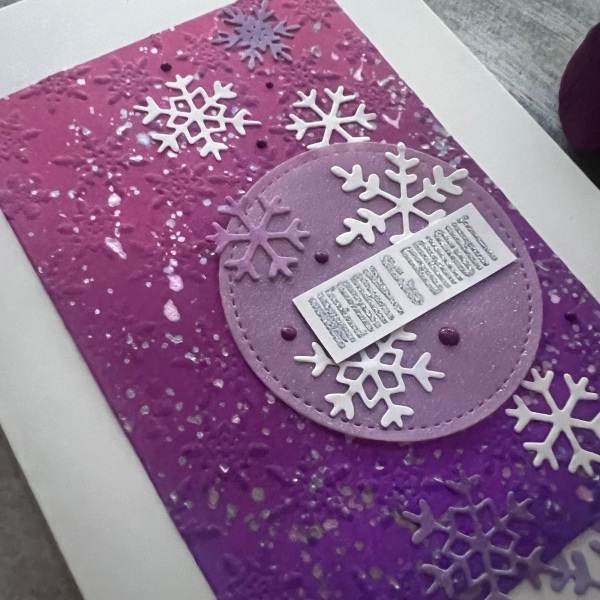
I used some mixed media cardstock and embossed it with the snowflake embossing folder. I then did ink blending with distress oxides in pinks and purples. I then did lots and lots of splatter using my shimmer watercolours in silver, purple and pink.
I did a slightly larger panel than ended up on the front but cut a piece off at this point to make it work with the shape of this card and I stuck that on the inside of the card.
I then chose a shimmer vellum and die cut the circle for grounding the sentiment. I already had this sentiment embossed on my desk so I trimmed it down and added some strips of card stock behind to slightly raise it and added the two snowflakes to the back before adhering it to the circle. This helped me choose where to add glue to the back of the circle as I didn’t want it to show through the vellum so only added glue where the snowflakes and sentiment were on the other side.
I had die cut lots of little snowflakes out of white and a few out of thinner cardstock I had inked in the same colours so that I had both white and inked snowflakes and made a ‘drift’ of snowflakes both down the card blank and the inked and embossed panel.
I glued the panel down and then added snowflakes inside too.
(Sorry the inside lights made this very yellow!)
On the front I also added some purple enamel accents … I originally looked for the stickles in purple but seems I must have run out so enamel accents used instead.
All in all a fun card to make and even more fun watching Amy and Chris crafting whilst I made it. Thanks for the inspiration Amy.
So this card came about because I found on my desk some scraps of patterned paper that I had previously put together as a card topper but never finished off with a focal image or a sentiment … and so I grabbed a preprinted digital stamp and coloured that in to add to the front of the card. Simple!
I added some glossy accents to the decorations on the tree and then added the stamped sentiment from Altenew and called this done!